Building an app with JHipster
When I started writing this book, I had a few different ideas for a sample application. My first idea involved creating a photo gallery to showcase the 1966 VW Bus I’ve been working on since 2006. I recently finished the project and wanted a website to show how things have progressed through the years.
After thinking about the VW Bus Gallery and developing the blog application, I thought, is this hip enough? Shouldn’t a book about becoming what the JHipster homepage calls a “Java Hipster” show how to build a hip application?
I wrote to Julien Dubois, founder of JHipster, and Dennis Sharpe, the technical editor for this book, and asked them what they thought. We went back and forth on a few ideas: a Gitter clone, a job board for JHipster coders, a shopping-cart app. Then it hit me: there was an idea I’d wanted to develop for a while.
It’s basically an app that you can use to monitor your health. From late September through mid-October 2014, I did a sugar detox during which I stopped eating sugar, started exercising regularly, and stopped drinking alcohol. (I had high blood pressure for over 10 years and was on blood-pressure medication then.) During the first week of the detox, I ran out of blood-pressure medication. Since a new prescription required a doctor visit, I decided to wait until after the detox. After three weeks, not only did I lose 15 pounds, but my blood pressure was at normal levels!
Before starting the detox, I came up with a 21-point system to see how healthy I was each week. Its rules were simple: you can earn up to three points per day for the following reasons:
-
If you eat healthy, you get a point. Otherwise, zero.
-
If you exercise, you get a point.
-
If you don’t drink alcohol, you get a point.
I was surprised that I got eight points the first week I used this system. During the detox, I got 16 points in the first week, 20 in the second, and 21 in the third. Before the detox, I thought eating healthy meant eating anything except fast food. After the detox, I realized that eating healthy meant eating no sugar. I’m also a big lover of craft beer, so I modified the alcohol rule to allow two healthier alcoholic drinks (like a greyhound or red wine) per day.
My goal is to earn 15 points per week. If I earn more, I’ll likely lose weight and have good blood pressure. If I earn fewer than 15, I risk getting sick. I’ve been tracking my health like this since September 2014. I’ve lost 30 pounds, and my blood pressure has returned to and maintained normal levels. I haven’t had good blood pressure since my early 20s, so this has been a life changer.
I thought writing a “21-Point Health” application would be great because tracking your health is always important. Wearables that can track your health stats can use the APIs or hooks I create to record points for a day. Imagine hooking into dailymile (where I track my exercise) or Untappd (where I sometimes list the beers I drink)—or even displaying other activities for a day (e.g., showing your blood-pressure score that you keep on iOS Health).
I thought my idea would fit nicely with JHipster and Spring Boot from a monitoring standpoint. Spring Boot has many health monitors for apps, and now you can use this JHipster app to monitor your health!
Creating the application
I started using the Installing JHipster instructions. I’m a Java developer, so I already had Java 11 installed, as well as Maven and Git. I installed Node.js 16 from Nodejs.org, then ran the following command to install JHipster.
npm install -g generator-jhipster@7| If you need to install Java, Maven, or Git, please see JHipster’s local installation documentation. |
Then I proceeded to build my application. Unlike many application generators in Javaland, Yeoman expects you to be in the directory you want to create your project in, rather than creating the directory for you. So I created a 21-points directory and typed the following command in it to invoke JHipster.
jhipsterAfter running this command, I was prompted to answer questions about how I wanted my application to be generated. You can see the choices I made in the following screenshot.
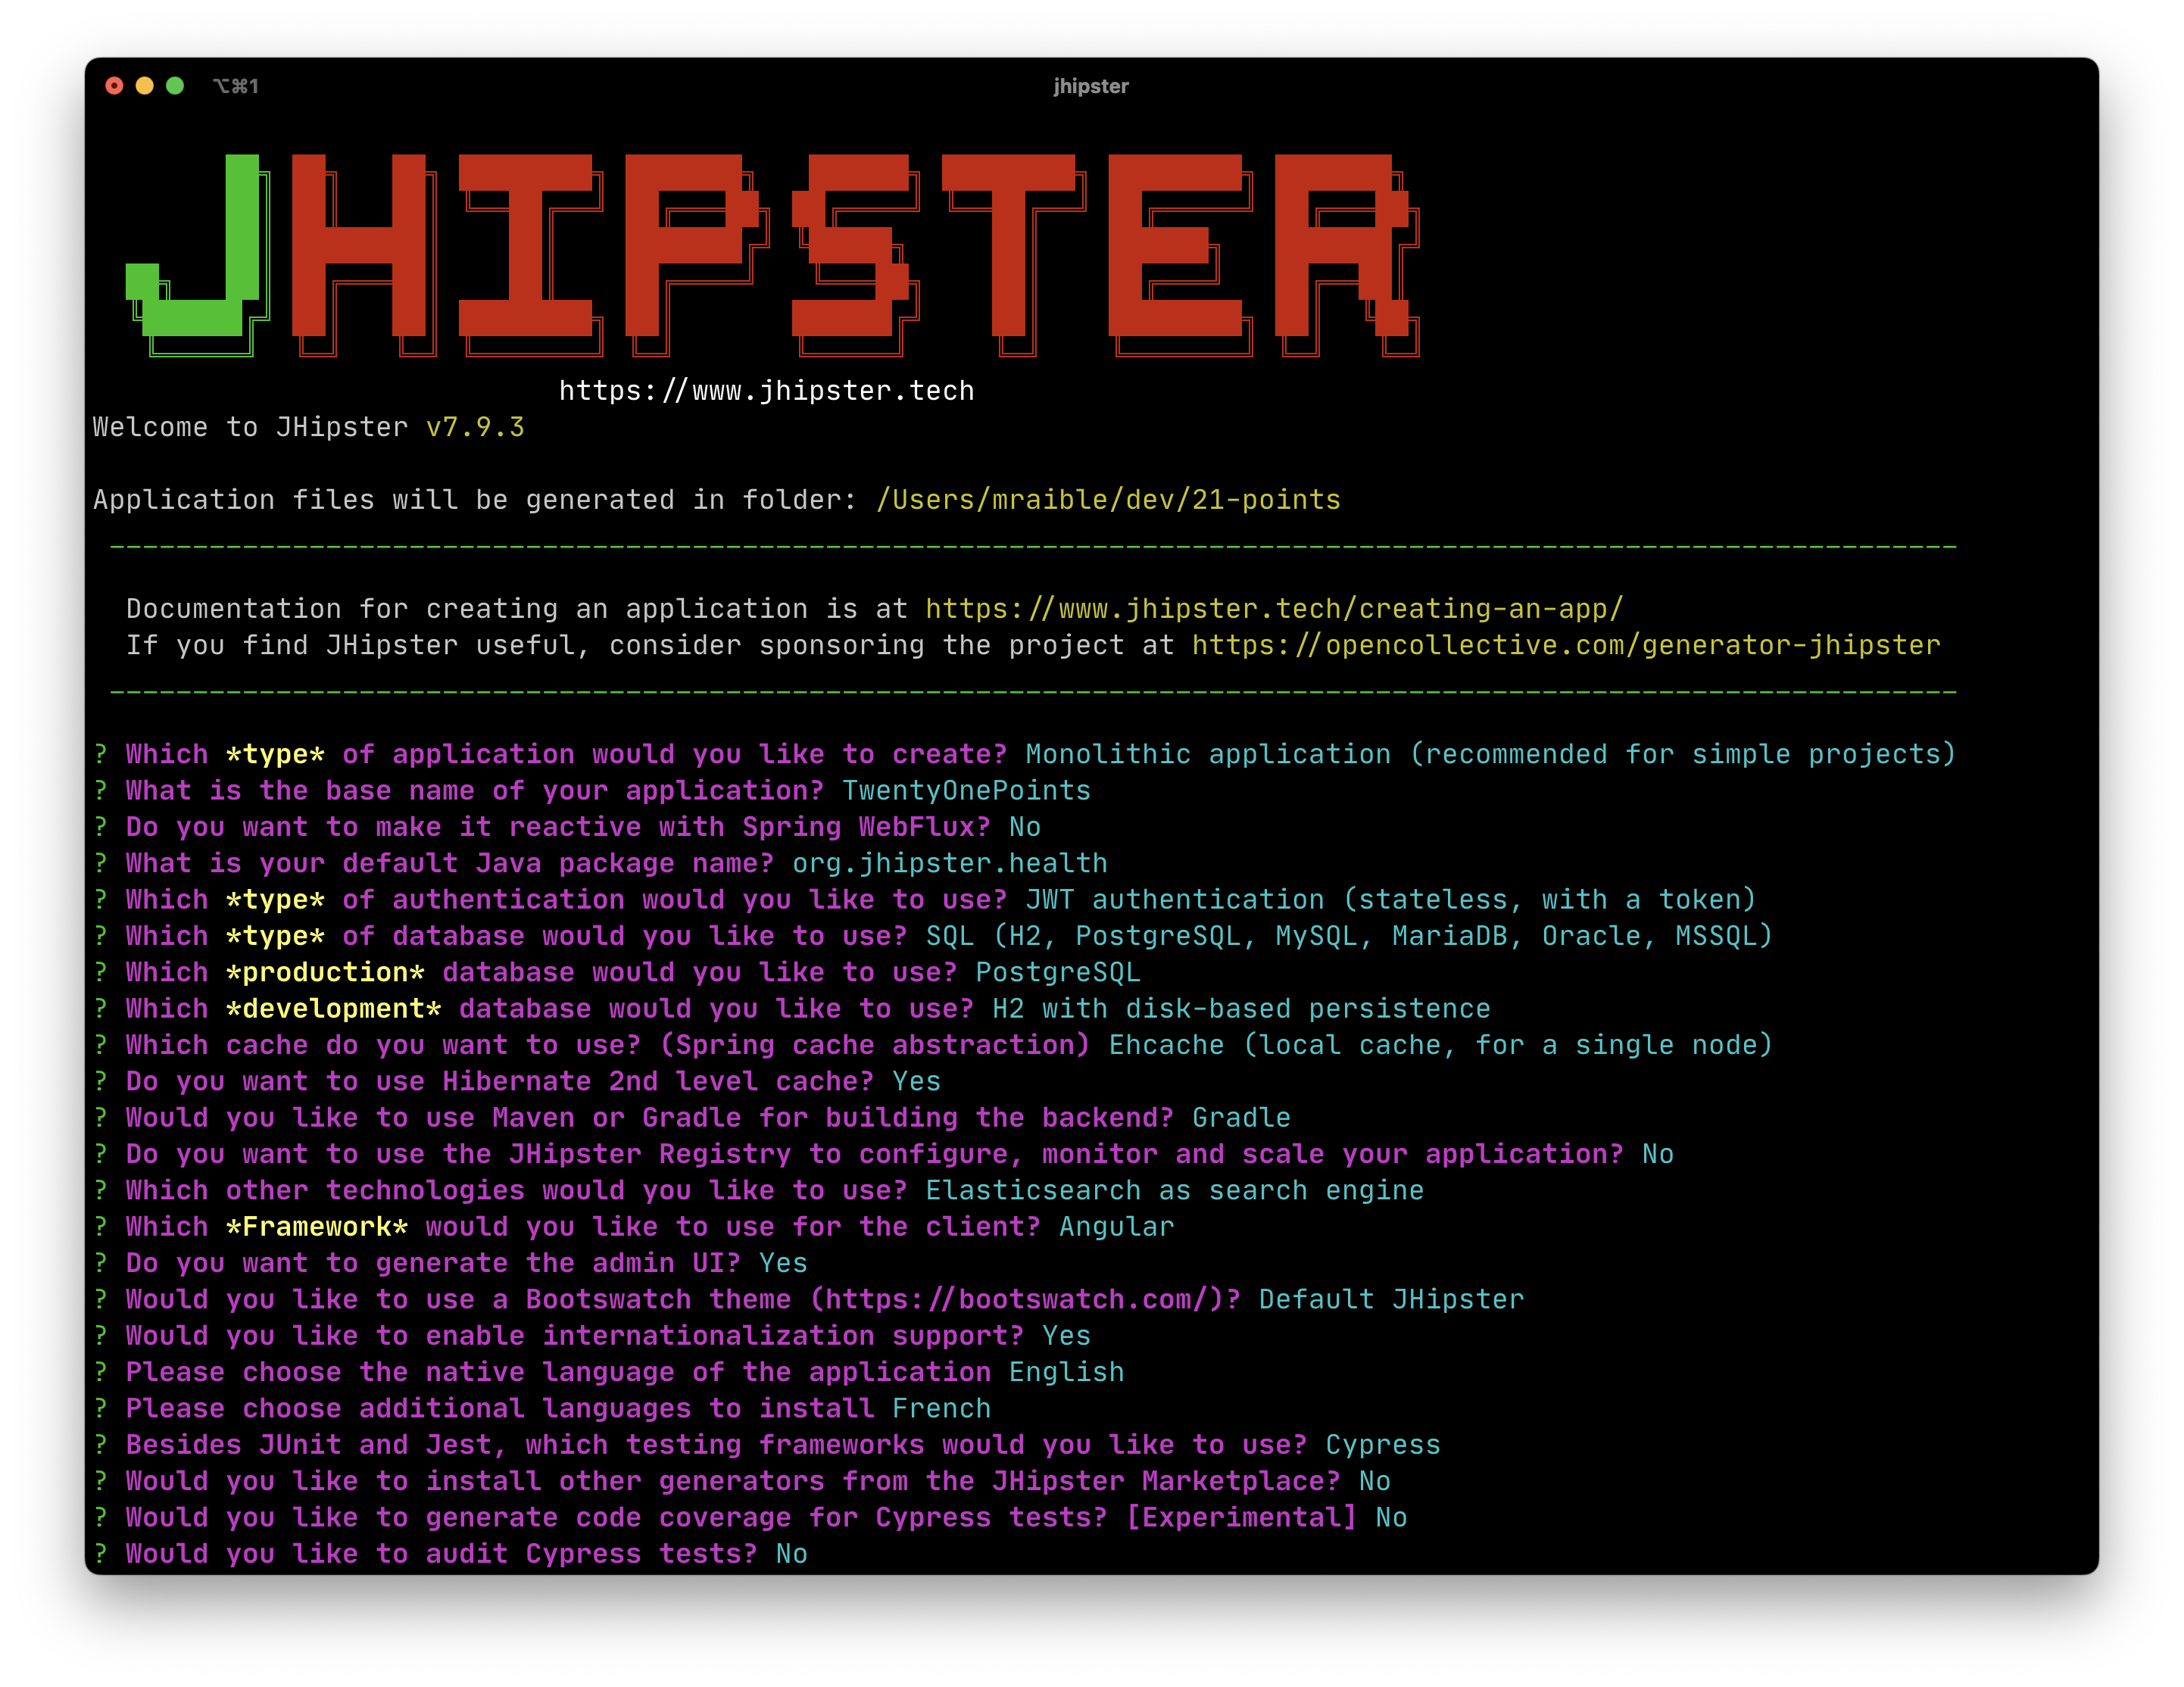
I tried using "21-points" as the application name, but quickly discovered JHipster prevents this with a validation error: Your base name cannot contain special characters or a blank space.
|
This process generates a .yo-rc.json file that captures all of the choices you make. You can use this file in an empty directory to create a project with the same settings.
{
  "generator-jhipster": {
    "applicationType": "monolith",
    "authenticationType": "jwt",
    "baseName": "TwentyOnePoints",
    "blueprints": [],
    "buildTool": "gradle",
    "cacheProvider": "ehcache",
    "clientFramework": "angularX",
    "clientPackageManager": "npm",
    "clientTheme": "none",
    "clientThemeVariant": "",
    "creationTimestamp": 1662997089611,
    "cypressAudit": false,
    "cypressCoverage": false,
    "databaseType": "sql",
    "devDatabaseType": "h2Disk",
    "devServerPort": 4200,
    "dtoSuffix": "DTO",
    "enableGradleEnterprise": false,
    "enableHibernateCache": true,
    "enableSwaggerCodegen": false,
    "enableTranslation": true,
    "entitySuffix": "",
    "jhiPrefix": "jhi",
    "jhipsterVersion": "7.9.3",
    "languages": ["en", "fr"],
    "messageBroker": false,
    "microfrontend": false,
    "microfrontends": [],
    "nativeLanguage": "en",
    "otherModules": [],
    "packageName": "org.jhipster.health",
    "pages": [],
    "prodDatabaseType": "postgresql",
    "reactive": false,
    "searchEngine": "elasticsearch",
    "serverPort": "8080",
    "serverSideOptions": ["searchEngine:elasticsearch"],
    "serviceDiscoveryType": "no",
    "skipCheckLengthOfIdentifier": false,
    "skipClient": false,
    "skipFakeData": false,
    "skipUserManagement": false,
    "testFrameworks": ["cypress"],
    "websocket": false,
    "withAdminUi": true
  }
}
You can see that I chose H2 with disk-based persistence for development and PostgreSQL for my production database. I did this because using a non-embedded database offers some important benefits:
-
Your data is retained when restarting the application.
-
Your application starts a bit faster.
-
You can use Liquibase to generate a database changelog.
The Liquibase homepage describes it as source control for your database. It will help create new fields as you add them to your entities. It will also refactor your database, for example, creating tables and dropping columns. It also can undo changes to your database, either automatically or with custom SQL.
After answering all the questions, JHipster created a lot of files, then ran npm install. To prove everything was good to go, I ran the Java unit tests using ./gradlew test.
BUILD SUCCESSFUL in 1m 12s
15 actionable tasks: 13 executed, 2 up-to-date
JHipster 5+ will only work with an external Elasticsearch instance. In previous versions, you could use an embedded Elasticsearch instance, but Elasticsearch has removed this ability in recent releases. The easiest way to run a local Elasticsearch instance is to use Docker Compose. I ran the following command to start Elasticsearch as a daemon. Remove the -d option if you don’t want it to run as a daemon.
docker-compose -f src/main/docker/elasticsearch.yml up -dNext, I started the app using ./gradlew and then ran the UI integration tests in another terminal with npm run e2e. All tests passed with flying colors.
$ npm run e2e

> twenty-one-points@0.0.1-SNAPSHOT e2e
> npm run e2e:cypress:headed --

> twenty-one-points@0.0.1-SNAPSHOT e2e:cypress:headed
> npm run e2e:cypress -- --headed

> twenty-one-points@0.0.1-SNAPSHOT e2e:cypress
> cypress run --e2e --browser chrome --record ${CYPRESS_ENABLE_RECORD:-false}

...

    ✔  All specs passed!

Execution time: 41 s.
To prove the prod profile worked, and I could talk to PostgreSQL, I ran Docker Compose for PostgreSQL.
docker-compose -f src/main/docker/postgresql.yml up -dThen I restarted the app with the prod profile enabled.
$ ./gradlew -Pprod
...
----------------------------------------------------------
        Application 'TwentyOnePoints' is running! Access URLs:
        Local:          http://localhost:8080/
        External:       http://127.0.0.1:8080/
        Profile(s):     [prod]
----------------------------------------------------------
Wahoo—it worked!
Adding source control
One of the first things I like to do when creating a new project is to add it to a version-control system (VCS). In this particular case, I chose Git and GitHub.
JHipster will initialize Git for your project automatically if you have Git installed. The following commands show how I added a reference to the remote GitHub repository, then pushed everything. I created the repository on GitHub before executing these commands.
git remote add origin git@github.com:mraible/21-points.git
git branch -M main
git push -u origin main
The response should indicate success:
Enumerating objects: 652, done.
Counting objects: 100% (652/652), done.
Delta compression using up to 10 threads
Compressing objects: 100% (618/618), done.
Writing objects: 100% (652/652), 952.77 KiB | 11.34 MiB/s, done.
Total 652 (delta 79), reused 0 (delta 0), pack-reused 0
remote: Resolving deltas: 100% (79/79), done.
To github.com:mraible/21-points.git
 * [new branch]      main -> main
Branch 'main' set up to track remote branch 'main' from 'origin'.
This is how I created a new application with JHipster and checked it into source control. If you’re creating an application following similar steps, there are two common approaches for continuing. The first involves developing the application, then testing and deploying. The second option is to set up continuous integration, deploy, then begin development and testing. In a team development environment, I recommend the second option. However, since you’re likely reading this as an individual, I’ll follow the first approach and get right to coding. If you’re interested in setting up continuous integration with Jenkins, please see Setting up Continuous Integration on Jenkins 2.
Building the UI and business logic
In v4 of this book (and 21-Points Health), I opted to use Bootstrap and its default theme, changing some variables so it looked like Angular Material. Since I got used to it, I decided to keep this same setup for this version. To make the default Bootstrap theme look like Material Design, modify _bootstrap-variables.scss and replace it with the contents below.
/*
 * Bootstrap overrides https://getbootstrap.com/docs/5.1/customize/sass/
 * All values defined in bootstrap source
 * https://github.com/twbs/bootstrap/blob/v5.1.3/scss/_variables.scss can be overwritten here
 * Make sure not to add !default to values here
 */

// Colors:
// Grayscale and brand colors for use across Bootstrap.

// Customize colors to match Bootstrap Material Theme from https://mdbootstrap.com/docs/standard/
// https://github.com/mdbootstrap/mdb-ui-kit/blob/master/src/scss/bootstrap/_variables.scss

$primary: #009688;
$success: #4caf50;
$info: #03a9f4;
$warning: #ff5722;
$danger: #f44336;
$blue: #0275d8;

// Options:
// Quickly modify global styling by enabling or disabling optional features.
$enable-rounded: true;
$enable-shadows: false;
$enable-gradients: false;
$enable-transitions: true;
$enable-hover-media-query: false;
$enable-grid-classes: true;
$enable-print-styles: true;

// Components:
// Define common padding and border radius sizes and more.

$border-radius: 0.15rem;
$border-radius-lg: 0.125rem;
$border-radius-sm: 0.1rem;

// Body:
// Settings for the `<body>` element.

$body-bg: #fff;

// Typography:
// Font, line-height, and color for body text, headings, and more.

$font-size-base: 0.9rem;

$border-radius: 2px;
$border-radius-sm: 1px;

$font-family-sans-serif: 'Roboto', 'Helvetica', 'Arial', sans-serif;
$headings-font-weight: 300;

$link-color: $primary;

$input-focus-border-color: lighten($blue, 25%);
$input-focus-box-shadow: none;
Then add the following Sass to the bottom of global.scss.
/* ==========================================================================
custom styles for 21-Points Health
==========================================================================*/
.jh-card {
  border: none !important;
}

.jh-navbar {
  background-color: #009688 !important;
}

.blockquote {
  padding: 0.5rem 1rem;
  margin-bottom: 1rem;
  font-size: 1rem !important;
  font-weight: 100;
  border-left: 0.25rem solid #eceeef;
}

a {
  font-weight: normal !important;
}

.truncate {
  width: 180px;
  white-space: nowrap;
  overflow: hidden;
  text-overflow: ellipsis;
  cursor: pointer;

  &.cal-day-notes {
    width: 150px;
  }
}

.footer {
  bottom: 0;
  left: 0;
  color: #666;
  background: #eee;
  border-top: 1px solid silver;
  position: fixed;
  width: 100%;
  padding: 10px;
  padding-bottom: 0;
  text-align: center;
  z-index: 3;
  font-size: 0.9em;

  p {
    margin-bottom: 7px;
  }
}

.thread-dump-modal-lock {
  max-width: 450px;
  overflow: hidden;
  text-overflow: ellipsis;
  white-space: nowrap;
}

/* Override Bootstrap's default vertical-align: top */
.table {
  th,
  td {
    vertical-align: middle !important;
  }
}If you’d like to use Material Design for Bootstrap & Angular with JHipster, that’s possible too.
-
Install The MDB Angular UI KIT:
npm i mdb-angular-ui-kit@3 @angular/cdk@14 -
Remove all variables from
src/main/webapp/content/scss/_bootstrap-variables.scss. -
Comment out the import for Bootstrap in
src/main/webapp/content/scss/vendor.scss:// Import Bootstrap source files from node_modules // @import '~bootstrap/scss/bootstrap'; -
Add the following to import the MDB stylesheet in
src/main/webapp/content/scss/vendor.scss:@import url('https://fonts.googleapis.com/css?family=Roboto:300,400,500,700&display=swap'); @import '~mdb-angular-ui-kit/assets/scss/mdb.scss'; -
Add
https://fonts.googleapis.comandhttps://fonts.gstatic.comto thestyle-srcandfont-srccontent security policy rules insrc/main/resources/config/application.yml.jhipster: ... security: content-security-policy: "... style-src 'self' 'unsafe-inline' https://fonts.googleapis.com; ... font-src 'self' data: https://fonts.gstatic.com" -
Remove the following styles from
global.scss:/* Error highlight on input fields */ .ng-valid[required], .ng-valid.required { border-left: 5px solid green; } .ng-invalid:not(form) { border-left: 5px solid red; } -
Modify the
.dropdown-menurule to set the display tonone..dropdown-menu { padding-left: 0px; display: none; }
Below is a screenshot taken after these changes.
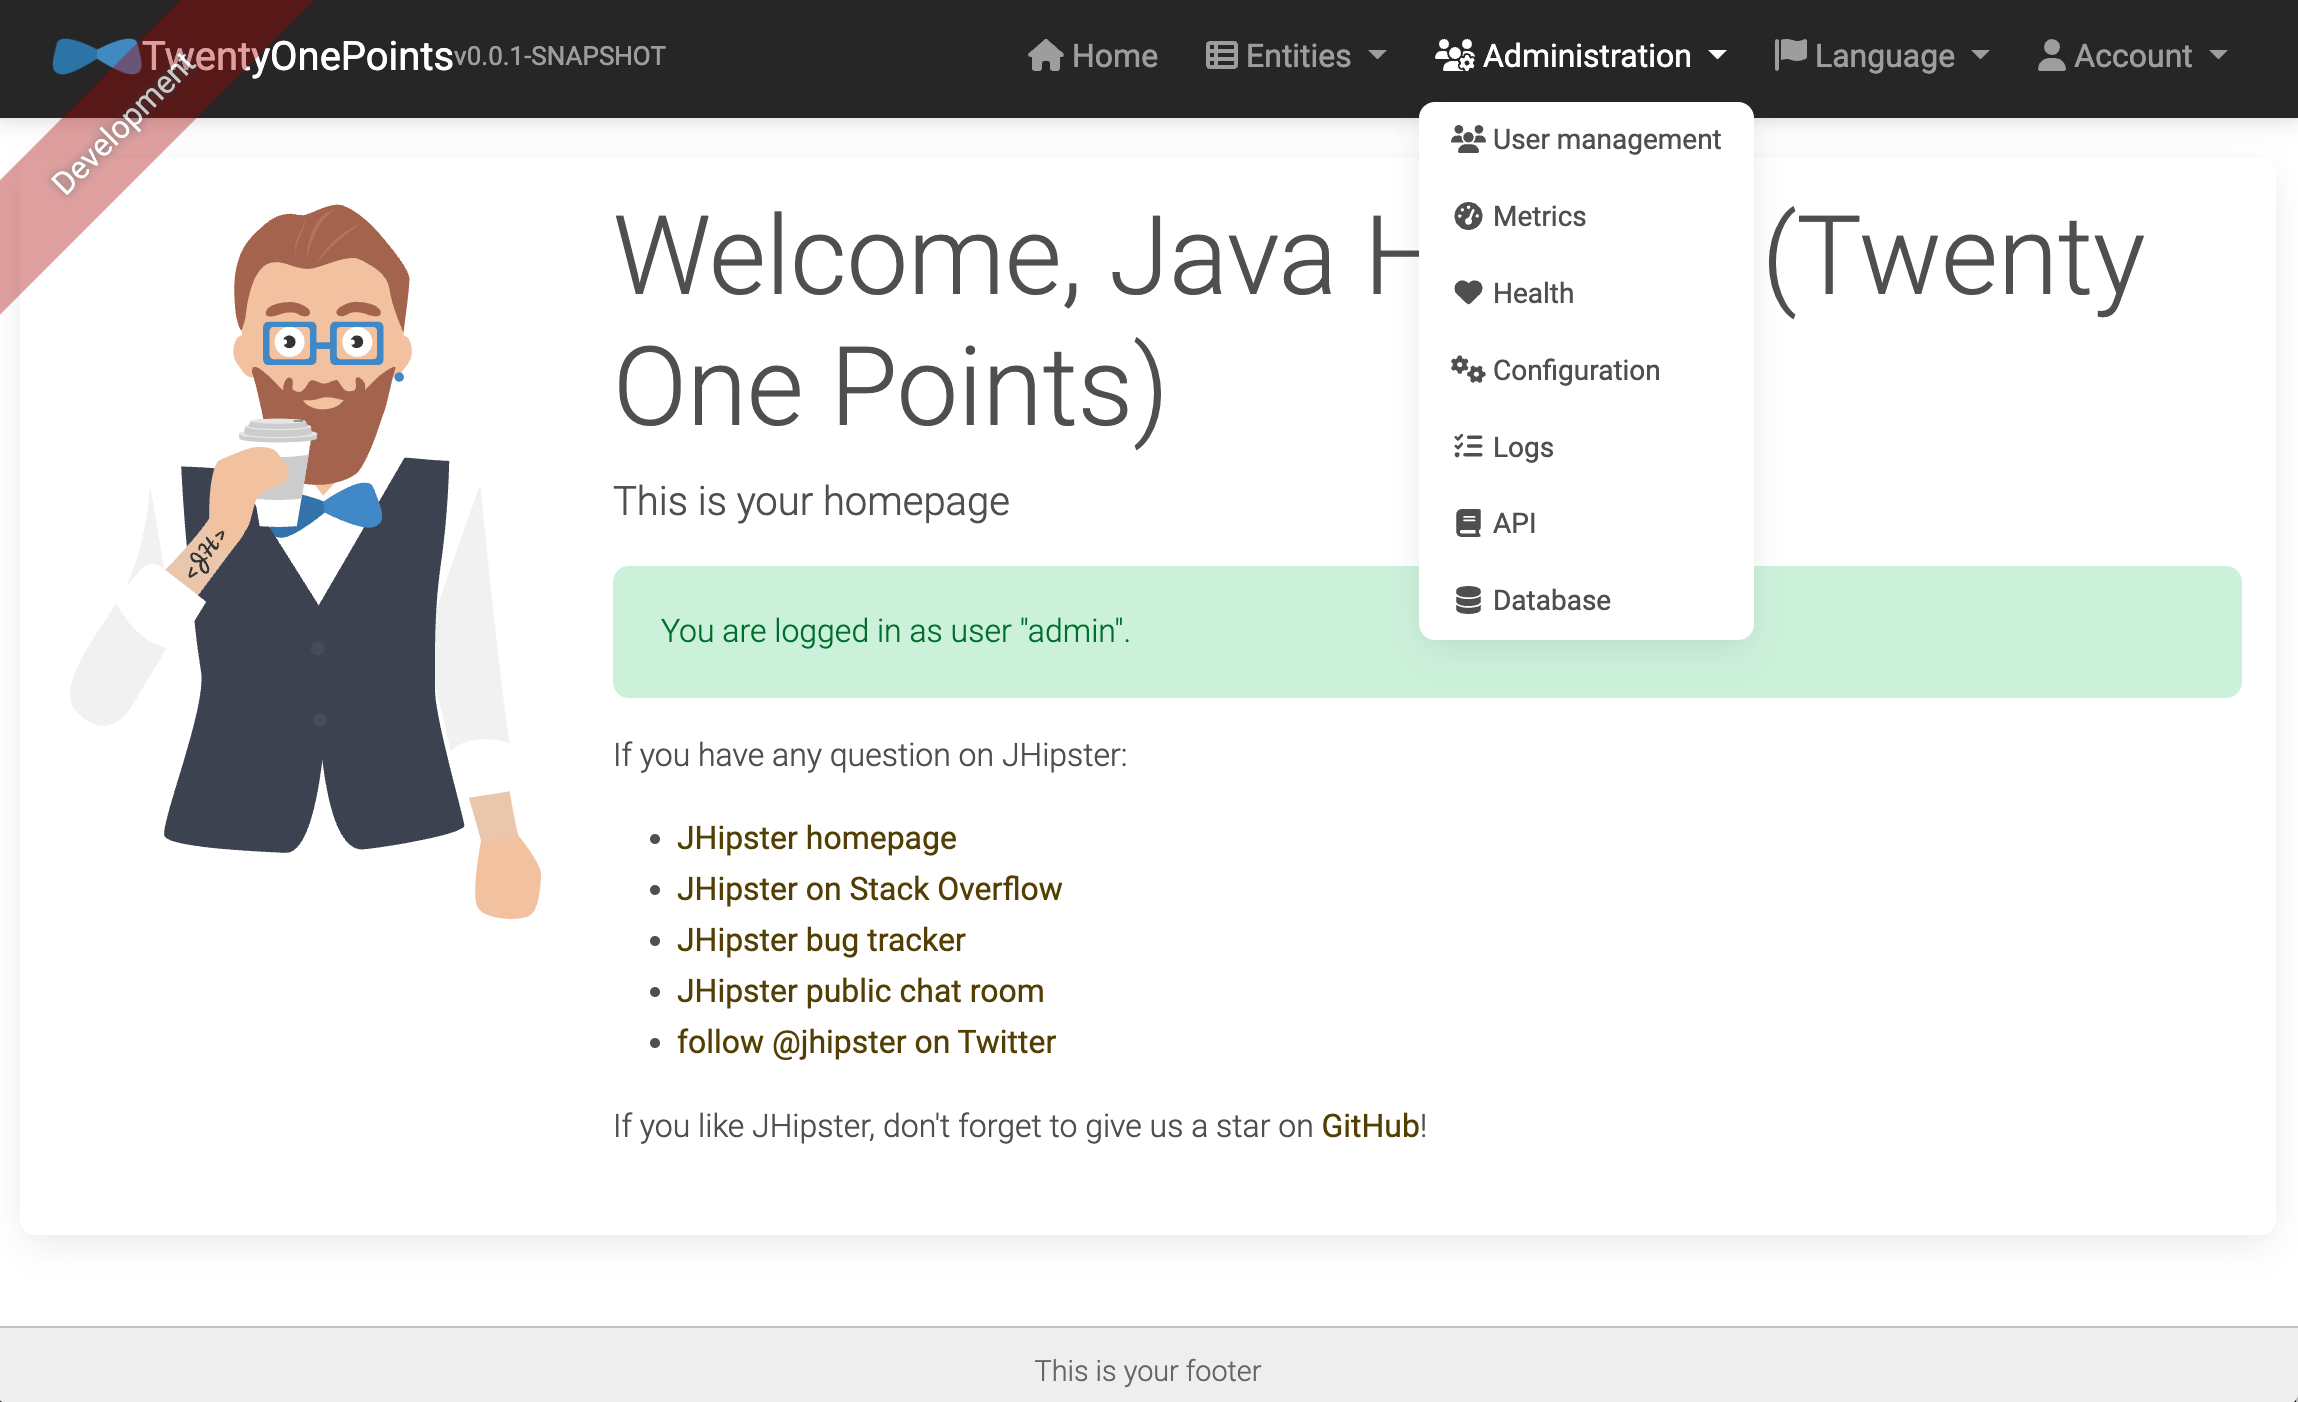
At this point, I deployed to Heroku for the first time. This is covered in the Deploying to Heroku section of this chapter.
Generating entities
For each entity you want to create, you will need:
-
a database table
-
a Liquibase change set
-
a JPA entity class
-
a Spring Data
JpaRepositoryinterface -
a Spring MVC
RestControllerclass -
an Angular router, controller, and service
-
a HTML page
In addition, you should have integration tests to verify that everything works and performance tests to verify that it runs fast. You’d also have unit and integration tests for your Angular code in an ideal world.
The good news is JHipster can generate all of this code for you, including integration tests and performance tests. In addition, if you have entities with relationships, it will generate the necessary schema to support them (with foreign keys) and the TypeScript and HTML code to manage them. You can also set up validation to require certain fields and control their length.
JHipster supports several methods of code generation. The first uses its entity sub-generator. The entity sub-generator is a command-line tool that prompts you with questions to answer. JDL-Studio is a browser-based tool for defining your domain model with JHipster Domain Language (JDL). Finally, JHipster-UML is an option for those that like UML. Supported UML editors include Modelio, UML Designer, and GenMyModel. Because the entity sub-generator is one of the simplest to use, I chose that for this project.
| If you want to see how easy it is to use JDL-Studio, please see my Get Started with JHipster 7 screencast. |
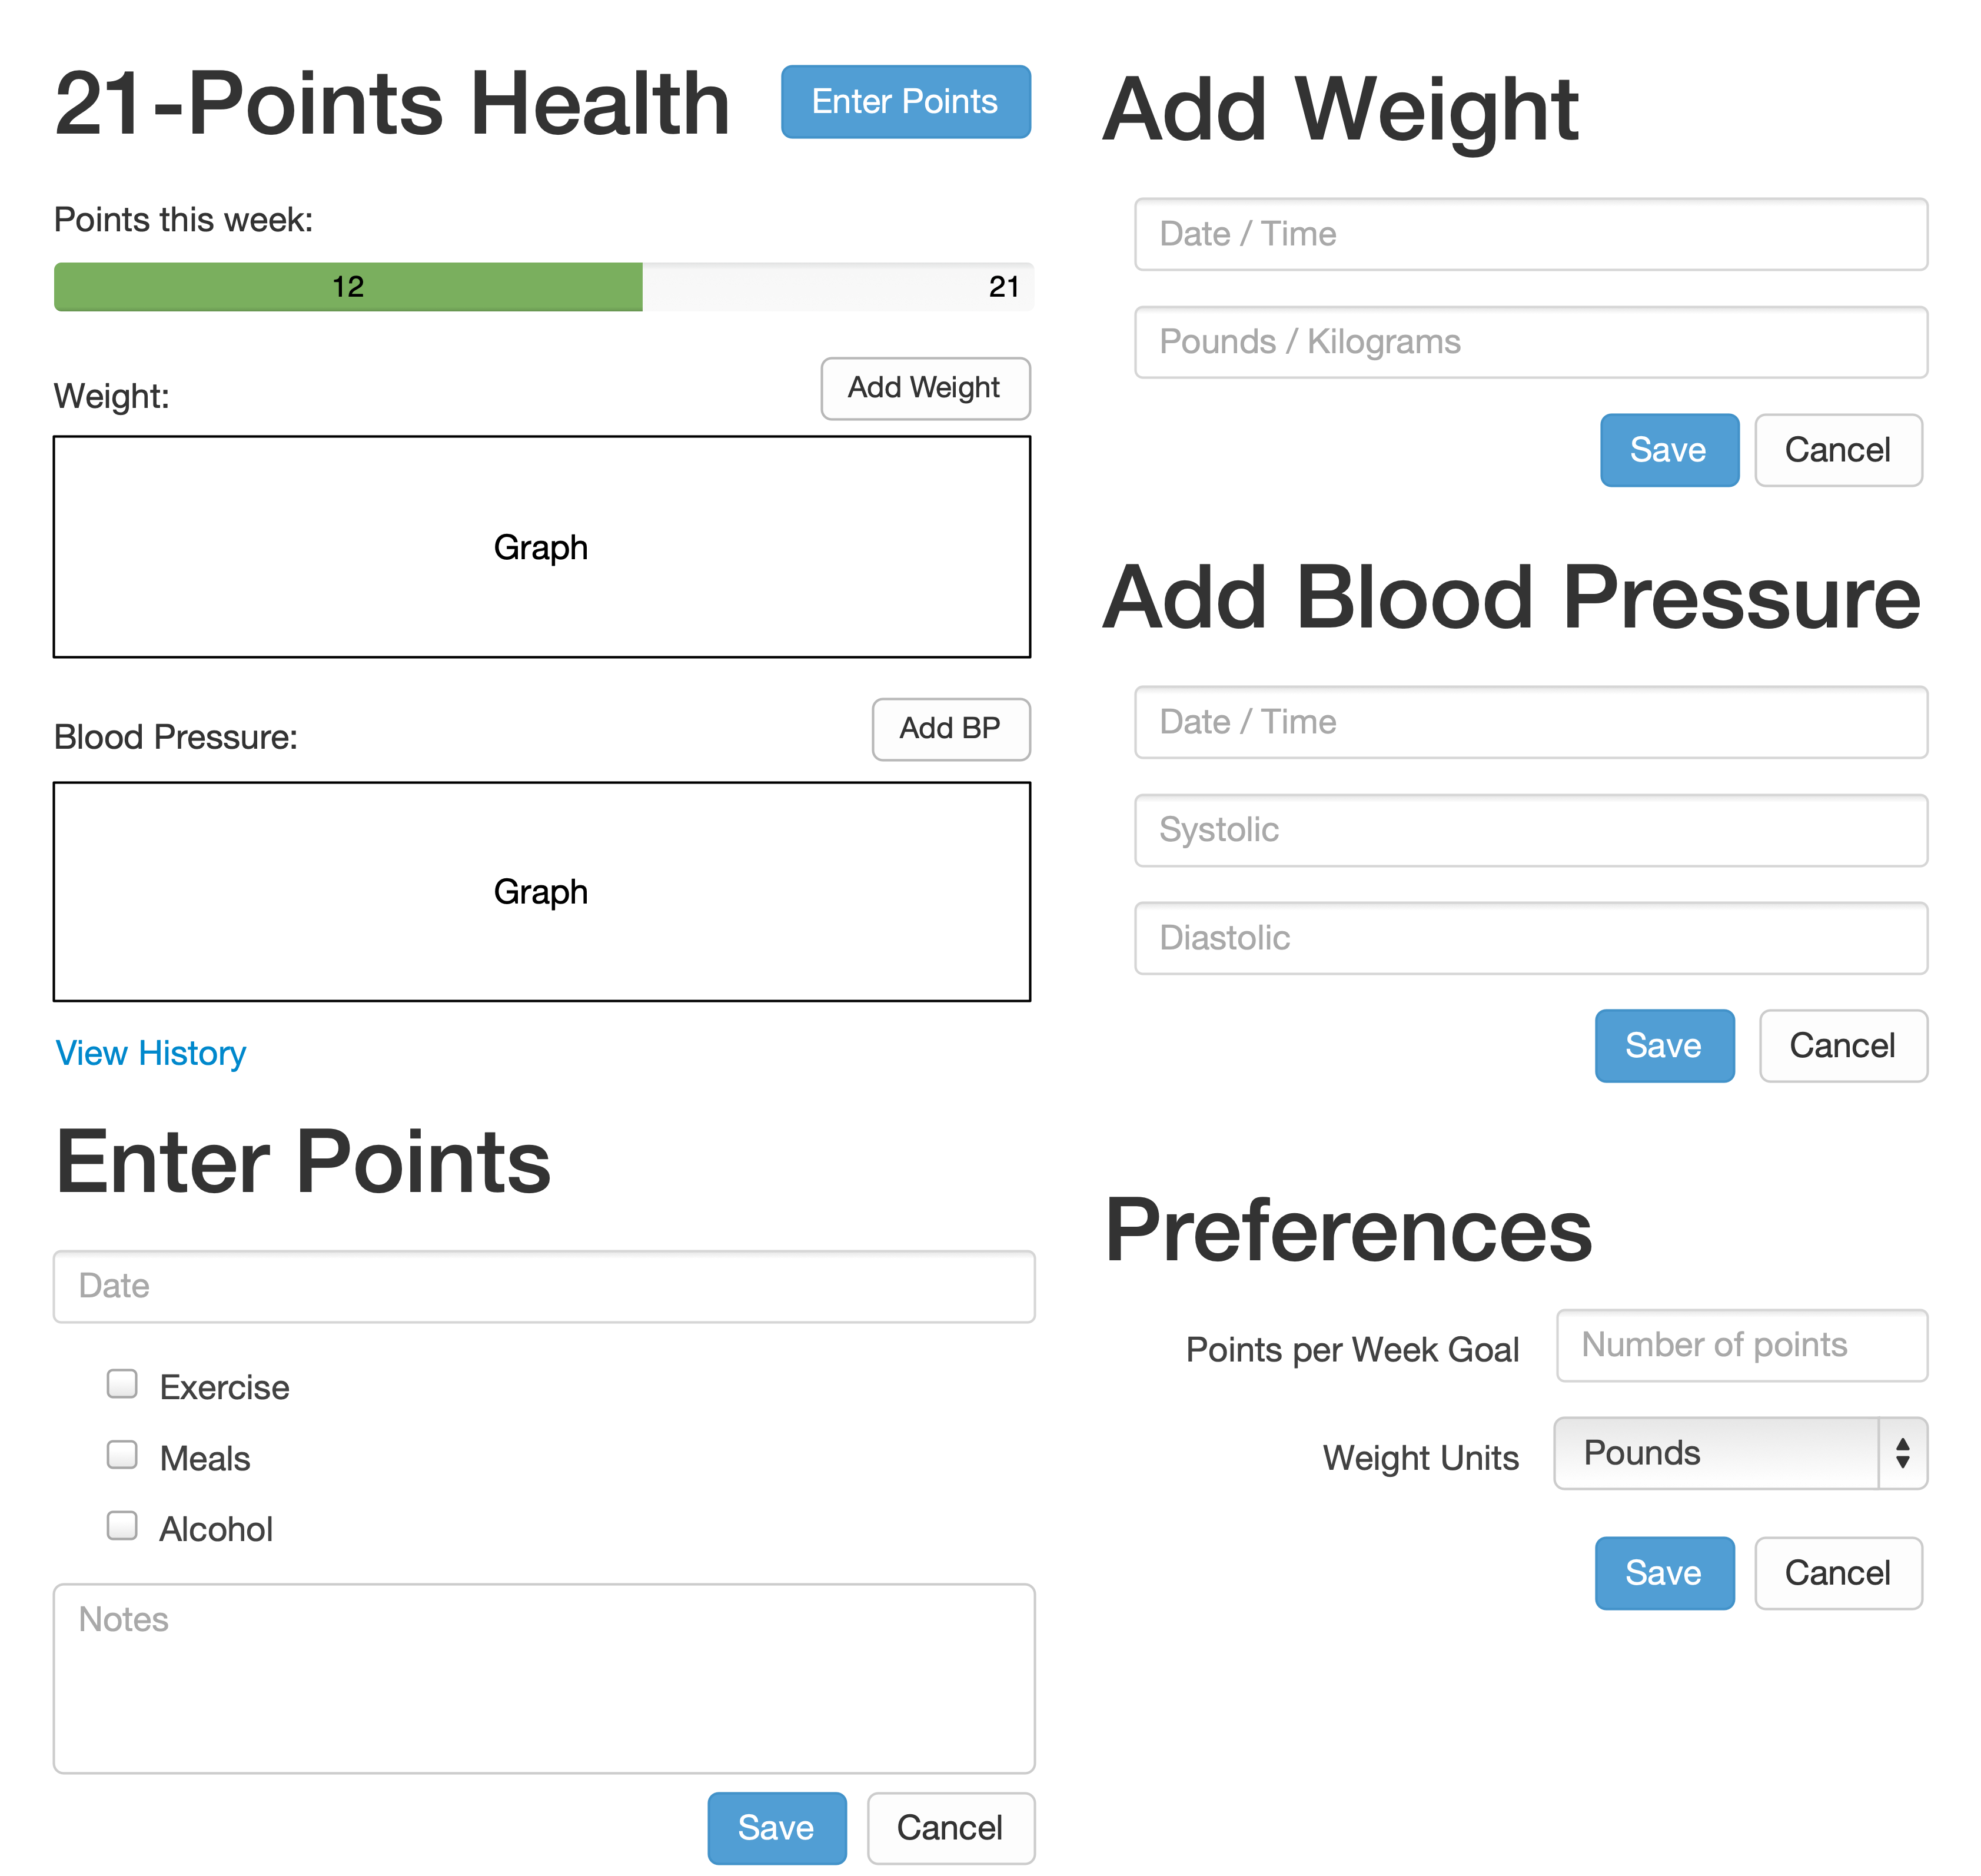
At this point, I did some trial-and-error designs with the data model. I generated entities with JHipster, tried the app, and changed to start with a UI-first approach. As a user, I was hoping to easily add daily entries about whether I’d exercised, eaten healthy meals, or consumed alcohol. I also wanted to record my weight and blood pressure metrics when I measured them. When I started using the UI I’d just created, it seemed like it might be able to accomplish these goals, but it also seemed somewhat cumbersome. I decided to create a UI mockup with the main screen and its ancillary screens for data entry. I used OmniGraffle and a Bootstrap stencil to create the following UI mockup.
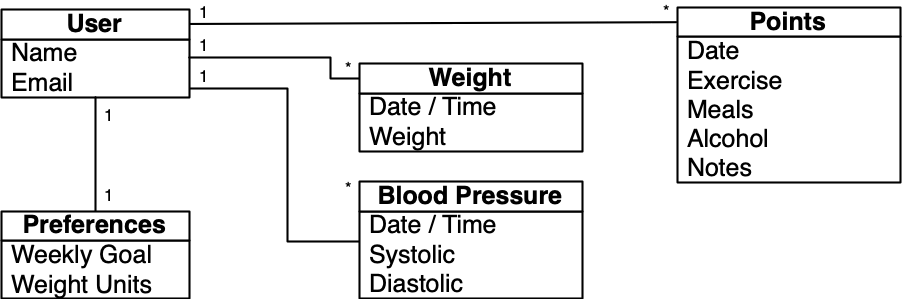
After figuring out how I wanted the UI to look, I started to think about the data model. I quickly decided I didn’t need to track high-level goals (e.g., lose ten pounds in Q1 2023). I was more concerned with tracking weekly goals, and 21-Points Health is all about how many points you get in a week. I created the following diagram as my data model.
I ran jhipster entity points. I added the appropriate fields and their validation rules and specified a many-to-one relationship with user. Below is the final output from my answers.
================= Points =================
Fields
date (LocalDate) required
exercise (Integer)
meals (Integer)
alcohol (Integer)
notes (String) maxlength='140'

Relationships
user (User) many-to-one

? Do you want to use separate service class for your business logic? No, the REST controller should use the repository
directly
? Is this entity read-only? No
? Do you want pagination and sorting on your entity? Yes, with pagination links and sorting headers

     info Creating changelog for entities Points
    ...
    force .yo-rc-global.json
    force .yo-rc.json
    force .jhipster/Points.json
   create src/test/java/org/jhipster/health/domain/PointsTest.java
   create src/test/java/org/jhipster/health/web/rest/PointsResourceIT.java
   create src/main/java/org/jhipster/health/web/rest/PointsResource.java
   create src/main/webapp/app/entities/points/points.model.ts
   create src/main/java/org/jhipster/health/repository/PointsRepository.java
   create src/main/java/org/jhipster/health/repository/search/PointsSearchRepository.java
   create src/main/webapp/app/entities/points/points.module.ts
   create src/main/webapp/app/entities/points/list/points.component.html
   create src/main/webapp/app/entities/points/points.test-samples.ts
   create src/main/webapp/app/entities/points/detail/points-detail.component.html
   create src/main/webapp/app/entities/points/list/points.component.ts
   create src/main/webapp/app/entities/points/route/points-routing.module.ts
   create src/main/webapp/app/entities/points/detail/points-detail.component.ts
   create src/main/webapp/app/entities/points/route/points-routing-resolve.service.ts
   create src/main/webapp/app/entities/points/service/points.service.ts
   create src/main/webapp/app/entities/points/update/points-form.service.ts
   create src/main/webapp/app/entities/points/update/points-form.service.spec.ts
   create src/main/webapp/app/entities/points/update/points-update.component.html
   create src/main/webapp/app/entities/points/update/points-update.component.ts
   create src/main/webapp/app/entities/points/delete/points-delete-dialog.component.html
   create src/main/webapp/app/entities/points/detail/points-detail.component.spec.ts
   create src/main/webapp/app/entities/points/delete/points-delete-dialog.component.ts
   create src/main/webapp/app/entities/points/list/points.component.spec.ts
   create src/main/webapp/app/entities/points/route/points-routing-resolve.service.spec.ts
   create src/main/webapp/app/entities/points/service/points.service.spec.ts
   create src/main/webapp/app/entities/points/update/points-update.component.spec.ts
   create src/main/webapp/app/entities/points/delete/points-delete-dialog.component.spec.ts
   create src/main/webapp/i18n/en/points.json
   create src/main/webapp/i18n/fr/points.json
   create src/test/javascript/cypress/e2e/entity/points.cy.ts
 conflict src/main/webapp/i18n/en/global.json
? Overwrite src/main/webapp/i18n/en/global.json? overwrite this and all others
    force src/main/webapp/i18n/en/global.json
   create src/main/resources/config/liquibase/changelog/20221108000520_added_entity_Points.xml
   create src/main/resources/config/liquibase/changelog/20221108000520_added_entity_constraints_Points.xml
   create src/main/resources/config/liquibase/fake-data/points.csv
   create src/main/java/org/jhipster/health/domain/Points.java
    force src/main/webapp/i18n/fr/global.json
    force src/main/java/org/jhipster/health/config/CacheConfiguration.java
    force src/main/webapp/app/entities/entity-routing.module.ts
    force src/main/resources/config/liquibase/master.xml
    force src/main/webapp/app/layouts/navbar/navbar.component.html
    force .yo-rc.json
    force .jhipster/Points.json

No change to package.json was detected. No package manager install will be executed.
Entity Points generated successfully.

Running `webapp:build` to update client app
You can see the validation rules for the date and notes above, but you don’t see how I created the relationship with the user. Here are the questions and answers from that section.
? Do you want to add a relationship to another entity? Yes
? What is the name of the other entity? User
? What is the name of the relationship? user
? What is the type of the relationship? many-to-one
? Do you want to add any validation rules to this relationship? No
I had similar answers for the Weight and BloodPressure entities. Please refer to the entity diagram for the field names in each entity. For Preferences, I created a one-to-one relationship with User.
To ensure that people use 21-Points Health effectively, I set the weekly goal to a minimum of 10 points and a max of 21. I also made the weightUnits property an enum.
================= Preferences =================
Fields
weeklyGoal (Integer) required min='10' max='21'

Generating field #2

? Do you want to add a field to your entity? Yes
? What is the name of your field? weightUnits
? What is the type of your field? Enumeration (Java enum type)
? What is the class name of your enumeration? Units
? What are the values of your enumeration (separated by comma, no spaces)? kg,lb
? Do you want to add validation rules to your field? Yes
? Which validation rules do you want to add? Required

================= Preferences =================
Fields
weeklyGoal (Integer) required min='10' max='21'
weightUnits (Units) required
After generating the Weight and BloodPressure entities with a date property for the date/time field, I decided that timestamp was a better property name. To fix this, I modified the respective JSON files in the .jhipster directory and ran jhipster entity for each entity again. This seemed easier than refactoring with IntelliJ and hoping it caught all the name instances.
|
When I ran ./gradlew test, I was pleased to see that all tests passed.
BUILD SUCCESSFUL in 1m 25s
I checked in seven changed files and 144 new files generated by the JHipster before continuing to implement my UI mockups.
Application improvements
To make my new JHipster application into something I could be proud of, I made several improvements, described below.
| At this point, I set up continuous testing of this project using Jenkins. This is covered in the Continuous integration and deployment section of this chapter. |
Improved HTML layout and I18N messages
Of all the code I write, UI code (HTML, JavaScript, and CSS) is my favorite. I like that you can see changes immediately and make progress quickly—especially when you’re using dual monitors with [Browsersync]. Below is a consolidated list of changes I made to the HTML to make things look better:
-
improved layout of tables and forms
-
improved titles and button labels by editing generated JSON files in
src/main/webapp/i18n/en -
adjusted date format in custom DatePipe’s to use
MMM D, YYYYinstead ofD MMM YYYY -
defaulted to the current date on new entries
-
replaced point metrics with icons on list/detail screens
-
replaced point metrics with checkboxes on the update screen
The biggest visual improvements are on the list screens. I made the buttons smaller, turned button text into tooltips, and moved add/search buttons to the top right corner. I converted the 1 and 0 metric values to icons for the points list screen. Before and after screenshots of the points list illustrate the improved, compact layout.
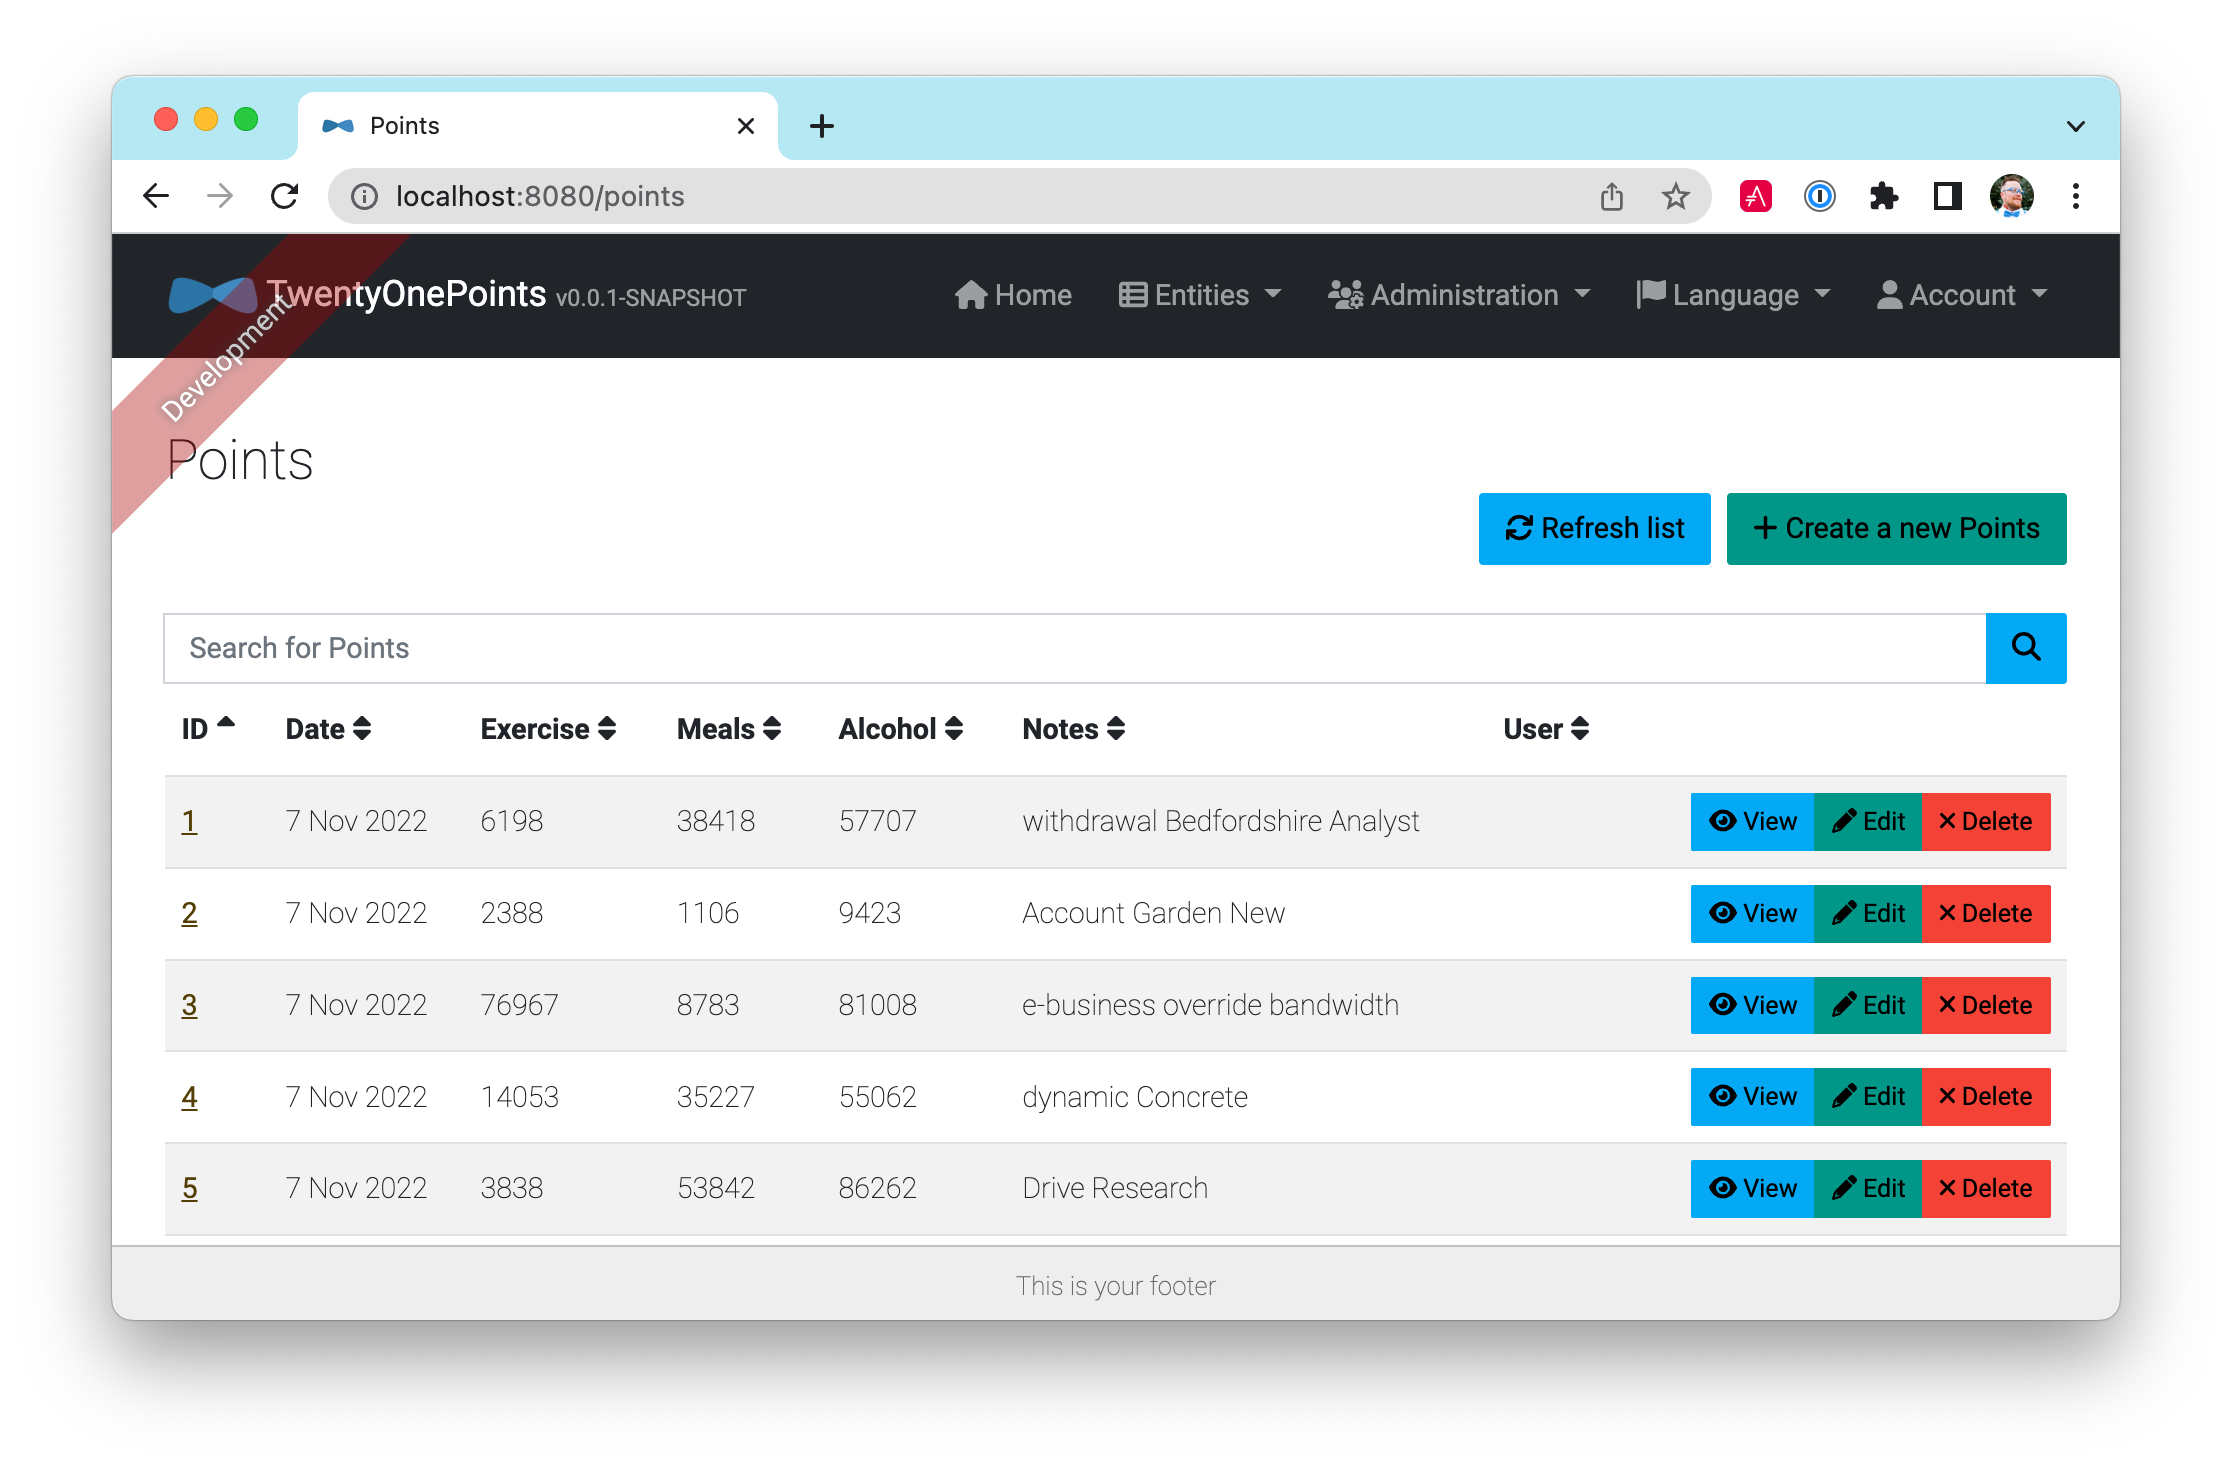
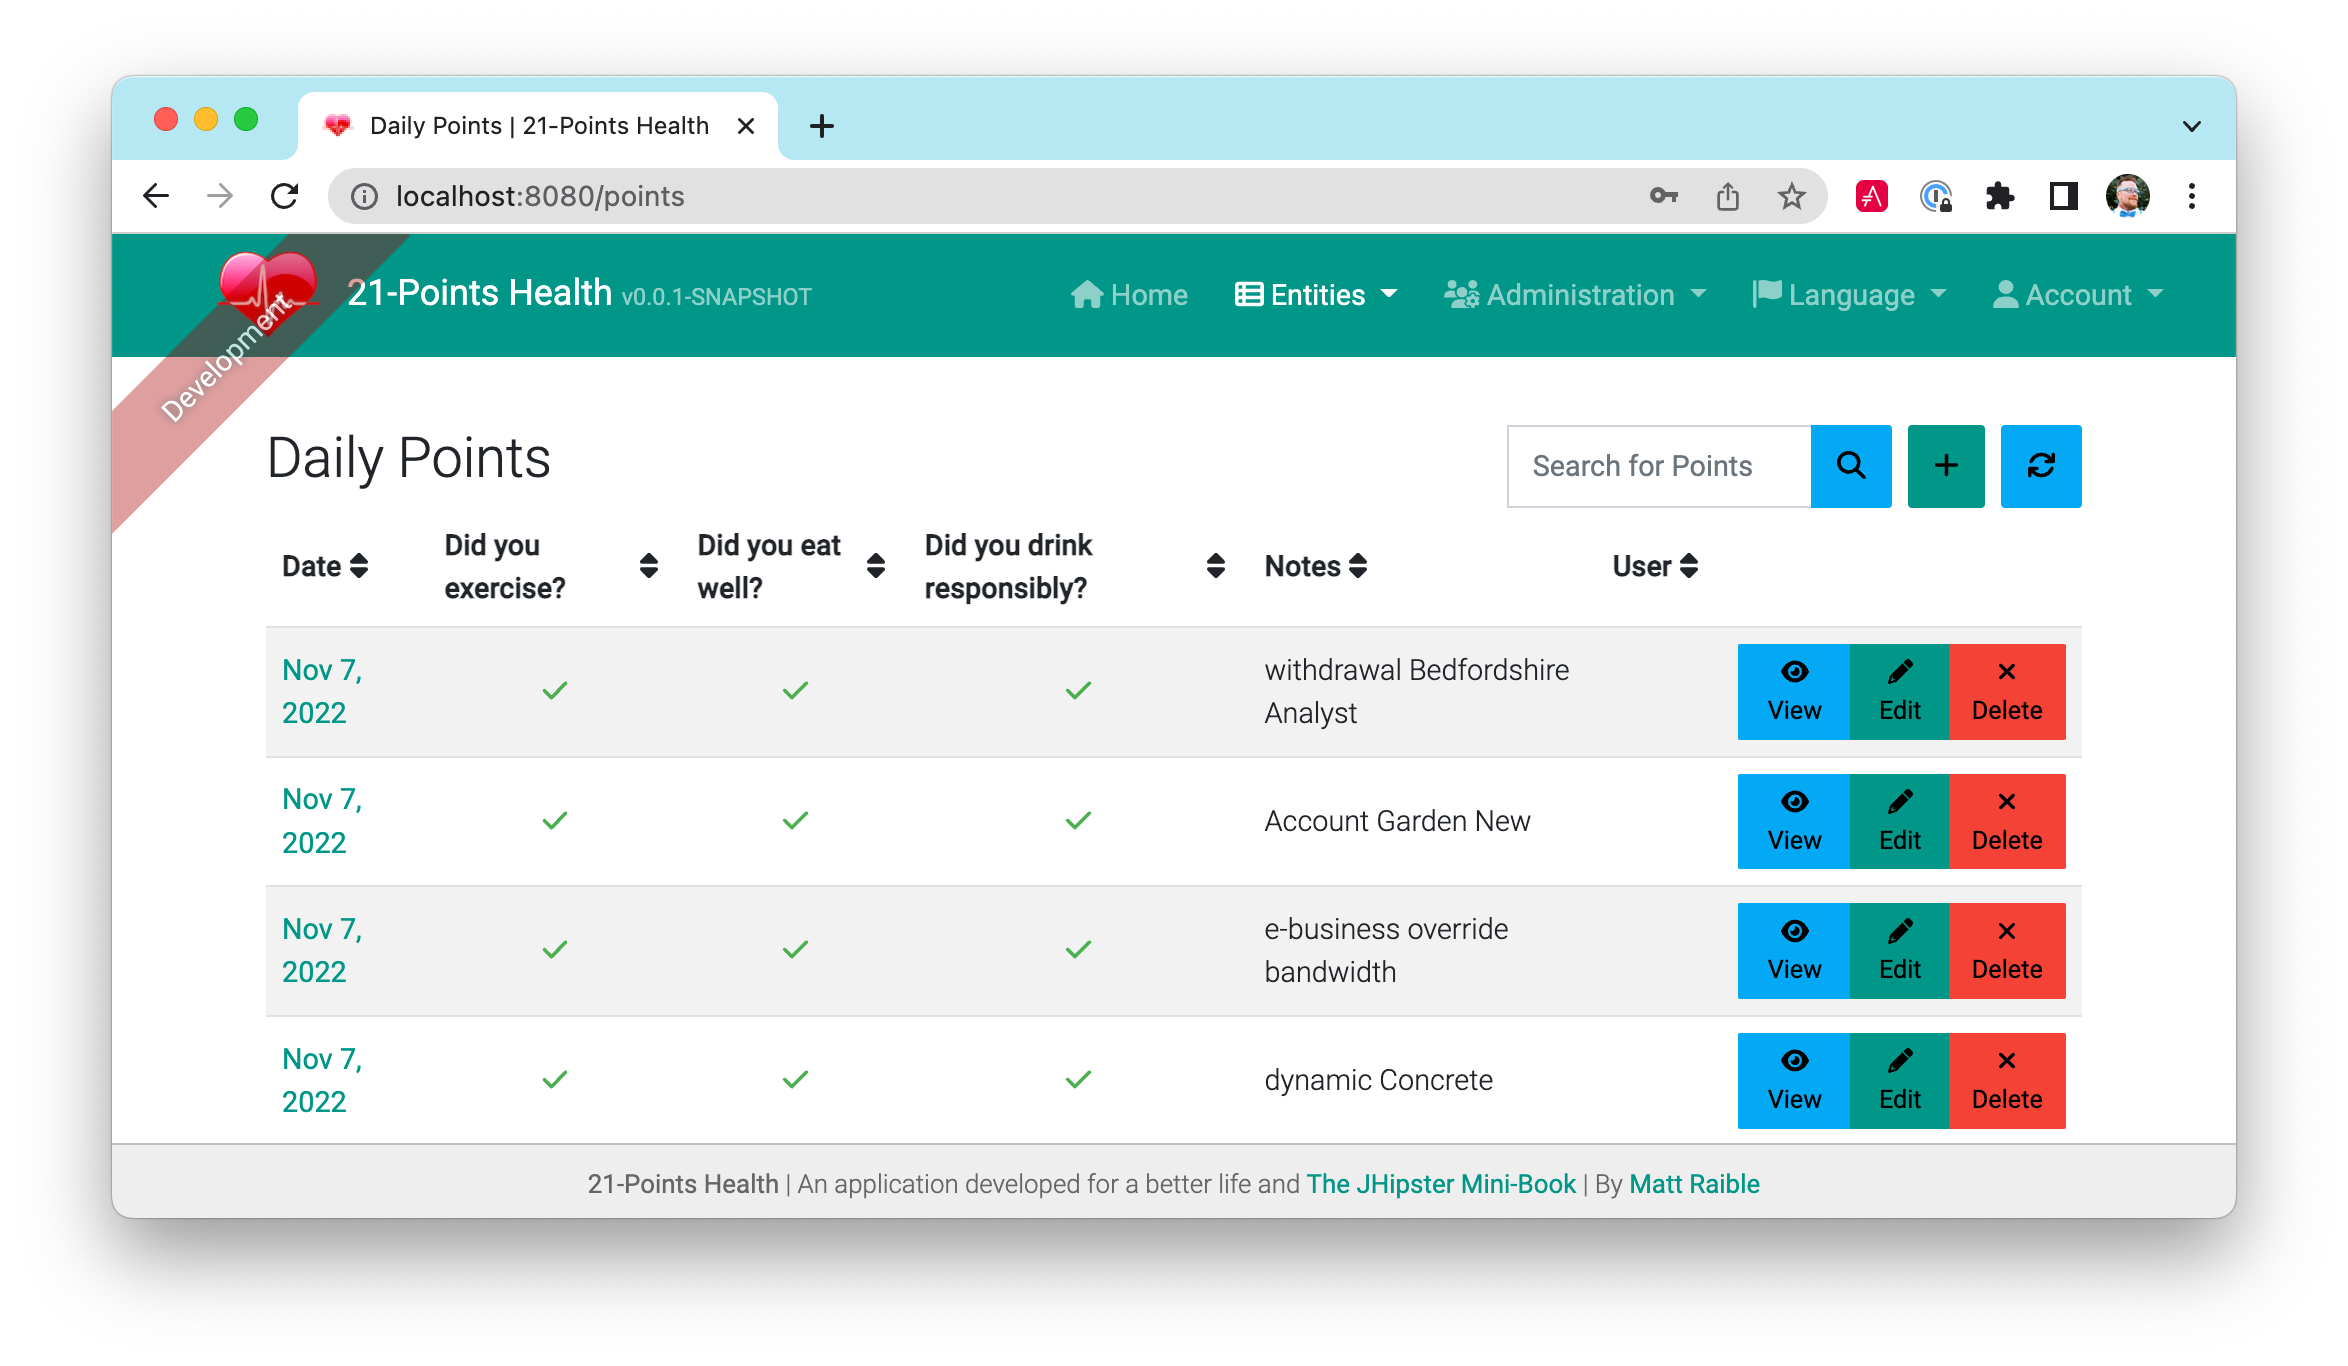
I refactored the HTML at the top of points.component.html to put the title, search, and add buttons on the same row. I also removed the button text in favor of using ng-bootstrap’s tooltip directive. The jhiTranslate directive you see in the button tooltips is provided by JHipster’s Angular library.
<div class="row">
  <jhi-alert-error></jhi-alert-error>
  <jhi-alert></jhi-alert>

  <div class="col-md-8 col-sm-4">
    <h2 id="page-heading" data-cy="PointsHeading">
      <span jhiTranslate="twentyOnePointsApp.points.home.title">Points</span>
    </h2>
  </div>
  <div class="col-md-4 col-sm-8 text-right d-flex flex-row-reverse">
    <button class="btn btn-info ms-2" (click)="load()" [disabled]="isLoading"
            [ngbTooltip]="refreshTooltip" placement="bottom">
      <fa-icon icon="sync" [spin]="isLoading"></fa-icon>
      <ng-template #refreshTooltip>
        <span jhiTranslate="twentyOnePointsApp.points.home.refreshListLabel">Refresh list</span>
      </ng-template>
    </button>

    <button
      id="jh-create-entity"
      data-cy="entityCreateButton"
      class="btn btn-primary jh-create-entity create-points ms-2"
      [routerLink]="['/points/new']"
      [ngbTooltip]="addTooltip"
      placement="bottom"
    >
      <fa-icon icon="plus"></fa-icon>
      <ng-template #addTooltip>
        <span class="hidden-sm-down"
              jhiTranslate="twentyOnePointsApp.points.home.createLabel">Add Points</span>
      </ng-template>
    </button>
    <form name="searchForm" class="w-100">
      <div class="input-group h-100">
        <label class="visually-hidden" for="currentSearch"
               jhiTranslate="twentyOnePointsApp.points.home.search">Search for Points</label>
        <input
          type="text"
          class="form-control"
          [(ngModel)]="currentSearch"
          id="currentSearch"
          name="currentSearch"
          placeholder="{{ 'twentyOnePointsApp.points.home.search' | translate }}"
        />

        <button class="btn btn-info" (click)="search(currentSearch)">
          <fa-icon icon="search"></fa-icon>
        </button>

        <button class="btn btn-danger" (click)="search('')" *ngIf="currentSearch">
          <fa-icon icon="trash-alt"></fa-icon>
        </button>
      </div>
    </form>
  </div>
</div>
<div class="row">
  ...
</div>
Changing the numbers to icons was pretty easy thanks to Angular’s expression language.
<td class="text-center">
  <fa-icon [icon]="points.exercise ? 'check' : 'times'" aria-hidden="true"
           class="{{points.exercise ? 'text-success' : 'text-danger'}}"></fa-icon>
</td>
<td class="text-center">
  <fa-icon [icon]="points.meals ? 'check' : 'times'" aria-hidden="true"
           class="{{points.meals ? 'text-success' : 'text-danger'}}"></fa-icon>
</td>
<td class="text-center">
  <fa-icon [icon]="points.alcohol ? 'check' : 'times'" aria-hidden="true"
           class="{{points.alcohol ? 'text-success' : 'text-danger'}}"></fa-icon>
</td>
Next, I changed the input fields to checkboxes in points-update.component.html.
<div class="form-check">
  <label class="form-check-label" jhiTranslate="twentyOnePointsApp.points.exercise"
         for="field_exercise">Exercise</label>
  <input type="checkbox" class="form-check-input" name="exercise" id="field_exercise"
         data-cy="exercise" formControlName="exercise"/>
</div>
<div class="form-check">
  <label class="form-check-label" jhiTranslate="twentyOnePointsApp.points.meals"
         for="field_meals">Meals</label>
  <input type="checkbox" class="form-check-input" name="meals" id="field_meals"
         data-cy="meals" formControlName="meals" />
</div>
<div class="form-check mb-3">
  <label class="form-check-label" jhiTranslate="twentyOnePointsApp.points.alcohol"
         for="field_alcohol">Alcohol</label>
  <input type="checkbox" class="form-check-input" name="alcohol" id="field_alcohol"
         data-cy="alcohol" formControlName="alcohol" />
</div>
In points-update.component.ts, I had to modify the save() method to convert booleans from each checkbox into integers.
save(): void {
  this.isSaving = true;
  const points = this.pointsFormService.getPoints(this.editForm);

  // convert booleans to ints
  points.exercise = points.exercise ? 1 : 0;
  points.meals = points.meals ? 1 : 0;
  points.alcohol = points.alcohol ? 1 : 0;

  if (points.id !== null) {
    this.subscribeToSaveResponse(this.pointsService.update(points));
  } else {
    this.subscribeToSaveResponse(this.pointsService.create(points));
  }
}
After making these changes, modifying a bit of HTML, and tweaking some i18n messages, the “Add Points” screen is starting to look like the UI mockup I created.

Improving the UI was the most fun but also the most time-consuming as it involved lots of little tweaks to multiple screens. The next task was more straightforward: implementing business logic.
Added logic so non-admin users only see their data
I wanted to make several improvements to what users could see based on their roles. Users should be able to see and modify their data, but nobody else’s. I also wanted to ensure that an administrator could see and modify everyone’s data.
Hide user selection from non-admin users
The default update components for many-to-one relationships allow you to choose the user when you add/edit a record. To ensure only administrators had this ability, I modified the update templates and used the *jhiHasAnyAuthority directive. This directive is included with JHipster, in src/main/webapp/app/shared/auth/has-any-authority.directive.ts. It allows you to pass in a single role or a list of roles.
<div class="form-group" *jhiHasAnyAuthority="'ROLE_ADMIN'">
  <label class="form-label" jhiTranslate="twentyOnePointsApp.points.user"
         for="field_user">User</label>
  <select class="form-control" id="field_user" data-cy="user" name="user"
          formControlName="user" [compareWith]="compareUser">
    <option [ngValue]="null"></option>
    <option [ngValue]="userOption"
            *ngFor="let userOption of usersSharedCollection">{{userOption.login}}</option>
  </select>
</div>
Since the dropdown is hidden from non-admins, I had to modify each Resource class to default to the current user when creating a new record. Below is a diff that shows the changes I needed to make to PointsResource.java.
+import org.jhipster.health.repository.UserRepository;
+import org.jhipster.health.security.AuthoritiesConstants;
+import org.jhipster.health.security.SecurityUtils;

public class PointsResource {

     private final PointsSearchRepository pointsSearchRepository;

-    public PointsResource(PointsRepository pointsRepository, PointsSearchRepository pointsSearchRepository) {
+    private final UserRepository userRepository;
+
+    public PointsResource(PointsRepository pointsRepository, PointsSearchRepository pointsSearchRepository,
+                          UserRepository userRepository) {
         this.pointsRepository = pointsRepository;
         this.pointsSearchRepository = pointsSearchRepository;
+        this.userRepository = userRepository;
     }

     @PostMapping("/points")
     public ResponseEntity<Points> createPoints(@Valid @RequestBody Points points) throws URISyntaxException {
         log.debug("REST request to save Points : {}", points);
         if (points.getId() != null) {
             throw new BadRequestAlertException("A new points cannot already have an ID", ENTITY_NAME, "idexists");
         }
+        if (!SecurityUtils.hasCurrentUserThisAuthority(AuthoritiesConstants.ADMIN)) {
+            log.debug("No user passed in, using current user: {}", SecurityUtils.getCurrentUserLogin().get());
+            String username = SecurityUtils.getCurrentUserLogin().get();
+            points.setUser(userRepository.findOneByLogin(username).get());
+        }
         Points result = pointsRepository.save(points);
         pointsSearchRepository.index(result);
         return ResponseEntity
             .created(new URI("/api/points/" + result.getId()))
             .headers(HeaderUtil.createEntityCreationAlert(applicationName, true, ENTITY_NAME, result.getId().toString()))
             .body(result);
     }
}
SecurityUtils is a class JHipster provides when you create a project. The integration test for this class, PointsResourceIT.java, has a @WithMockUser annotation on it. This means it’s security-aware, and its tests will pass without changes.
List screen should show only user’s data
The next business-logic improvement I wanted was to modify list screens so they’d only show records for the current user. Admin users should see all users' data. To facilitate this feature, I modified PointsResource#getAllPoints() to have a switch based on the user’s role. Rather than showing you the diff of method, here’s the whole thing.
@GetMapping("/points")
public ResponseEntity<List<Points>> getAllPoints(
    @org.springdoc.api.annotations.ParameterObject Pageable pageable,
    @RequestParam(required = false, defaultValue = "false") boolean eagerload
) {
    log.debug("REST request to get a page of Points");
    Page<Points> page;
    if (SecurityUtils.hasCurrentUserThisAuthority(AuthoritiesConstants.ADMIN)) {
        page = pointsRepository.findAllByOrderByDateDesc(pageable);
    } else {
        page = pointsRepository.findByUserIsCurrentUser(pageable);
    }
    HttpHeaders headers = PaginationUtil.generatePaginationHttpHeaders(
        ServletUriComponentsBuilder.fromCurrentRequest(), page);
    return ResponseEntity.ok().headers(headers).body(page.getContent());
}
The PointsRepository#findByUserIsCurrentUser() method that JHipster generated contains a custom query that uses Spring Expression Language to grab the user’s information from Spring Security. I changed it from returning List<Points> to returning Page<Points>.
@Query("select points from Points points where points.user.login = ?#{principal.username}")
Page<Points> findByUserIsCurrentUser(Pageable pageable);To make tests pass, I had to add @WithMockUser to PointsResourceIT#getAllPoints() to run the test as an administrator.
@Test
@Transactional
@WithMockUser(authorities = AuthoritiesConstants.ADMIN)
void getAllPoints() throws Exception { ... }
Implementing the UI mockup
Making the homepage into something resembling my UI mockup required several steps:
-
Add buttons to facilitate adding new data from the homepage.
-
Add an API to get points achieved during the current week.
-
Add an API to get blood-pressure readings for the last 30 days.
-
Add an API to get body weights for the last 30 days.
-
Add charts to display points per week and blood pressure/weight for the last 30 days.
I started by reusing the update components for entering data that JHipster had created for me. I navigated to the components using Angular’s routerLink syntax, copied from each entity’s main list page. For example, below is the code for the "Add Points" button.
<a [routerLink]="['/points/new']"
   class="btn btn-primary m-0 mb-1 text-white">Add Points</a>
Because home.component.html already contains <jhi-alert></jhi-alert>, I didn’t have to do anything else to get success messages to show up on the homepage.
Points this week
To get points achieved in the current week, I started by adding a unit test to PointsResourceIT.java that would allow me to prove my API was working.
private void createPointsByWeek(LocalDate thisMonday, LocalDate lastMonday) {
    User user = userRepository.findOneByLogin("user").get();
    // Create points in two separate weeks
    points = new Points(thisMonday.plusDays(2), 1, 1, 1, user); (1)
    pointsRepository.saveAndFlush(points);

    points = new Points(thisMonday.plusDays(3), 1, 1, 0, user);
    pointsRepository.saveAndFlush(points);

    points = new Points(lastMonday.plusDays(3), 0, 0, 1, user);
    pointsRepository.saveAndFlush(points);

    points = new Points(lastMonday.plusDays(4), 1, 1, 0, user);
    pointsRepository.saveAndFlush(points);
}

@Test
@Transactional
public void getPointsThisWeek() throws Exception {
    LocalDate today = LocalDate.now();
    LocalDate thisMonday = today.with(DayOfWeek.MONDAY);
    LocalDate lastMonday = thisMonday.minusWeeks(1);
    createPointsByWeek(thisMonday, lastMonday);

    // create security-aware mockMvc
    restPointsMockMvc = MockMvcBuilders
        .webAppContextSetup(context)
        .apply(springSecurity())
        .build();

    // Get all the points
    restPointsMockMvc.perform(get("/api/points")
        .with(user("user").roles("USER")))
        .andExpect(status().isOk())
        .andExpect(content().contentTypeCompatibleWith(MediaType.APPLICATION_JSON))
        .andExpect(jsonPath("$", hasSize(4)));

    // Get the points for this week only
    restPointsMockMvc.perform(get("/api/points-this-week")
        .with(user("user").roles("USER")))
        .andExpect(status().isOk())
        .andExpect(content().contentTypeCompatibleWith(MediaType.APPLICATION_JSON))
        .andExpect(jsonPath("$.week").value(thisMonday.toString()))
        .andExpect(jsonPath("$.points").value(5));
}| 1 | To simplify testing, I added a new constructor to Points.java that contained the arguments I wanted to set. I continued this pattern for most tests I created. |
Of course, this test failed when I first ran it since /api/points-this-week didn’t exist in PointsResource.java. You might notice the points-this-week API expects two return values: a date in the week field and the number of points in the points field. I created PointsPerWeek.java in my project’s rest.vm package to hold this information.
package org.jhipster.health.web.rest.vm;

import java.time.LocalDate;

public class PointsPerWeek {
    private LocalDate week;
    private Integer points;

    public PointsPerWeek(LocalDate week, Integer points) {
        this.week = week;
        this.points = points;
    }

    public Integer getPoints() {
        return points;
    }

    public void setPoints(Integer points) {
        this.points = points;
    }

    public LocalDate getWeek() {
        return week;
    }

    public void setWeek(LocalDate week) {
        this.week = week;
    }

    @Override
    public String toString() {
        return "PointsThisWeek{" +
            "points=" + points +
            ", week=" + week +
            '}';
    }
}
Spring Data JPA made it easy to find all point entries in a particular week. I added a new method to my PointsRepository.java that allowed me to query between two dates.
List<Points> findAllByDateBetweenAndUserLogin(LocalDate firstDate,
                                              LocalDate secondDate, String login);
From there, it was just a matter of calculating the beginning and end of the current week and processing the data in PointsResource.java.
/**
 * {@code GET  /points-this-week} : get all the points for the current week
 *
 * @param timezone the user's timezone
 * @return the {@link ResponseEntity} with status {@code 200 (OK)}
*          and a count of points in body.
 */
@GetMapping("/points-this-week")
public ResponseEntity<PointsPerWeek> getPointsThisWeek(@RequestParam(value = "tz", required = false) String timezone) {
    // Get current date (with timezone if passed in)
    LocalDate now = LocalDate.now();
    if (timezone != null) {
        now = LocalDate.now(ZoneId.of(timezone));
    }

    // Get first day of week
    LocalDate startOfWeek = now.with(DayOfWeek.MONDAY);
    // Get last day of week
    LocalDate endOfWeek = now.with(DayOfWeek.SUNDAY);
    log.debug("Looking for points between: {} and {}", startOfWeek, endOfWeek);

    List<Points> points = pointsRepository.findAllByDateBetweenAndUserLogin(
        startOfWeek,
        endOfWeek,
        SecurityUtils.getCurrentUserLogin().get()
    );
    return calculatePoints(startOfWeek, points);
}

private ResponseEntity<PointsPerWeek> calculatePoints(LocalDate startOfWeek, List<Points> points) {
    Integer numPoints = points.stream().mapToInt(p -> p.getExercise() + p.getMeals() + p.getAlcohol()).sum();

    PointsPerWeek count = new PointsPerWeek(startOfWeek, numPoints);
    return new ResponseEntity<>(count, HttpStatus.OK);
}
To support this new method on the client, I added a new IPointsPerWeek interface in points.model.ts:
export interface IPointsPerWeek {
  week?: dayjs.Dayjs;
  points: number;
}
I imported it into points.service.ts and added a few new methods:
thisWeek(): Observable<HttpResponse<IPointsPerWeek>> {
  const tz = Intl.DateTimeFormat().resolvedOptions().timeZone;
  return this.http.get<IPointsPerWeek>(`api/points-this-week?tz=${tz}`,
    { observe: 'response' })
    .pipe(map(res => this.convertWeekResponseFromServer(res)));
}

protected convertWeekResponseFromServer(res: HttpResponse<IPointsPerWeek>):
  HttpResponse<IPointsPerWeek> {
  return res.clone({
    body: res.body ? this.convertWeekDateFromServer(res.body) : null,
  });
}

protected convertWeekDateFromServer(pointsPerWeek: IPointsPerWeek):
  IPointsPerWeek {
  return {
    ...pointsPerWeek,
    week: dayjs(pointsPerWeek.week),
  };
}
Then I added the service as a dependency to home.component.ts and calculated the data I wanted to display.
import { PointsService } from '../entities/points/service/points.service';
import { IPointsPerWeek } from '../entities/points/points.model';

...
export class HomeComponent implements OnInit, OnDestroy {
  account: Account | null = null;
  pointsThisWeek: IPointsPerWeek = { points: 0 };
  pointsPercentage?: number;

  private readonly destroy$ = new Subject<void>();

  constructor(private accountService: AccountService, private router: Router,
              private pointsService: PointsService) {
  }

  ngOnInit(): void {
    this.accountService
      .getAuthenticationState()
      .pipe(takeUntil(this.destroy$))
      .subscribe(account => {
        this.account = account;
        this.getUserData(); // this line is new
      });
  }

  getUserData(): void {
    // Get points for the current week
    this.pointsService.thisWeek().subscribe(response => {
        if (response.body) {
          this.pointsThisWeek = response.body;
          this.pointsPercentage = (this.pointsThisWeek.points / 21) * 100;
        }
      }
    );
  }
  ...
}
I added a progress bar to home.component.html to show points-this-week progress.
<div class="row">
<div class="col-md-11 col-xs-12 mt-1">
<ngb-progressbar [max]="21" [value]="pointsThisWeek.points"
[hidden]="!pointsThisWeek.points" [striped]="true">
<span *ngIf="pointsThisWeek.points" class="fw-bolder">
{{pointsThisWeek.points}} / Goal: 10
</span>
</ngb-progressbar>
<ngb-alert [dismissible]="false" [hidden]="pointsThisWeek.points">
<span jhiTranslate="home.points.getMoving">
No points yet this week, better get moving!</span>
</ngb-alert>
</div>
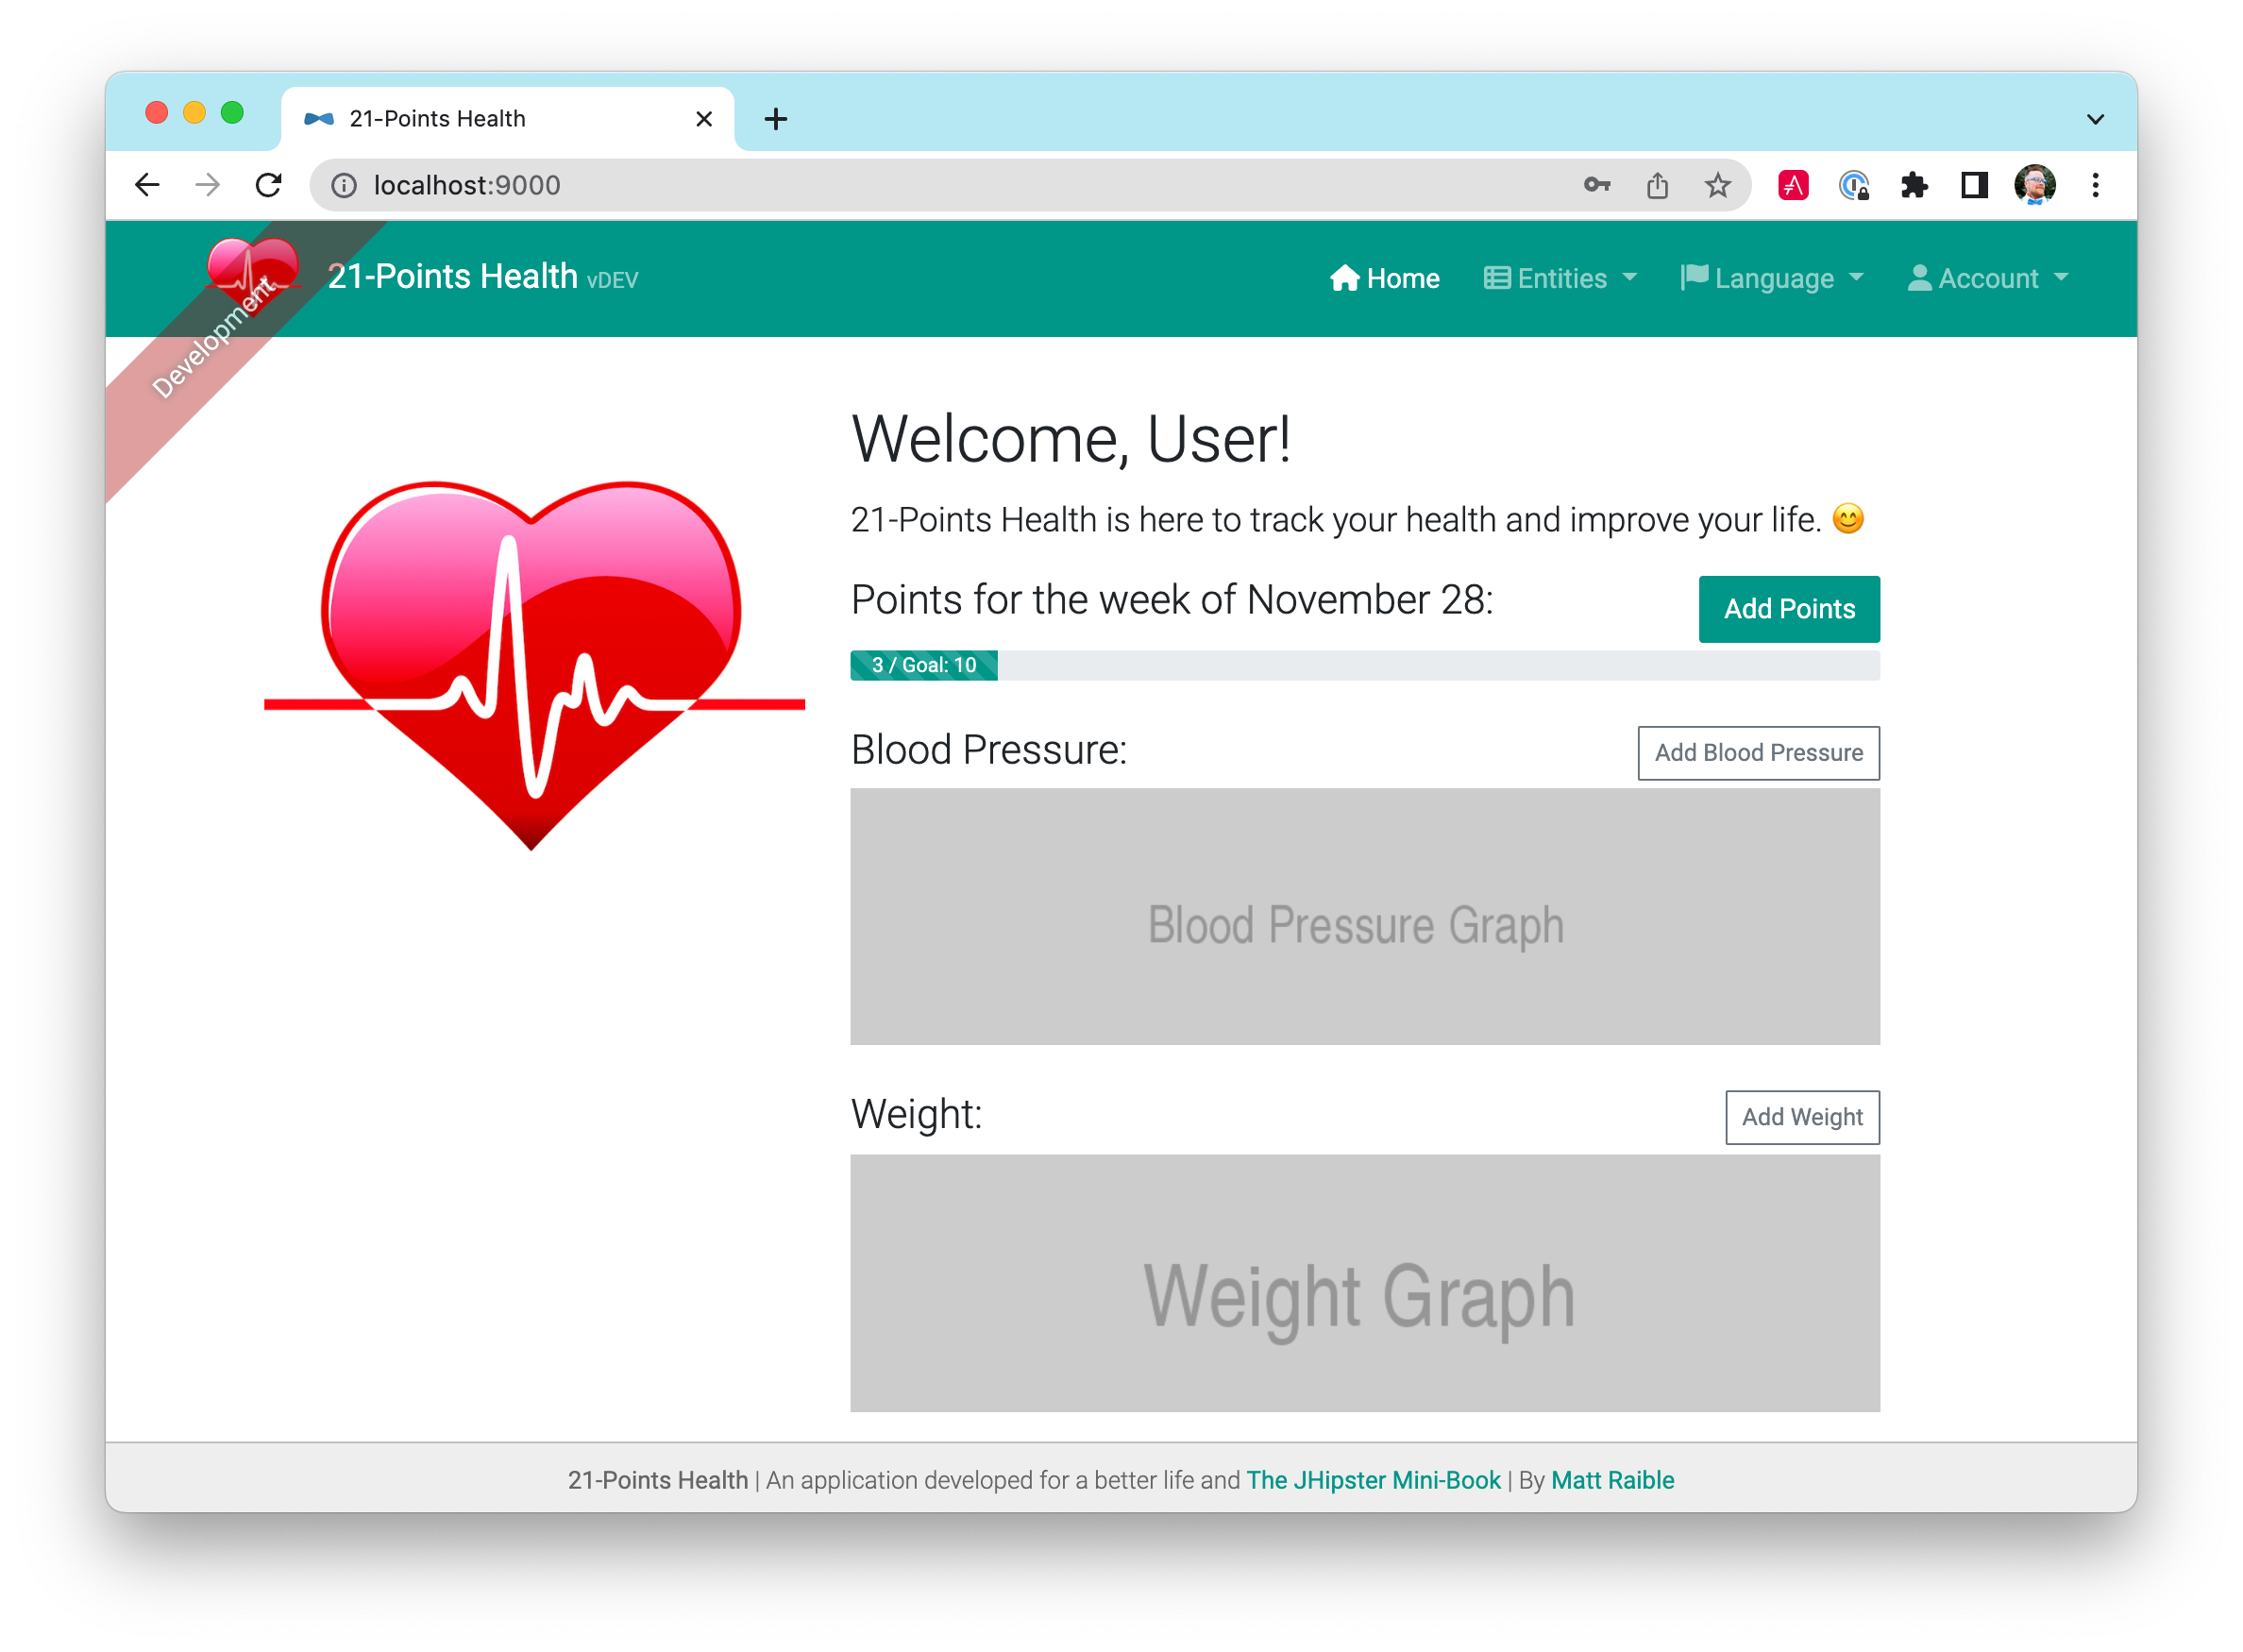
</div>Below is a screenshot of what this progress bar looked like after restarting the server and entering some data for the current user.
You might notice the goal is hardcoded to 10 in the progress bar’s HTML. To fix this, I needed to add the ability to fetch the user’s preferences. To make accessing a user’s preferences easier, I modified PreferencesRepository.java and added a method to retrieve a user’s preferences.
public interface PreferencesRepository extends JpaRepository<Preferences, Long> {
    ...

    Optional<Preferences> findOneByUserLogin(String login);
}
I created a new method in PreferencesResource.java to return the user’s preferences (or a default weekly goal of 10 points if no preferences are defined).
/**
 * {@code GET  /my-preferences} : get the current user's preferences
 *
 * @return the preferences or default (weeklyGoal: 10) if none exist.
 */
@GetMapping("/my-preferences")
public ResponseEntity<Preferences> getUserPreferences() {
    String username = SecurityUtils.getCurrentUserLogin().get();
    log.debug("REST request to get Preferences : {}", username);
    Optional<Preferences> preferences =
        preferencesRepository.findOneByUserLogin(username);

    if (preferences.isPresent()) {
        return new ResponseEntity<>(preferences.get(), HttpStatus.OK);
    } else {
        Preferences defaultPreferences = new Preferences();
        defaultPreferences.setWeeklyGoal(10); // default
        return new ResponseEntity<>(defaultPreferences, HttpStatus.OK);
    }
}
To facilitate calling this endpoint, I added a new user method to preferences.service.ts in the client.
user(): Observable<EntityResponseType> {
  return this.http.get<IPreferences>('api/my-preferences',
                                     { observe: 'response' });
}
In home.component.ts, I added the PreferencesService as a dependency and set the preferences in a local preferences variable, so the HTML template could read it. I also added logic to calculate the background color of the progress bar.
export class HomeComponent implements OnInit, OnDestroy {
  account: Account | null = null;
  pointsThisWeek: IPointsPerWeek = {points: 0};
  pointsPercentage?: number;
  preferences!: IPreferences;

  private readonly destroy$ = new Subject<void>();

  constructor(private accountService: AccountService, private router: Router,
              private pointsService: PointsService,
              private preferencesService: PreferencesService) {
  }

  ngOnInit(): void { ... }

  getUserData(): void {
    // Get preferences
    this.preferencesService.user().subscribe((preferences: any) => {
      this.preferences = preferences.body;

      // Get points for the current week
      this.pointsService.thisWeek().subscribe(response => {
          if (response.body) {
            this.pointsThisWeek = response.body;
            this.pointsPercentage =
              (this.pointsThisWeek.points / 21) * 100;

            // calculate success, warning, or danger
            if (this.pointsThisWeek.points >= preferences.weeklyGoal) {
              this.pointsThisWeek.progress = 'success';
            } else if (this.pointsThisWeek.points < 10) {
              this.pointsThisWeek.progress = 'danger';
            } else if (this.pointsThisWeek.points > 10 &&
              this.pointsThisWeek.points < preferences.weeklyGoal) {
              this.pointsThisWeek.progress = 'warning';
            }
          }
        }
      );
    });
  }

  ...
}
Now that a user’s preferences were available, I modified home.component.html to display the user’s weekly goal, as well as to color the progress bar appropriately with a [type] attribute.
<ngb-progressbar [max]="21" [value]="pointsThisWeek.points"
                 [hidden]="!pointsThisWeek.points" [striped]="true">
  <span *ngIf="pointsThisWeek.points" class="fw-bolder">
    {{ pointsThisWeek.points }} / Goal: {{ preferences.weeklyGoal }}
  </span>
</ngb-progressbar>
<ngb-alert [dismissible]="false" [hidden]="pointsThisWeek.points">
  <span jhiTranslate="home.points.getMoving">
    No points yet this week, better get moving!</span>
</ngb-alert>
To finish things off, I added a link to a component where users could edit their preferences.
<a [routerLink]="['/preferences' +
   (preferences && preferences.id ? '/' + preferences.id + '/edit' : '/new')]"
   class="float-end" jhiTranslate="home.link.preferences">Edit Preferences</a>
Blood pressure and weight for the last 30 days
To populate the two remaining charts on the homepage, I needed to fetch the user’s blood-pressure readings and weights for the last 30 days. I added a method to BloodPressureResourceIT.java to set up my expectations.
private void createBloodPressureByMonth(ZonedDateTime firstDate,
                                        ZonedDateTime firstDayOfLastMonth) {
    User user = userRepository.findOneByLogin("user").get();

    bloodPressure = new BloodPressure(firstDate, 120, 80, user);
    bloodPressureRepository.saveAndFlush(bloodPressure);
    bloodPressure = new BloodPressure(firstDate.plusDays(10), 125, 75, user);
    bloodPressureRepository.saveAndFlush(bloodPressure);
    bloodPressure = new BloodPressure(firstDate.plusDays(20), 100, 69, user);
    bloodPressureRepository.saveAndFlush(bloodPressure);

    // last month
    bloodPressure = new BloodPressure(firstDayOfLastMonth, 130, 90, user);
    bloodPressureRepository.saveAndFlush(bloodPressure);
    bloodPressure = new BloodPressure(firstDayOfLastMonth.plusDays(11), 135, 85, user);
    bloodPressureRepository.saveAndFlush(bloodPressure);
    bloodPressure = new BloodPressure(firstDayOfLastMonth.plusDays(23), 130, 75, user);
    bloodPressureRepository.saveAndFlush(bloodPressure);
}

@Test
@Transactional
public void getBloodPressureForLast30Days() throws Exception {
    ZonedDateTime now = ZonedDateTime.now();
    ZonedDateTime twentyNineDaysAgo = now.minusDays(29);
    ZonedDateTime firstDayOfLastMonth = now.withDayOfMonth(1).minusMonths(1);
    createBloodPressureByMonth(twentyNineDaysAgo, firstDayOfLastMonth);

    // Get all the blood pressure readings
    restBloodPressureMockMvc.perform(get("/api/blood-pressures"))
        .andExpect(status().isOk())
        .andExpect(content().contentTypeCompatibleWith(MediaType.APPLICATION_JSON))
        .andExpect(jsonPath("$", hasSize(6)));

    // Get the blood pressure readings for the last 30 days
    restBloodPressureMockMvc.perform(get("/api/bp-by-days/{days}", 30))
        .andDo(print())
        .andExpect(status().isOk())
        .andExpect(content().contentTypeCompatibleWith(MediaType.APPLICATION_JSON))
        .andExpect(jsonPath("$.period").value("Last 30 Days"))
        .andExpect(jsonPath("$.readings.[*].systolic").value(hasItem(120)))
        .andExpect(jsonPath("$.readings.[*].diastolic").value(hasItem(69)));
}
I created a BloodPressureByPeriod.java class to return the results from the API.
public class BloodPressureByPeriod {
    private String period;
    private List<BloodPressure> readings;

    public BloodPressureByPeriod(String period, List<BloodPressure> readings) {
        this.period = period;
        this.readings = readings;
    }

    // getters and setters and toString() generated by IntelliJ
}
Using similar logic that I used for points-this-week, I created a new method in BloodPressureRepository.java that allowed me to query between two different dates. I also added “OrderBy” logic so the records would be sorted by the date entered.
List<BloodPressure> findAllByTimestampBetweenOrderByTimestampDesc(
    ZonedDateTime firstDate, ZonedDateTime secondDate);
Next, I created a new method in BloodPressureResource.java that calculated the first and last days of the current month, executed the query for the current user, and constructed the data to return.
/**
 * {@code GET  /bp-by-days/:days} : get all the blood pressure readings by last x days.
 *
 * @param days the number of days.
 * @return the {@link ResponseEntity} with status {@code 200 (OK)}
 *         and with body the {@link BloodPressureByPeriod}.
 */
@RequestMapping(value = "/bp-by-days/{days}")
public ResponseEntity<BloodPressureByPeriod> getByDays(@PathVariable int days) {
    ZonedDateTime rightNow = ZonedDateTime.now(ZoneOffset.UTC);
    ZonedDateTime daysAgo = rightNow.minusDays(days);

    List<BloodPressure> readings =
        bloodPressureRepository.findAllByTimestampBetweenOrderByTimestampDesc(daysAgo, rightNow);
    BloodPressureByPeriod response =
        new BloodPressureByPeriod("Last " + days + " Days", filterByUser(readings));
    return new ResponseEntity<>(response, HttpStatus.OK);
}

private List<BloodPressure> filterByUser(List<BloodPressure> readings) {
    Stream<BloodPressure> userReadings = readings.stream()
        .filter(bp -> bp.getUser().getLogin().equals(SecurityUtils.getCurrentUserLogin().get()));
    return userReadings.collect(Collectors.toList());
}I added a new method to support this API in blood-pressure.service.ts.
last30Days(): Observable<HttpResponse<IBloodPressureByPeriod>> {
  return this.http.get<IBloodPressureByPeriod>('api/bp-by-days/30',
                                               { observe: 'response' });
}
This required adding a new IBloodPressureByPeriod interface in blood-pressure.model.ts and importing it in blood-pressure.service.ts:
export interface IBloodPressureByPeriod {
  period: string;
  readings: Array<IBloodPressure>;
}
While gathering this data seemed easy enough, the hard part was figuring out what charting library to use to display it.
Charts of the last 30 days
In the first three versions of this book, I looked for an Angular library that integrated with D3.js and found ng2-nvd3. However, this library is no longer maintained. I chose Chart.js and ng2-charts for Angular integration.
npm install -E ng2-charts@4.0.0Then I updated home.module.ts to import the NgChartsModule.
import { NgChartsModule } from 'ng2-charts';

@NgModule({
  imports: [..., NgChartsModule],
  declarations: [HomeComponent],
})
export class HomeModule {}
I modified home.component.ts to have the BloodPressureService as a dependency and went to work building the data so Chart.js could render it.
In home.component.ts, I grabbed the blood pressure readings from the API and morphed them into data that Chart.js could understand.
// Get blood pressure readings for the last 30 days
this.bloodPressureService.last30Days().subscribe((bpReadings: any) => {
  bpReadings = bpReadings.body;
  this.bpReadings = bpReadings;

  if (bpReadings.readings.length) {
    this.bpOptions = {
      plugins: {
        legend: { display: true },
        title: {
          display: true,
          text: bpReadings.period,
        },
      },
      scales: {
        y: {
          beginAtZero: false,
        },
        x: {
          beginAtZero: false,
        },
      },
    };
    const labels: any = [];
    const systolics: any = [];
    const diastolics: any = [];
    const upperValues: any = [];
    const lowerValues: any = [];
    bpReadings.readings.forEach((item: IBloodPressure) => {
      const timestamp = dayjs(item.timestamp).format('MMM DD');
      labels.push(timestamp);
      systolics.push({
        x: timestamp,
        y: item.systolic,
      });
      diastolics.push({
        x: timestamp,
        y: item.diastolic,
      });
      upperValues.push(item.systolic);
      lowerValues.push(item.diastolic);
    });
    const datasets = [
      {
        data: systolics,
        label: 'Systolic',
      },
      {
        data: diastolics,
        label: 'Diastolic',
      },
    ];
    this.bpData = {
      labels,
      datasets,
    };
    // set y scale to be 10 more than max and min
    this.bpOptions.scales = {
      y: {
        max: Math.max(...upperValues) + 10,
        min: Math.min(...lowerValues) - 10,
      },
    };
    // show both systolic and diastolic on hover
    this.bpOptions.interaction = {
      mode: 'index',
      intersect: false,
    };
  } else {
    this.bpReadings.readings = [];
  }
});
Finally, I used a <canvas> element with a “baseChart” attribute in home.component.html to read bpOptions and bpData, then display a chart.
<div class="row mt-1">
  <div class="col-md-11 col-xs-12">
    <canvas
      baseChart
      *ngIf="bpReadings && bpReadings.readings.length"
      height="125"
      [type]="'line'"
      [data]="bpData"
      [options]="bpOptions"
    >
    </canvas>
    <ngb-alert [dismissible]="false"
               [hidden]="bpReadings && bpReadings.readings.length">
      <span jhiTranslate="home.bloodPressure.noReadings">
        No blood pressure readings found.</span>
    </ngb-alert>
  </div>
</div>
After entering some test data, I was quite pleased with the results.
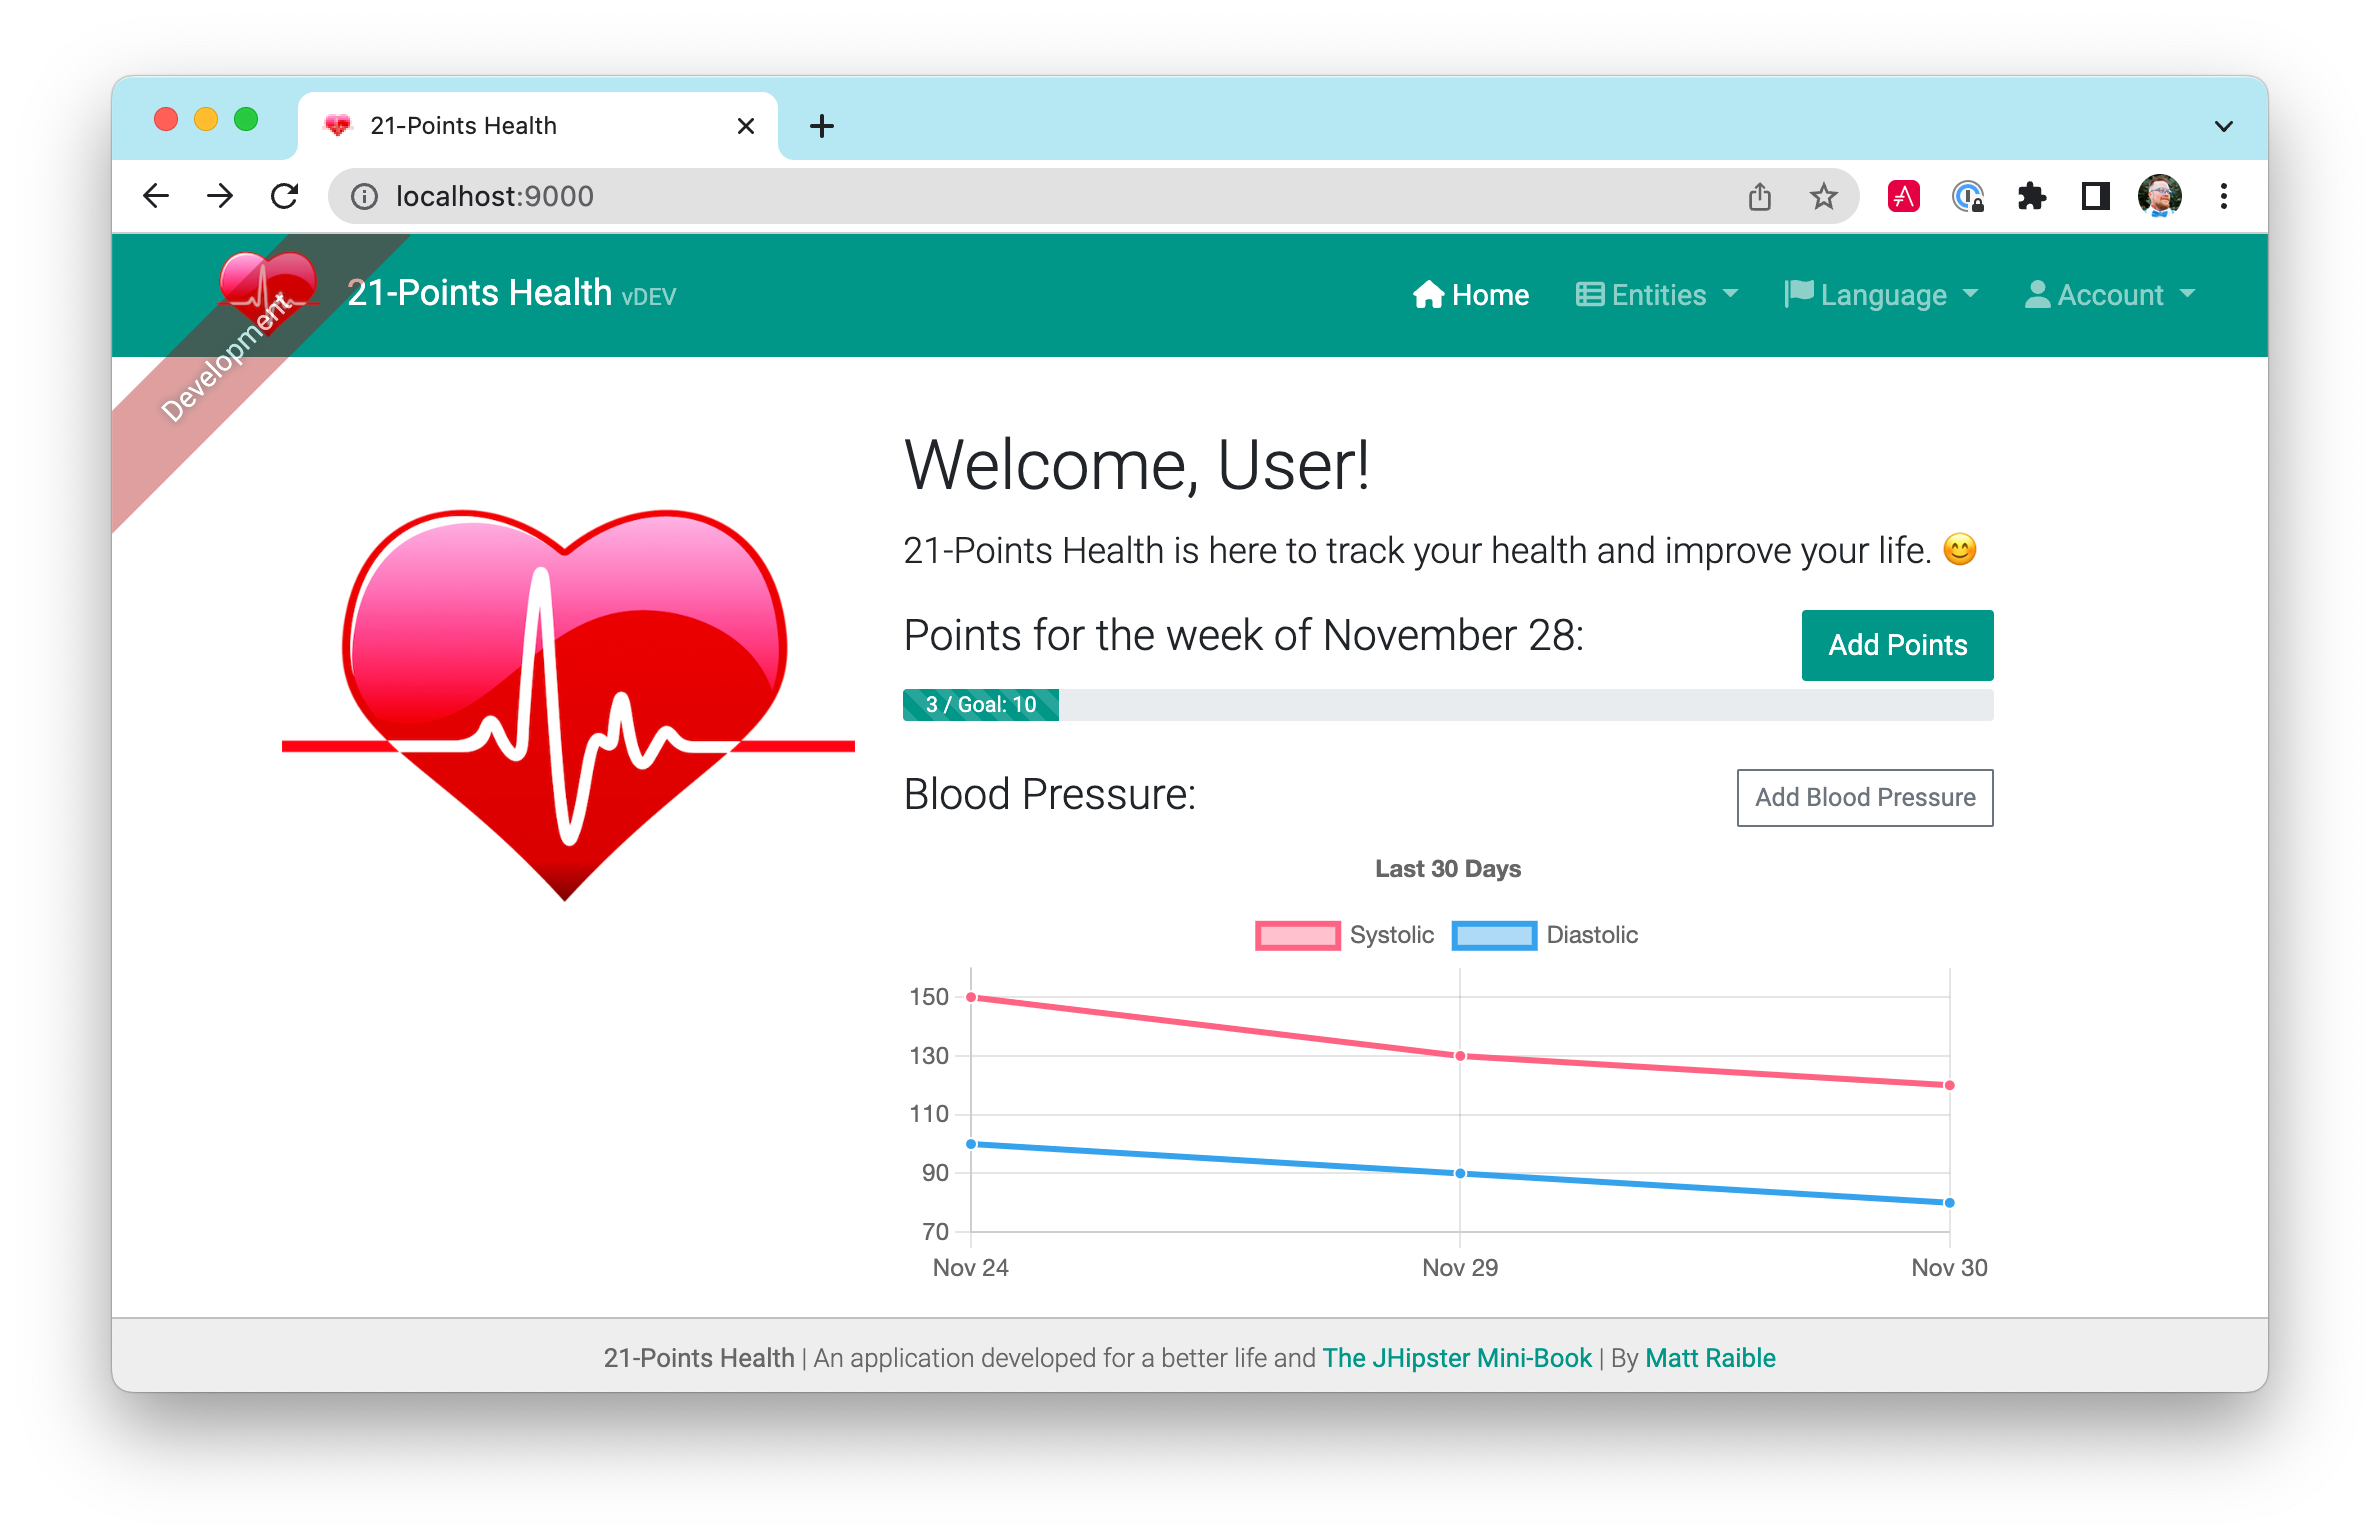
I made similar changes to display weights for the last 30 days as a chart.
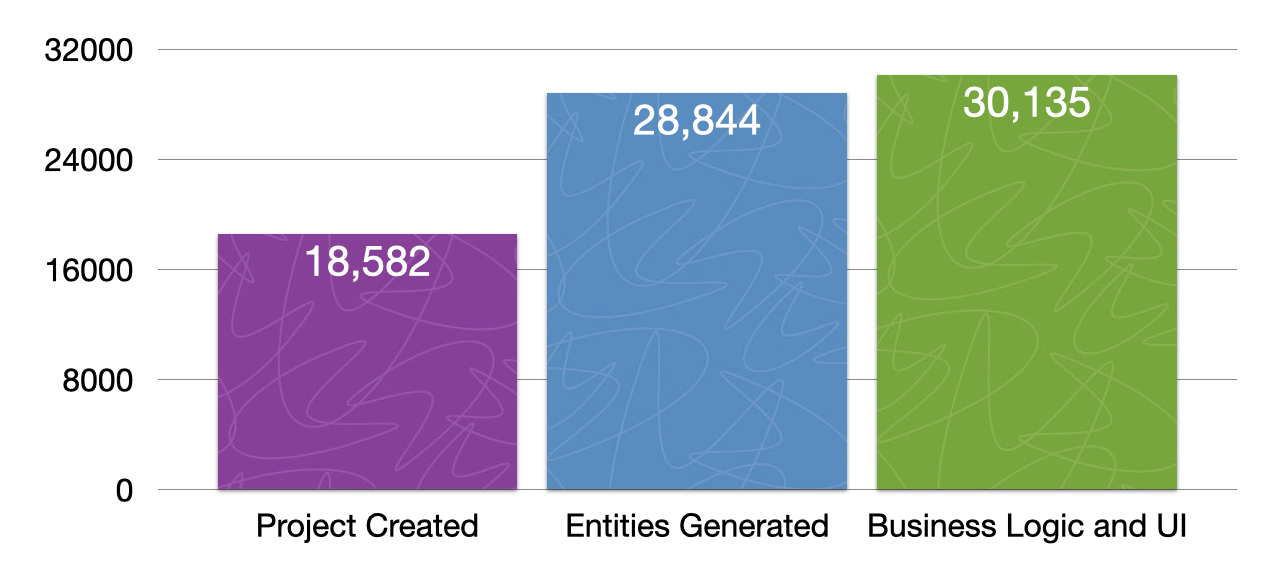
Lines of code
After finishing the MVP (minimum viable product) of 21-Points Health, I did some quick calculations to see how many lines of code JHipster produced. You can see from the graph below that I only had to write 1,291 lines of code. JHipster did the rest for me, generating 98.3% of the code in my project!
To drill down further, I made a graph of the top three languages in the project: TypeScript, Java, and HTML.
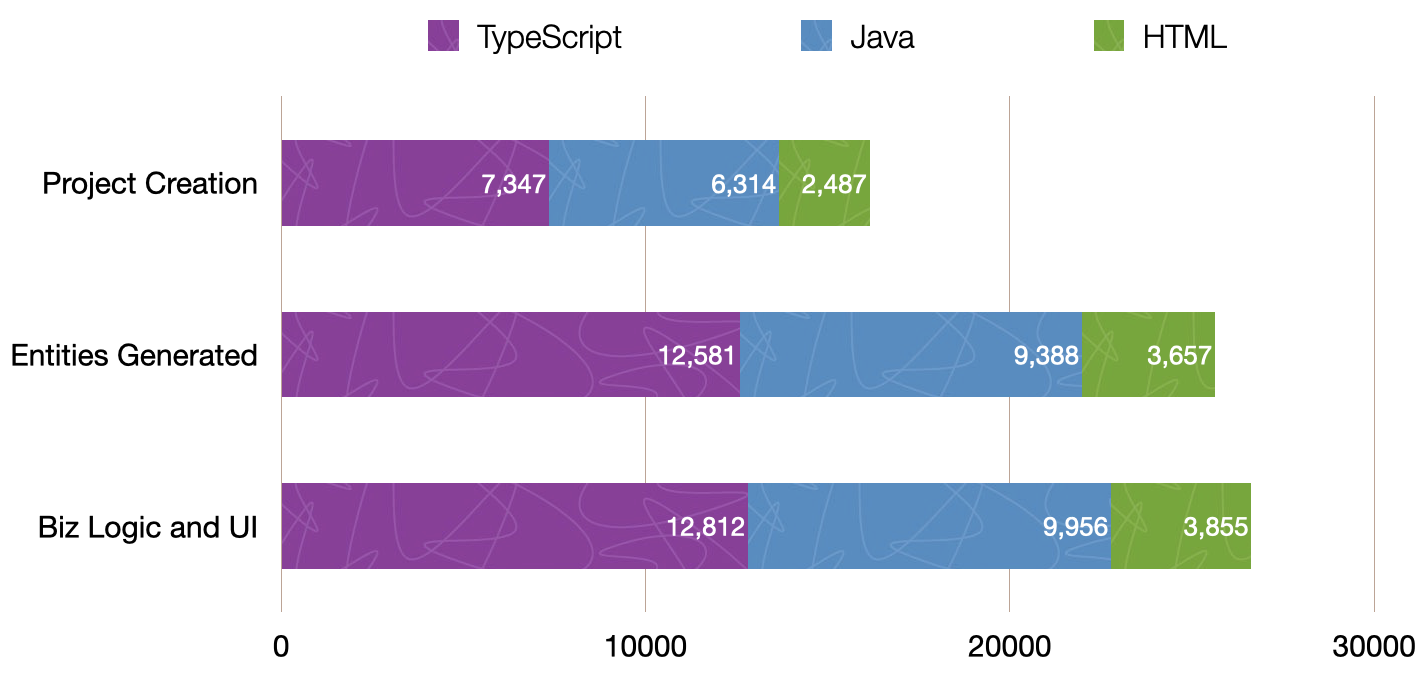
The amount of code I had to write in each language was 231 lines of TypeScript, 568 lines of Java, and 351 lines of HTML. The other 294 lines were a mix of various other files.
Wahoo! Thanks, JHipster!
Deploying to Heroku
JHipster ships with support for deploying to Google App Engine, Heroku, and Kubernetes, including Microsoft Azure, AWS, Google Cloud, and Digital Ocean. I used Heroku to deploy my application to the cloud because I’d worked with it before. When you prepare a JHipster application for production, it’s recommended to use the pre-configured “prod” profile. With Gradle, you can package your application by specifying this profile when building.
./gradle bootJar -PprodThe command looks similar when using Maven.
./mvnw package -PprodThe production profile is used to build an optimized JavaScript client. You can invoke this using webpack by running npm run webapp:build:prod. The production profile also configures gzip compression with a servlet filter, cache headers, and monitoring via Micrometer. If you have a Prometheus server configured in your application-prod.yml file, your application will automatically send metrics data to it.
To deploy 21-Points Health, I logged in to my Heroku account. I already had the Heroku CLI installed.
| I first deployed to Heroku after creating the application, meaning I had a default JHipster application with no entities. |
$ heroku login
heroku: Press any key to open the browser to login or q to exit:
Opening browser to https://cli-auth.heroku.com/auth/cli/browser/57c43ff8...
Logging in... done
Logged in as matt@raibledesigns.com
I ran jhipster heroku as recommended in the Deploying to Heroku documentation. When prompted, I tried using the name “21points” for my application.
$ jhipster heroku
...
Heroku configuration is starting
? Name to deploy as: 21points
? On which region do you want to deploy ? us
? Which type of deployment do you want ? Git (compile on Heroku)
? Which Java version would you like to use to build and run your app ? 11

Using existing Git repository

Installing Heroku CLI deployment plugin

Creating Heroku application and setting up node environment
✖ Error: Command failed: heroku create 21-points
Creating 21-points... !
 ▸    Name must start with a letter, end with a letter or digit and can only
 ▸    contain lowercase letters, digits, and dashes.
You can see my first attempt failed for the same reason that creating the initial JHipster app failed: it didn’t like the app name to start with a number. I tried again with “health”, but that failed, too, since a Heroku app with this name already existed. Finally, I settled on “health-by-points” as the application name.
I ran git checkout .yo-rc.json to revert the changes the Heroku sub-generator made, then tried again. I typed “a” when prompted to overwrite build.gradle.
$ jhipster heroku
...
Heroku configuration is starting
? Name to deploy as: health-by-points
? On which region do you want to deploy ? us
? Which type of deployment do you want ? Git (compile on Heroku)
? Which Java version would you like to use to build and run your app ? 11
Using existing Git repository
Heroku CLI deployment plugin already installed
Creating Heroku application and setting up node environment
https://health-by-points.herokuapp.com/ | https://git.heroku.com/health-by-points.git
Provisioning addons
Provisioning bonsai elasticsearch addon
Provisioning database addon heroku-postgresql --as DATABASE
No suitable cache addon for cacheprovider ehcache available.
Creating Heroku deployment files
force .yo-rc-global.json
force .yo-rc.json
create Procfile
create system.properties
create gradle/heroku.gradle
conflict build.gradle
? Overwrite build.gradle? (ynarxdeiH) a
? Overwrite build.gradle? overwrite this and all others
force build.gradle
create src/main/resources/config/bootstrap-heroku.yml
create src/main/resources/config/application-heroku.yml
Skipping build
Updating Git repository
git add .
git commit -m "Deploy to Heroku" --allow-empty
...
Configuring Heroku
Deploying application
remote: Compressing source files... done.
remote: Building source:
...
remote: BUILD SUCCESSFUL in 3m 29s
remote: 12 actionable tasks: 12 executed
remote: -----> Discovering process types
remote: Procfile declares types -> web
remote:
remote: -----> Compressing...
remote: Done: 197.8M
remote: -----> Launching...
remote: Released v7
remote: https://health-by-points.herokuapp.com/ deployed to Heroku
...
remote: Verifying deploy... done.
To https://git.heroku.com/health-by-points.git
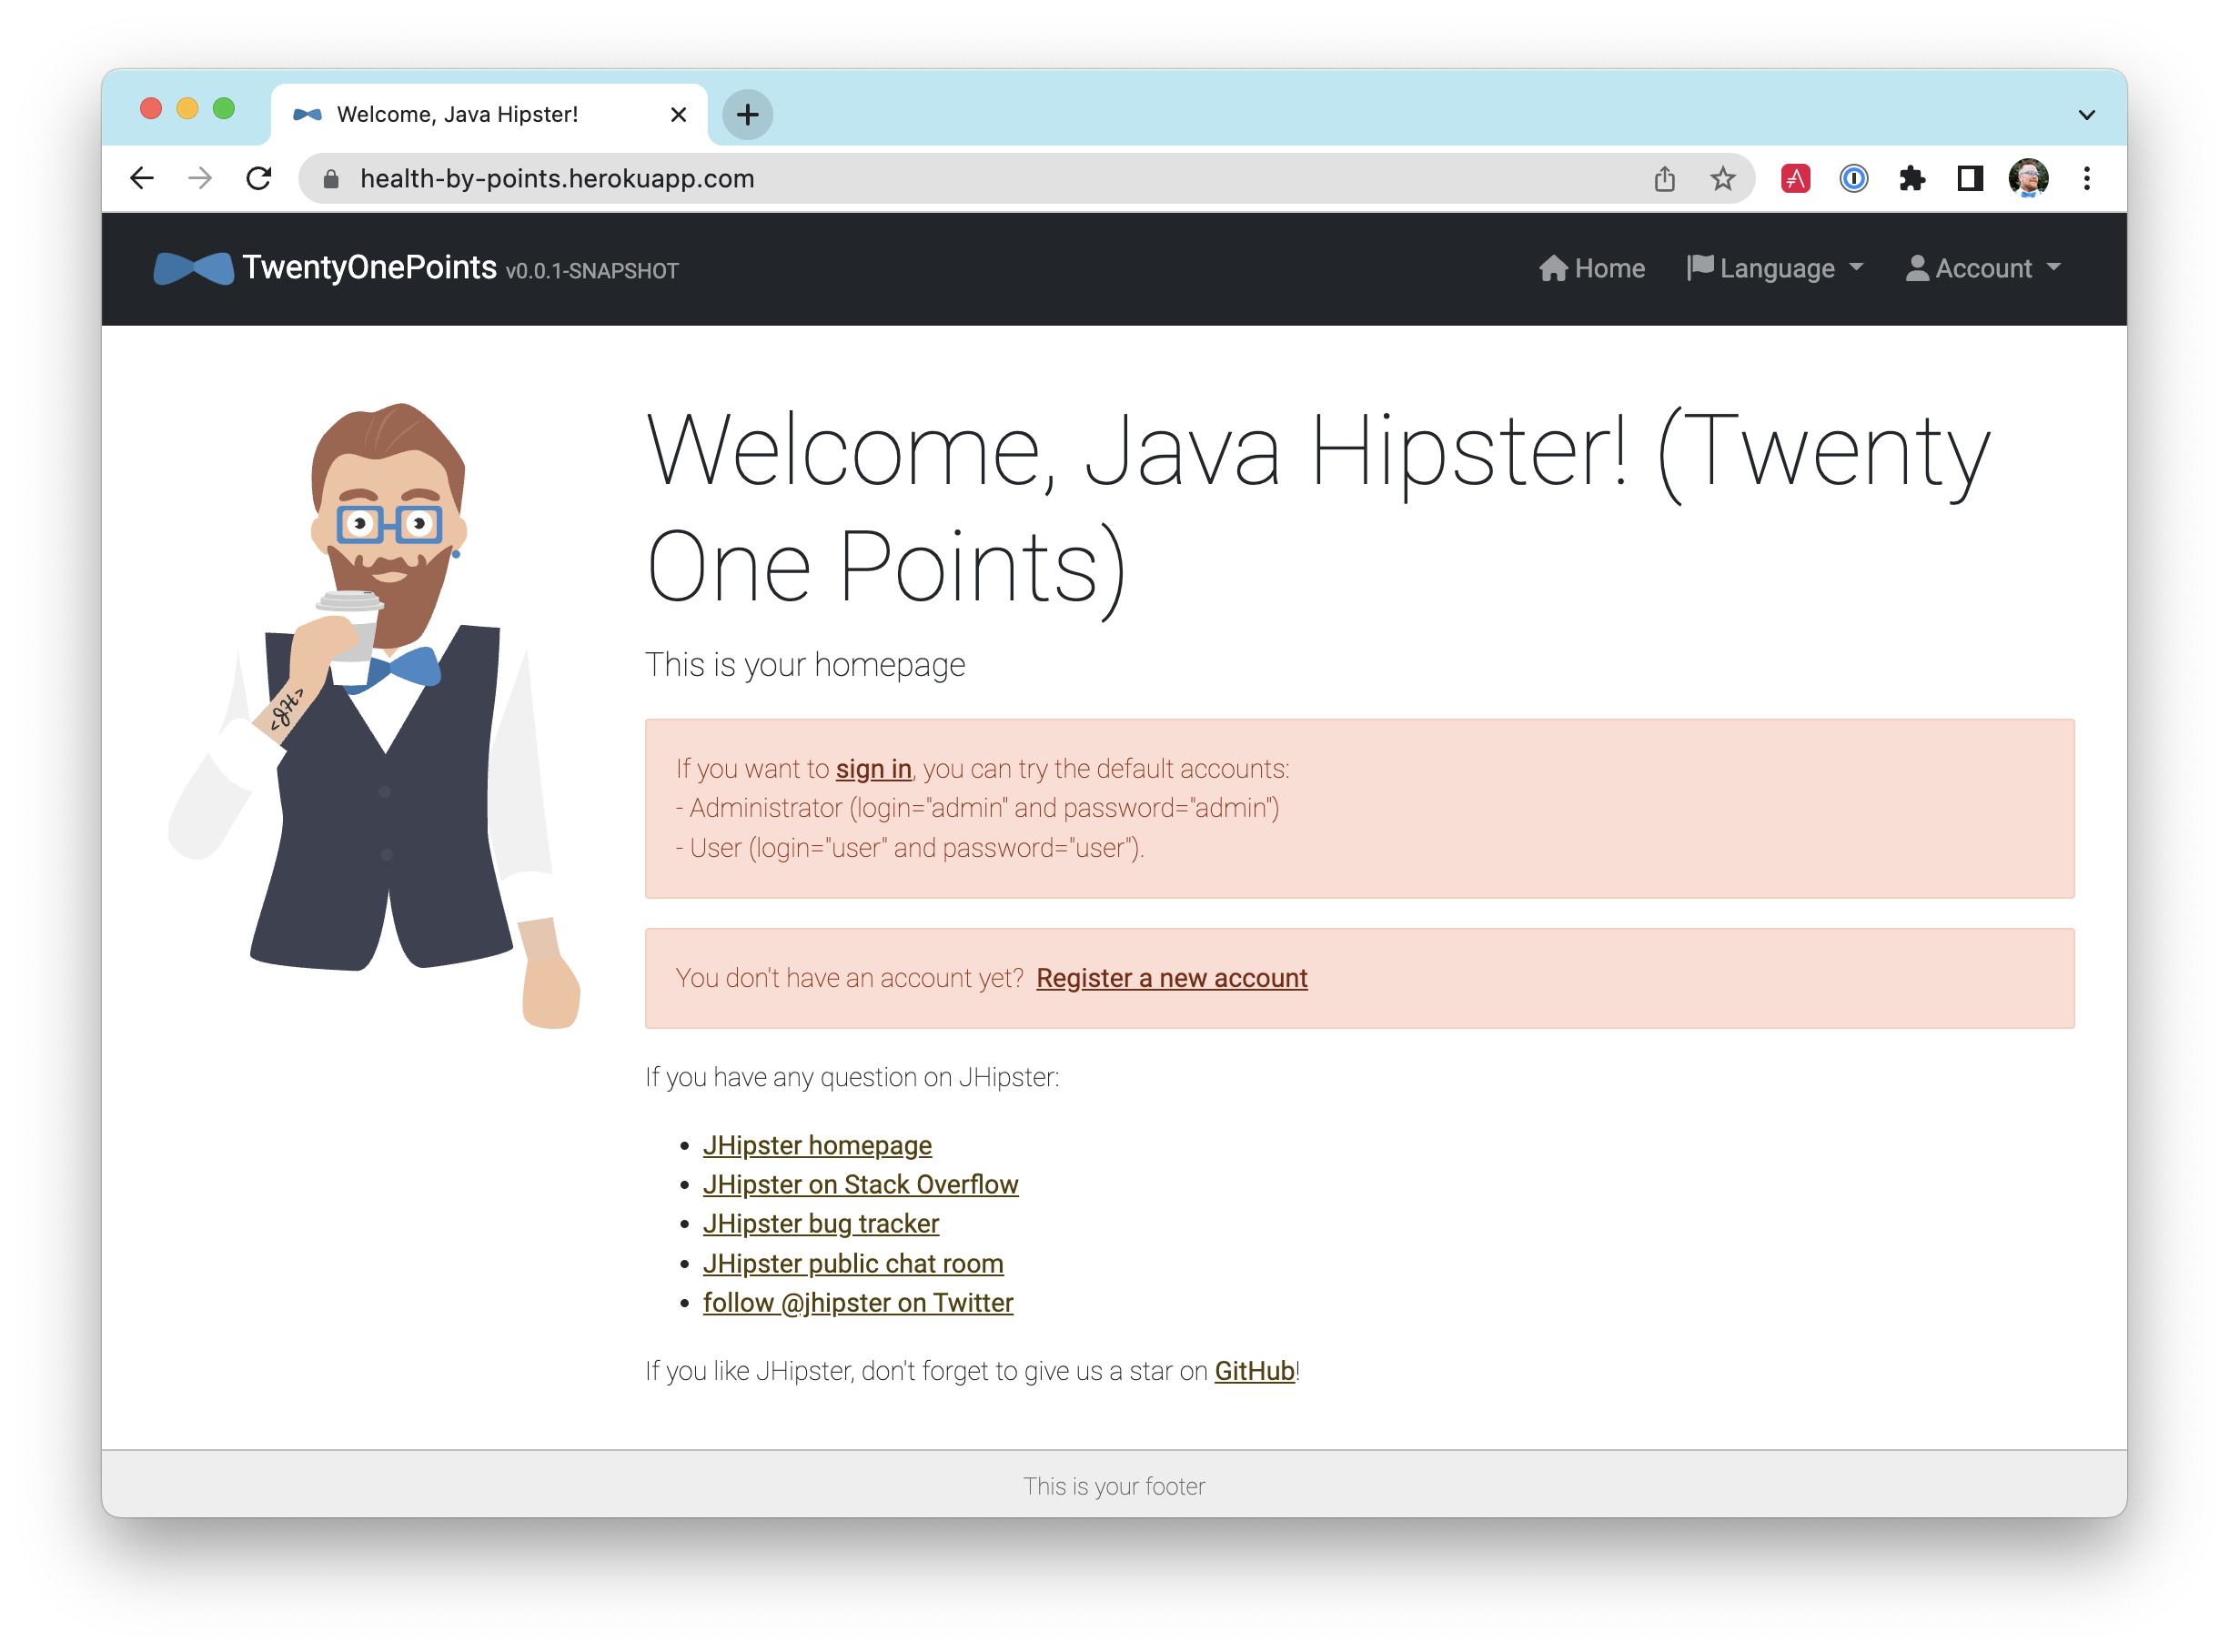
* [new branch] HEAD -> mainI was pumped to see that this process worked and that my application was available at http://health-by-points.herokuapp.com. I quickly changed the default passwords for admin and user to make things more secure.
Next, I bought the 21-points.com domain from Google Domains. To configure this domain for Heroku, I ran heroku domains:add.
$ heroku domains:add www.21-points.com
Adding www.21-points.com to health-by-points... done
!    Configure your app's DNS provider to point to the DNS Target www.21-points.com
!    For help, see https://devcenter.heroku.com/articles/custom-domains
I read the documentation, then went to work configuring DNS settings on Google Domains. I configured a subdomain forward of:
21-points.com → http://www.21-points.com
I also configured a custom resource record with a CNAME to point to health-by-points.herokuapp.com.
| Name | Type | TTL | Data |
|---|---|---|---|
* |
CNAME |
1h |
health-by-points.herokuapp.com |
This was all I needed to get my JHipster application running on Heroku. For subsequent deployments, I ran jhipster heroku again or used git push heroku main.
Elasticsearch on Heroku
To prove everything was working on Heroku, I tried registering a new user. I received an error that appeared to come from Elasticsearch.
2022-11-08T05:17:22.489474+00:00 app[web.1]: 2022-11-08T05:17:22.488Z ERROR 4
o.z.problem.spring.common.AdviceTraits : Internal Server Error
2022-11-08T05:17:22.489494+00:00 app[web.1]: org.springframework.web.util.NestedServletException:
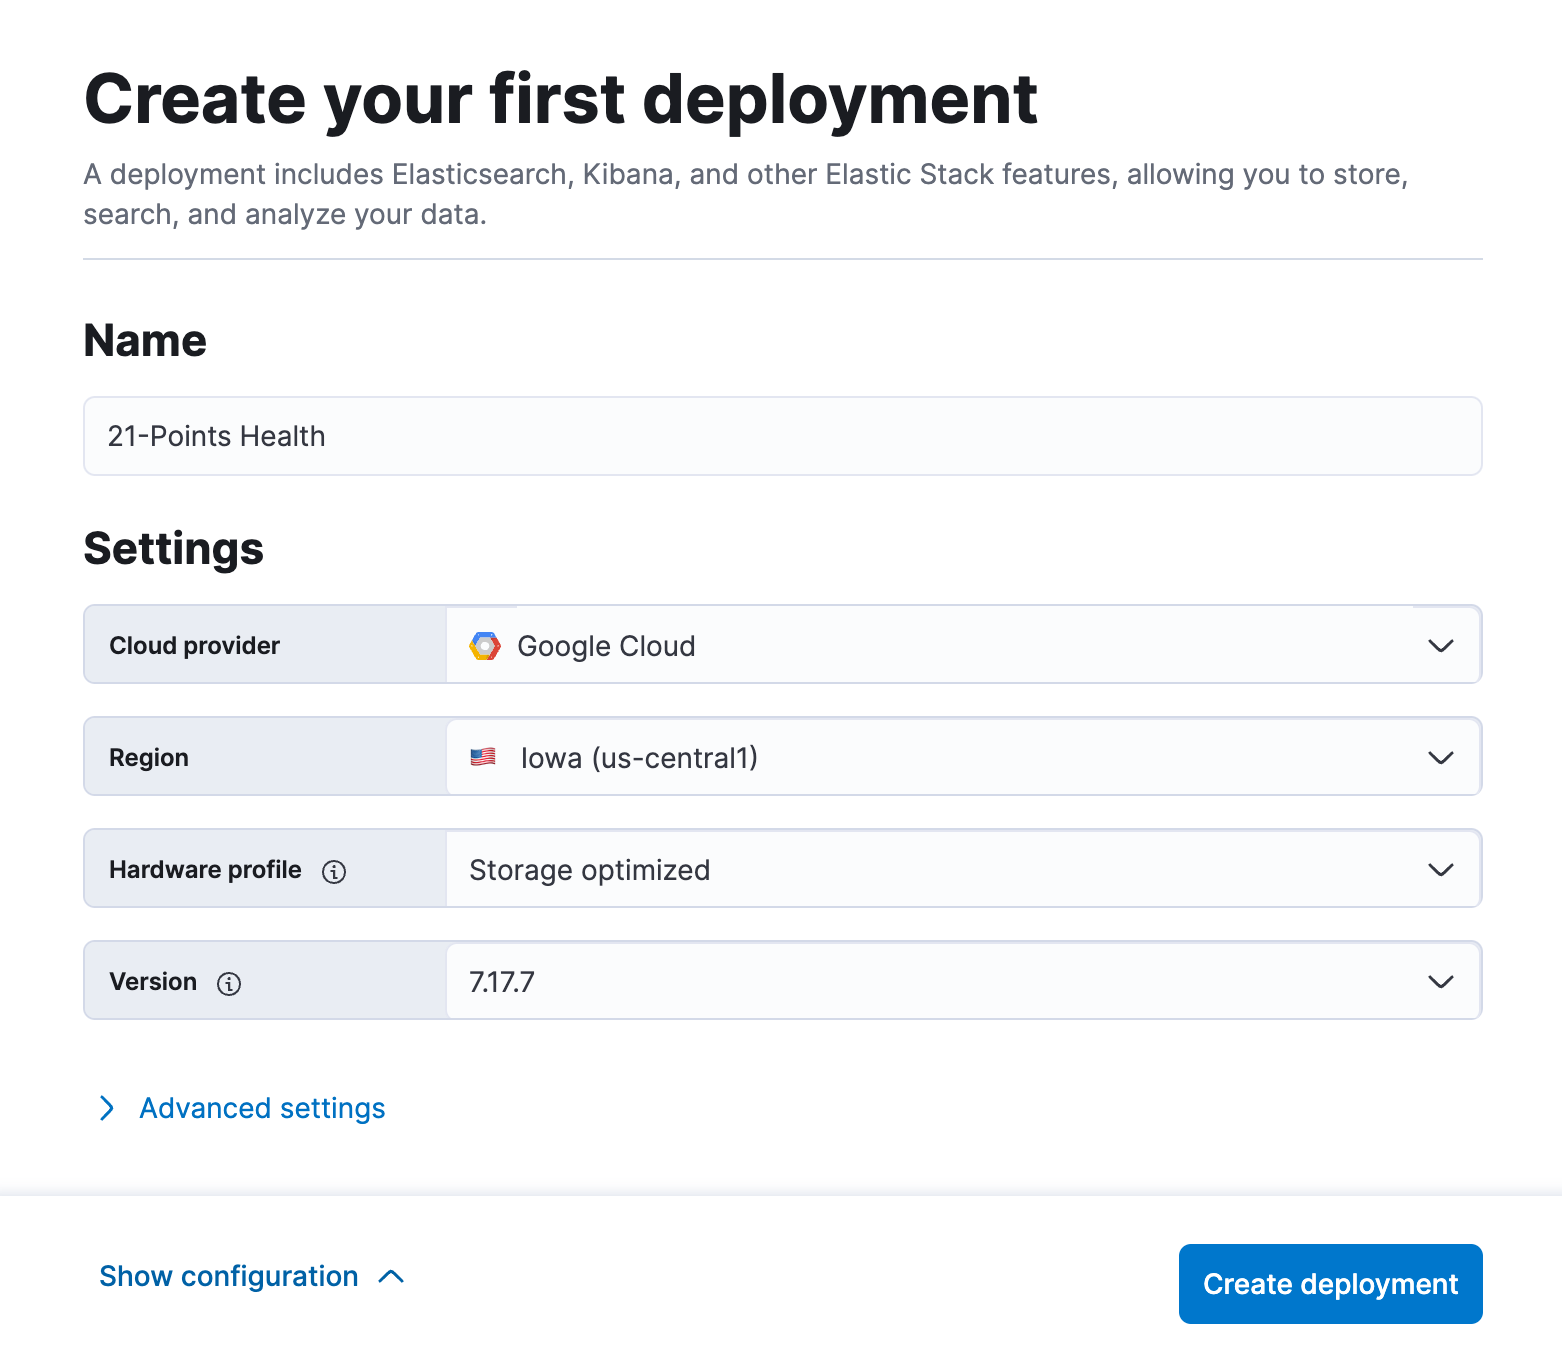
Handler dispatch failed; nested exception is java.lang.NoSuchFieldError: INDEX_CONTENT_TYPEI created an issue in the JHipster project saying that Elasticsearch doesn’t work out of the box with Heroku. I contacted the Elastic team to determine the best solution. They recommended starting a free trial on Elastic Cloud. After logging in, I created a deployment called 21-Points Health. I used the default settings, selected 7.17.7 as the version, and pressed Create deployment.
| I tried the latest version, but it resulted in an "Unable to parse response body" error. |
I downloaded my credentials from the following screen and clicked Continue. Next, I selected Manage this deployment from the menu and copied the Elasticsearch endpoint.
I set the credentials and endpoint URL as a new ELASTIC_URL environment variable on Heroku.
heroku config:set ELASTIC_URL=https://elastic:<password>@<endpoint>To fix my JHipster app so it recognized this variable, I modified heroku.gradle to remove the entire block below for Bansai (that no longer works):
// force dependency version as used bonsai add-on as of now only supports 7.10.x
// https://github.com/jhipster/generator-jhipster/issues/18650
def bonsaiElasticSearchVersion = "7.10.2"
if (System.getenv("DYNO") != null) {
    configurations {
        all { ... }
    }
}
And I updated application-heroku.yml to use ELASTIC_URL.
spring:
  ...
  elasticsearch:
    uris: ${ELASTIC_URL}
I committed these changes and ran git push heroku main to redeploy the application.
Mail on Heroku
This time, when I tried to register, I received an error when my MailService tried to send me an activation e-mail.
2022-11-27T22:05:47.068322+00:00 app[web.1]: 2022-11-27T22:05:47.067Z  WARN 4 --- [e-points-task-2]
  org.jhipster.health.service.MailService  : Email could not be sent to user 'mraible@gmail.com'
2022-11-27T22:05:47.068339+00:00 app[web.1]:
2022-11-27T22:05:47.068341+00:00 app[web.1]: org.springframework.mail.MailSendException:
  Mail server connection failed; nested exception is com.sun.mail.util.MailConnectException:
  Couldn't connect to host, port: localhost, 25; timeout -1;
2022-11-27T22:05:47.068342+00:00 app[web.1]: nested exception is:
2022-11-27T22:05:47.068343+00:00 app[web.1]: java.net.ConnectException: Connection refused
  (Connection refused). Failed messages: com.sun.mail.util.MailConnectException:
  Couldn't connect to host, port: localhost, 25; timeout -1;
I’d used Heroku’s SendGrid for e-mail in the past, so I added it to my project.
$ heroku addons:create sendgrid
Creating sendgrid on ⬢ health-by-points... free
Created sendgrid-spherical-88389 as SENDGRID_PASSWORD, SENDGRID_USERNAME
Use heroku addons:docs sendgrid to view documentation
Then I updated application-prod.yml to use SENDGRID_API_USER and SENDGRID_API_KEY environment variables for mail, as well as to turn on authentication.
spring:
  ...
  mail:
    host: smtp.sendgrid.net
    port: 587
    username: ${SENDGRID_API_USER}
    password: ${SENDGRID_API_KEY}
    protocol: smtp
    properties:
      tls: false
      auth: true
I also changed the jhipster.mail.* properties further down in this file.
jhipster:
  ...
  mail:
    base-url: http://www.21-points.com
    from: app@21-points.com
The SENDGRID_USERNAME and SENDGRID_PASSWORD variables will not work to send email. You need to create an API Key instead. You can do this by navigating to your app in Heroku’s dashboard. Then, select Resources > Twilio SendGrid and then the Setup Guide at the bottom. Create a sender identity that matches the from value above. Then, create an API key using the SMTP Relay integration.
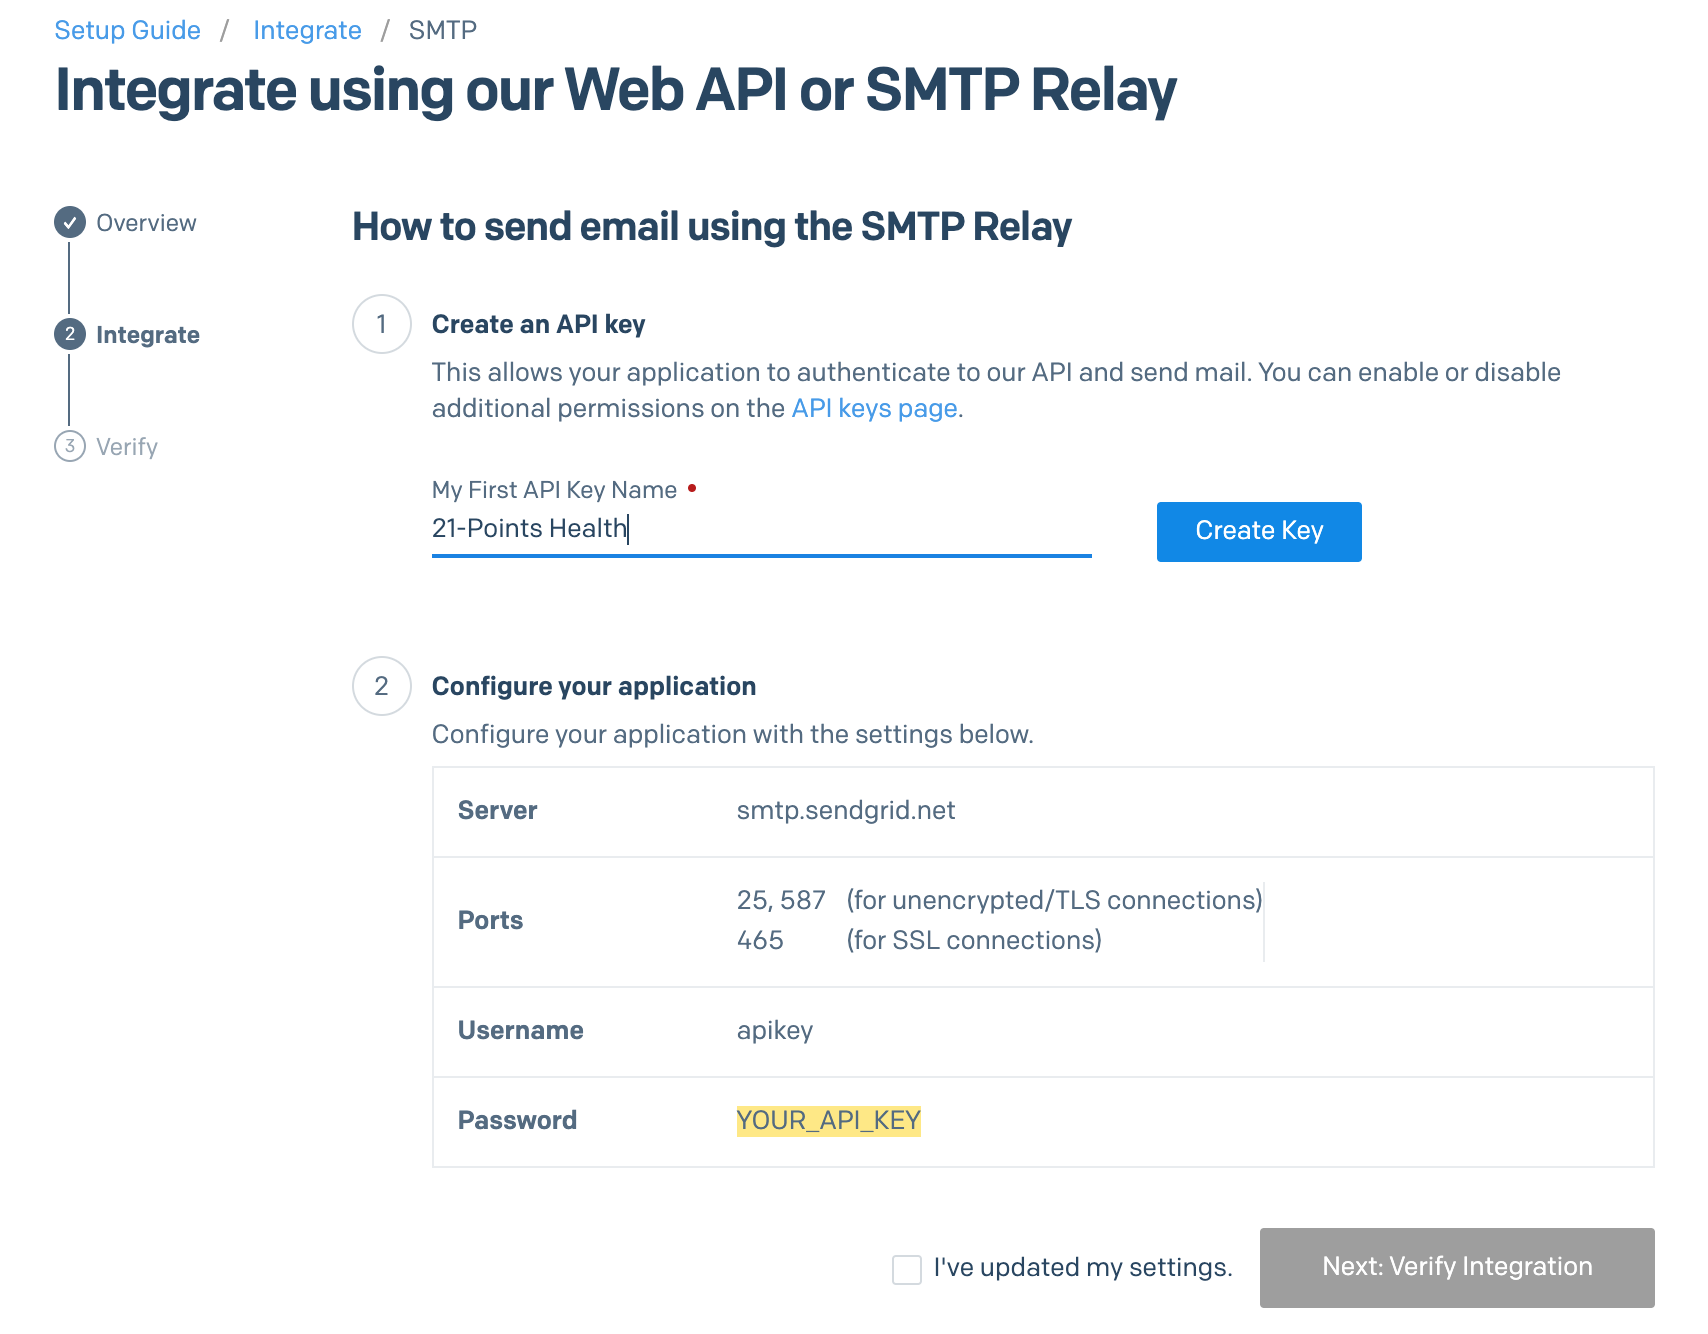
Once you have an API key, set the user and password for SendGrid on Heroku:
heroku config:set SENDGRID_API_USER=apikey SENDGRID_API_KEY=SG...After redeploying, I logged in to my Heroku app with administrator credentials. I deleted the user I’d tried to add previously. I added the user again and smiled when I received the activation email.
Monitoring and analytics
JHipster generates the code necessary for Google Analytics in every application’s index.html file. I chose not to enable this just yet, but I hope to eventually. I already have a Google Analytics account, so it’s just a matter of creating a new account for www.21-points.com, copying the account number, and modifying the following section of index.html:
<!-- Google Analytics: uncomment and change UA-XXXXX-X to be your site's ID.
<script>
  (function(b,o,i,l,e,r){b.GoogleAnalyticsObject=l;b[l]||(b[l]=
  function(){(b[l].q=b[l].q||[]).push(arguments)});b[l].l=+new Date;
  e=o.createElement(i);r=o.getElementsByTagName(i)[0];
  e.src='//www.google-analytics.com/analytics.js';
  r.parentNode.insertBefore(e,r)}(window,document,'script','ga'));
  ga('create','UA-XXXXX-X');ga('send','pageview');
</script>-->
I’ve used New Relic to monitor my production applications in the past. There is a free New Relic add-on for Heroku. Heroku’s New Relic APM describes how to set things up if you’re letting Heroku do the build for you (meaning, you deploy with git push). However, it’s a bit different if you’re using the heroku-deploy plugin.
For that, you’ll first need to download the New Relic agent manually and a newrelic.yml license file and put them in the root directory of your project. Then you can run commands like:
./gradlew bootJar -Pheroku,prod
heroku buildpacks:clear
heroku jar:deploy build/libs/*.jar --includes newrelic-agent.jar:newrelic.yml
That will include the JAR in the slug. Then you’ll need to modify your Procfile to include the javaagent argument:
web: java -javaagent:newrelic-agent.jar $JAVA_OPTS -Xmx256m -jar build/libs/*.jar ...
If you want to deploy using git push heroku main after using the heroku-deploy plugin, you’ll have to run heroku buildpacks:clear.
|
To ensure newrelic-agent.jar is included when running git push, you’ll need to modify your .gitignore to allow it and add it to Git with git add newrelic.jar.
*.jar
!newrelic-agent.jar
Securing user data
After running the 5.0 version of 21-Points Health on Heroku for a couple of weeks, someone reported an issue with security on GitHub. They pointed out that you could see another user’s data if you searched. I also discovered you could edit data based on the URL too.
To fix this data leakage, I enhanced the Java code to allow only users that own an entity to edit it. Here’s some pseudocode to show the logic:
Optional<Points> points = pointsRepository.findById(id);
if ((user not admin) && (points.user not current user)) {
    return new ResponseEntity<>("error.http.403", HttpStatus.FORBIDDEN);
}
return ResponseUtil.wrapOrNotFound(points);
See 21-points#106 for all the changes that I needed to make in resource classes, search repositories, and their tests.
Continuous integration and deployment
After generating entities for this project, I wanted to configure a continuous-integration (CI) server to build/test/deploy whenever I checked in changes to Git. I chose Jenkins for my CI server and used the simplest configuration possible: I downloaded jenkins.war to /opt/tools/jenkins on my MacBook Pro. I started it with the following command.
java -jar jenkins.war --httpPort=9000JHipster has good documentation on
setting up CI on Jenkins 2
and
deploying to Heroku.
It also has a handy sub-generator to generate the config files needed for Jenkins. I ran jhipster ci-cd and watched the magic happen.
$ jhipster ci-cd
...
🚀 Welcome to the JHipster CI/CD Sub-Generator 🚀
? What CI/CD pipeline do you want to generate? Jenkins pipeline
? Would you like to perform the build in a Docker container ? No
? Would you like to send build status to GitLab ? No
? What tasks/integrations do you want to include ? Deploy to *Heroku*
? *Heroku*: name of your Heroku Application ? health-by-points
   create Jenkinsfile
   create src/main/resources/idea.gdsl
    force .yo-rc-global.json
    force .yo-rc.json
   create src/main/docker/jenkins.yml
After I generated these files, I checked them in and pushed them to GitHub.
To log in to Jenkins, I navigated to http://localhost:9000. I copied the password from the startup log file and pasted it into the unlock Jenkins page.

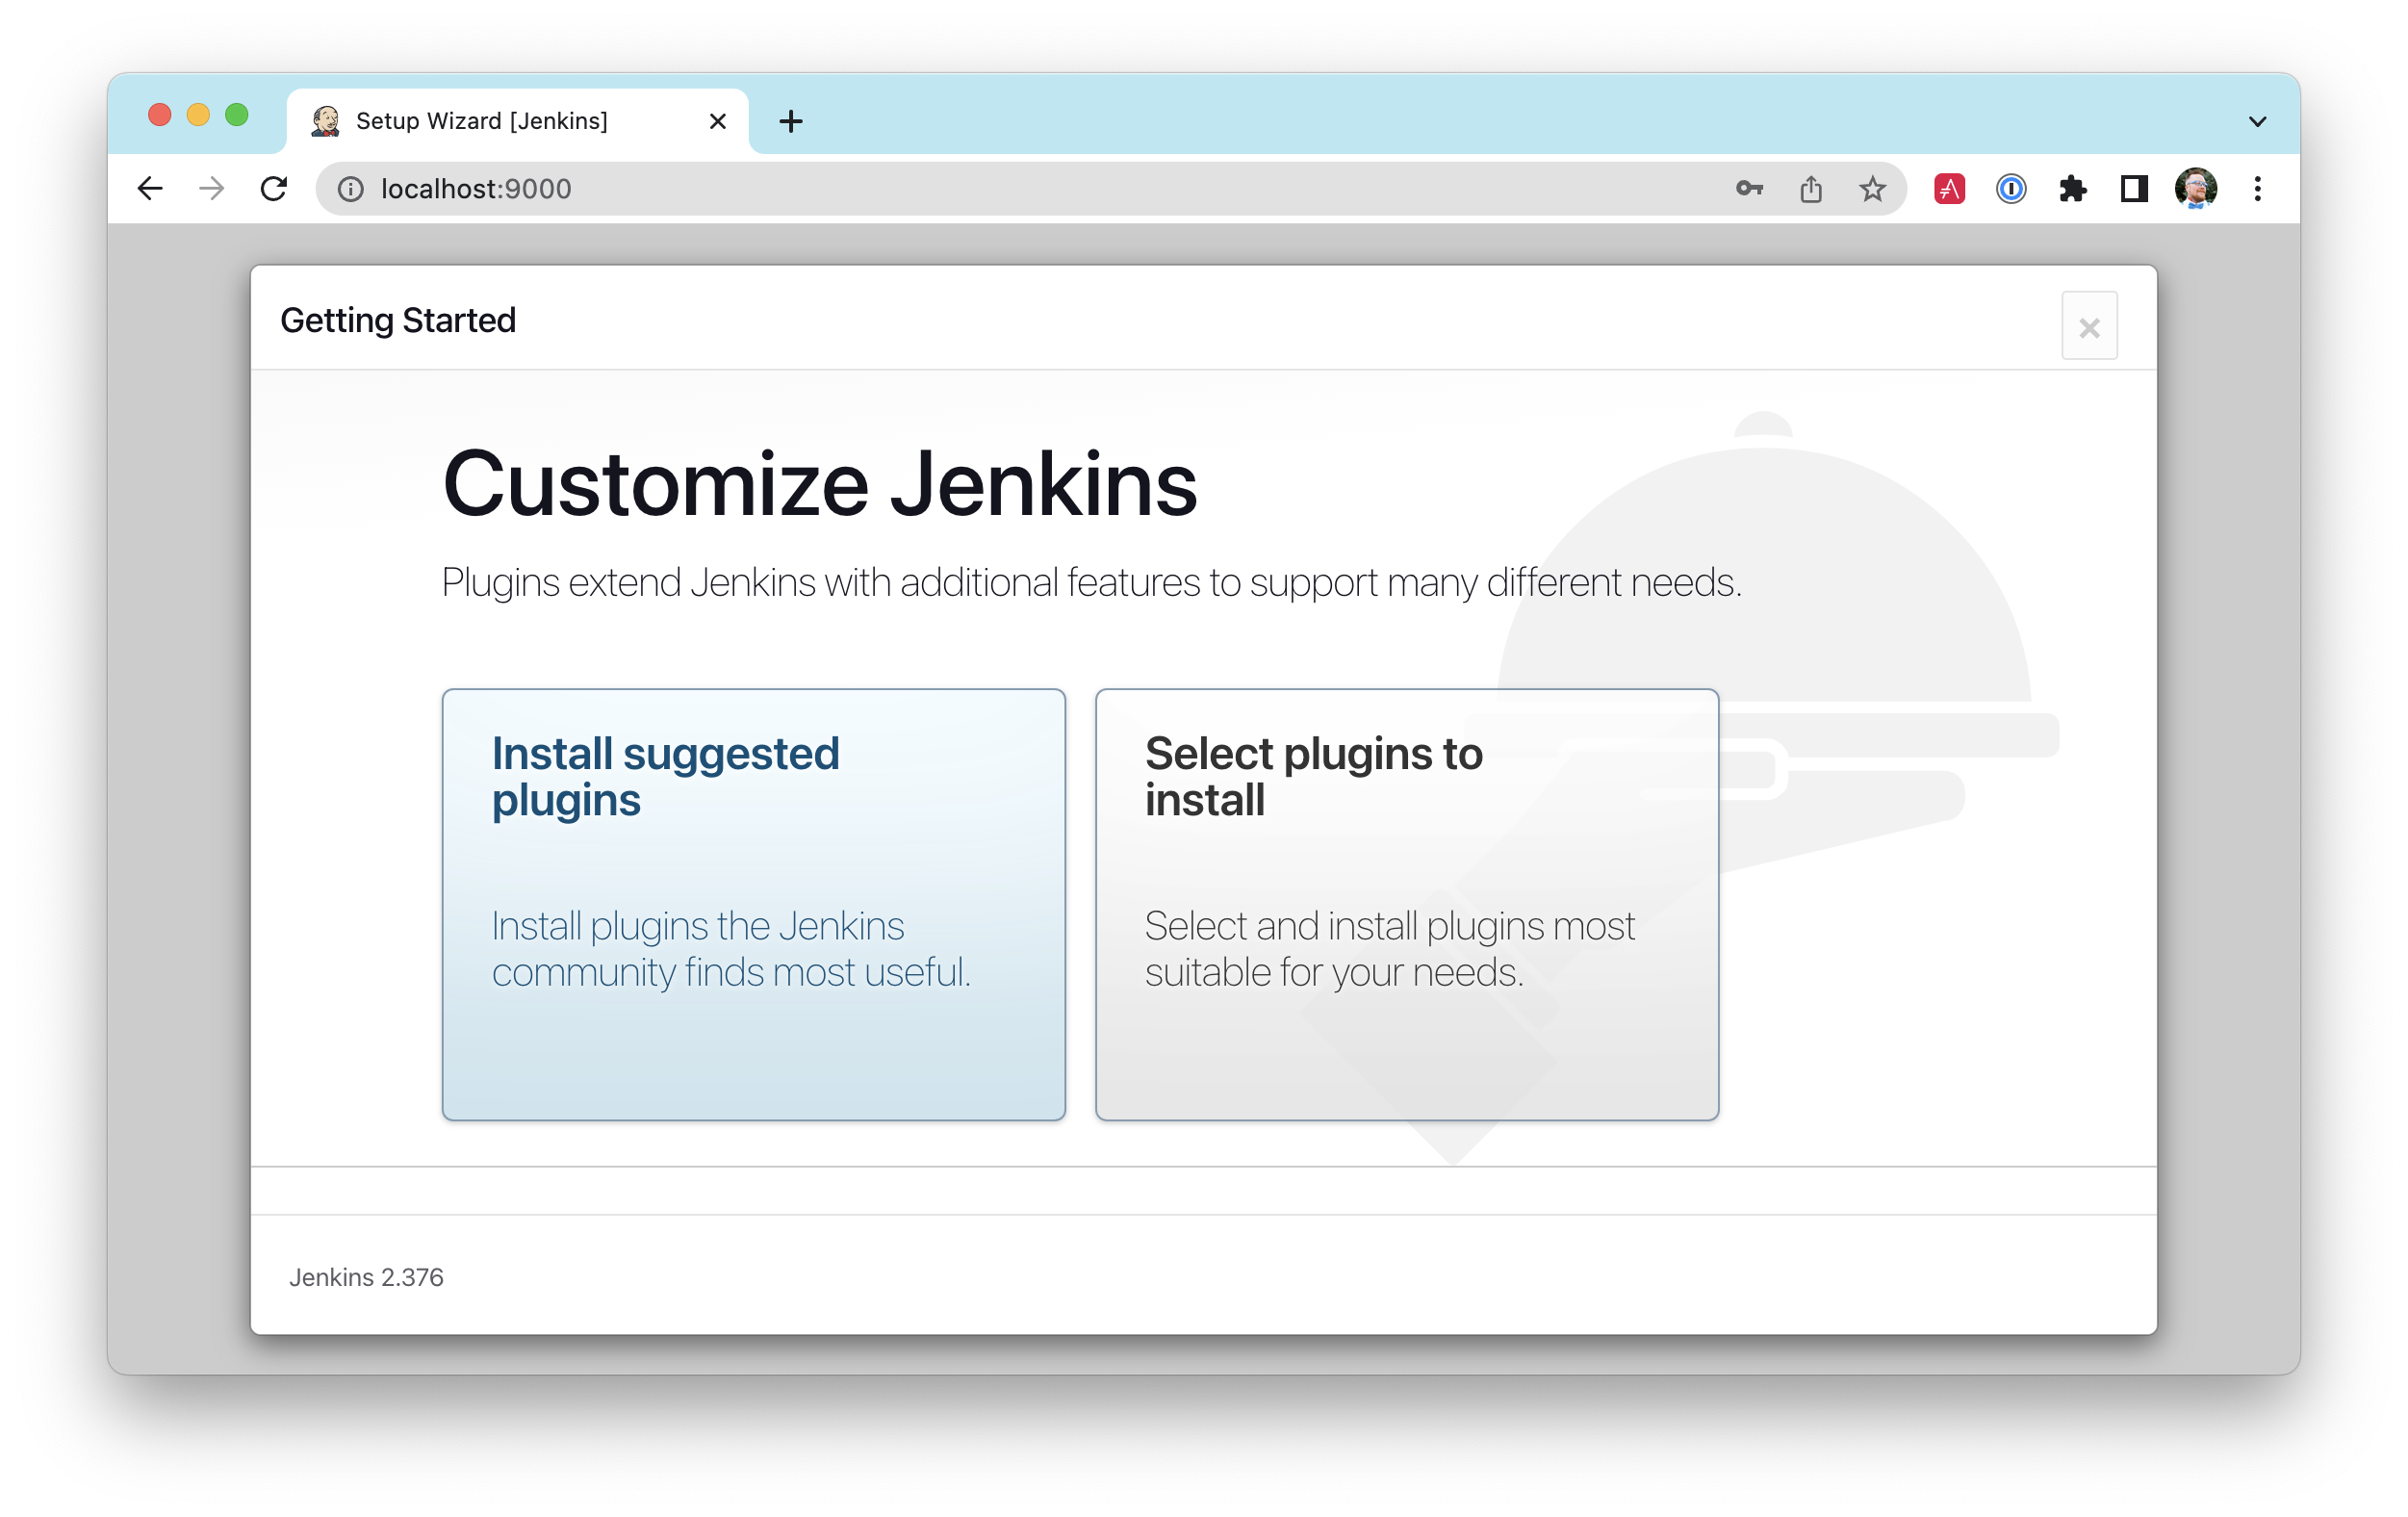
Next, I installed selected plugins and waited while everything completed downloading.
I created a new job called "21-points" with a Pipeline script from SCM. I configured a “Poll SCM” build trigger with a schedule of H/5 * * * *. After saving the job, I confirmed it ran successfully.
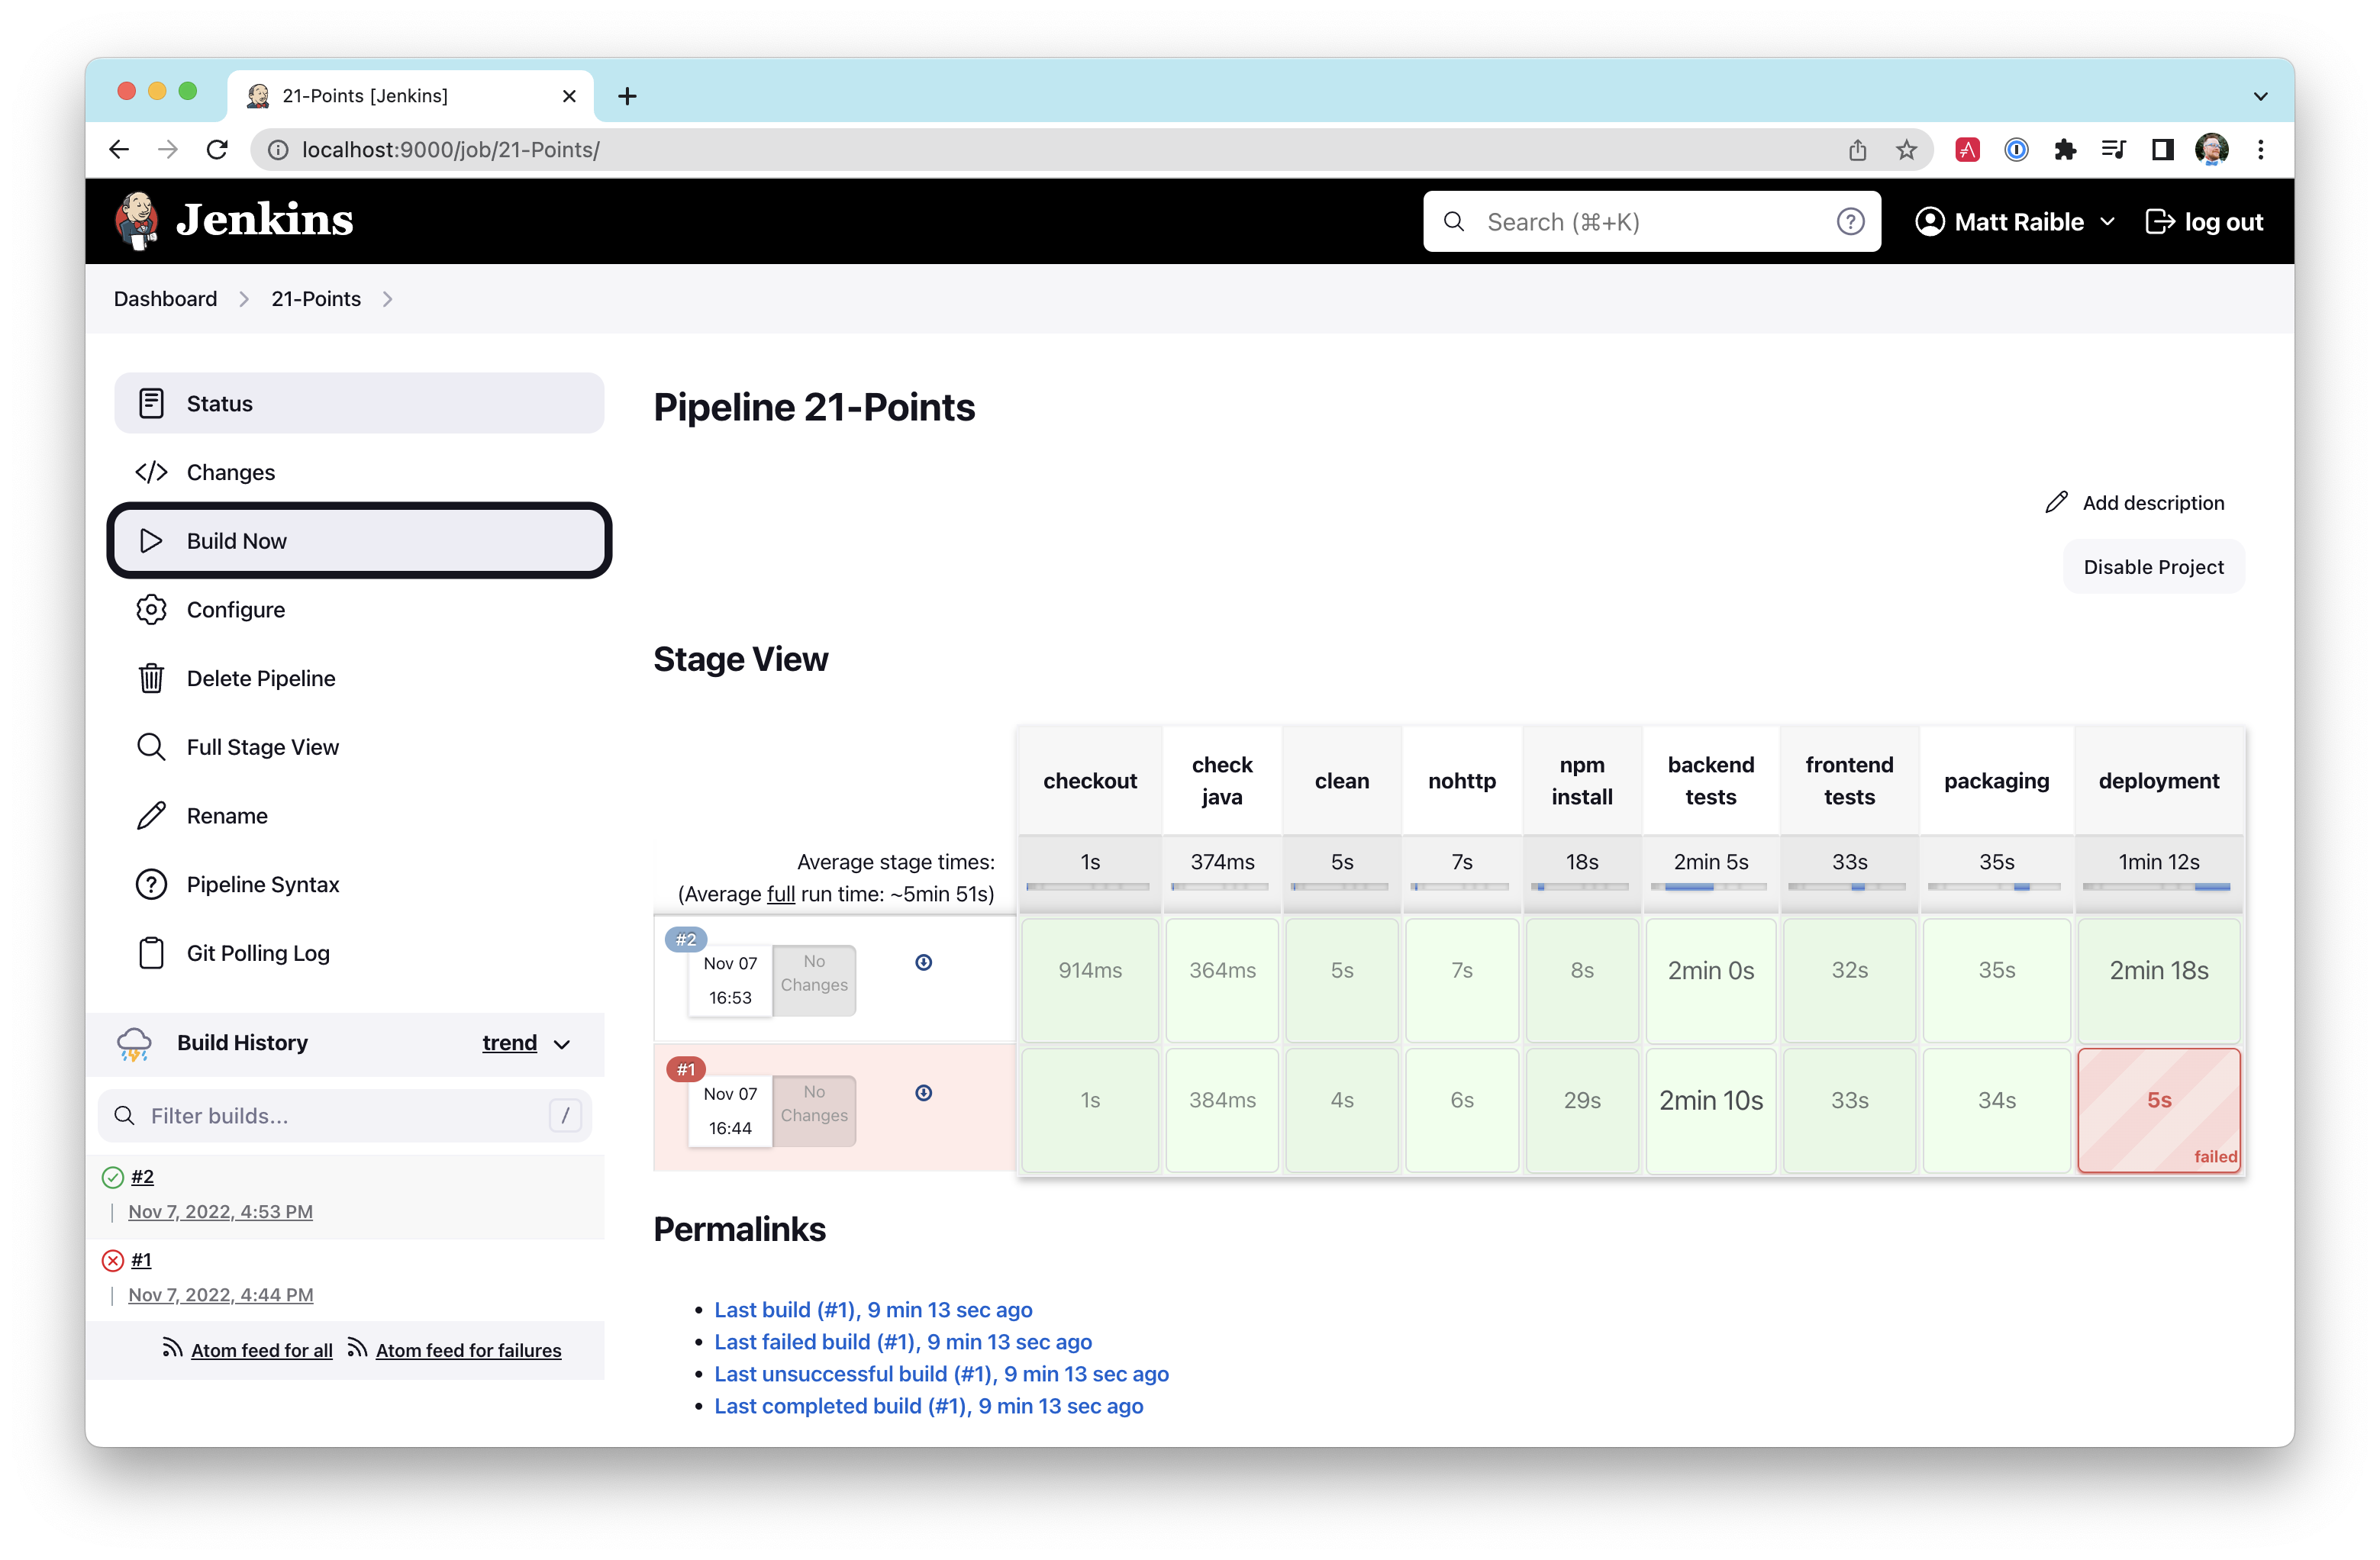
It’s possible the deployment stage will fail for you the first time (like it did for me above). If this happens, stop Jenkins, run heroku login, then restart Jenkins.
|
I modified Jenkinsfile to add an e2e tests stage to run all the Cypress tests. Before I checked it in, I started the app in one terminal and ran npm run e2e in another. I discovered the footer covered the bottom of the points edit form. I had to adjust points.cy.ts to force button clicks on lines 121 and 131.
cy.get(entityCreateCancelButtonSelector).click({force: true});I checked in my changes to trigger another build.
#!/usr/bin/env groovy
node {
stage('checkout') {
checkout scm
}
stage('check java') {
sh "java -version"
}
stage('clean') {
sh "chmod +x gradlew"
sh "./gradlew clean --no-daemon"
}
stage('nohttp') {
sh "./gradlew checkstyleNohttp --no-daemon"
}
stage('npm install') {
sh "./gradlew npm_install -PnodeInstall --no-daemon"
}
stage('backend tests') {
try {
sh "./gradlew test integrationTest -PnodeInstall --no-daemon"
} catch(err) {
throw err
} finally {
junit '**/build/**/TEST-*.xml'
}
}
stage('frontend tests') {
try {
sh "./gradlew npm_run_test -PnodeInstall --no-daemon"
} catch(err) {
throw err
} finally {
junit '**/build/test-results/TESTS-*.xml'
}
}
stage('e2e tests') {
sh '''./gradlew &
bootPid=$!
sleep 30
npm run e2e
kill $bootPid
'''
}
stage('packaging') {
sh "./gradlew bootJar -x test -Pprod -PnodeInstall --no-daemon"
archiveArtifacts artifacts: '**/build/libs/*.jar', fingerprint: true
}
stage('deployment') {
sh "./gradlew deployHeroku --no-daemon"
}
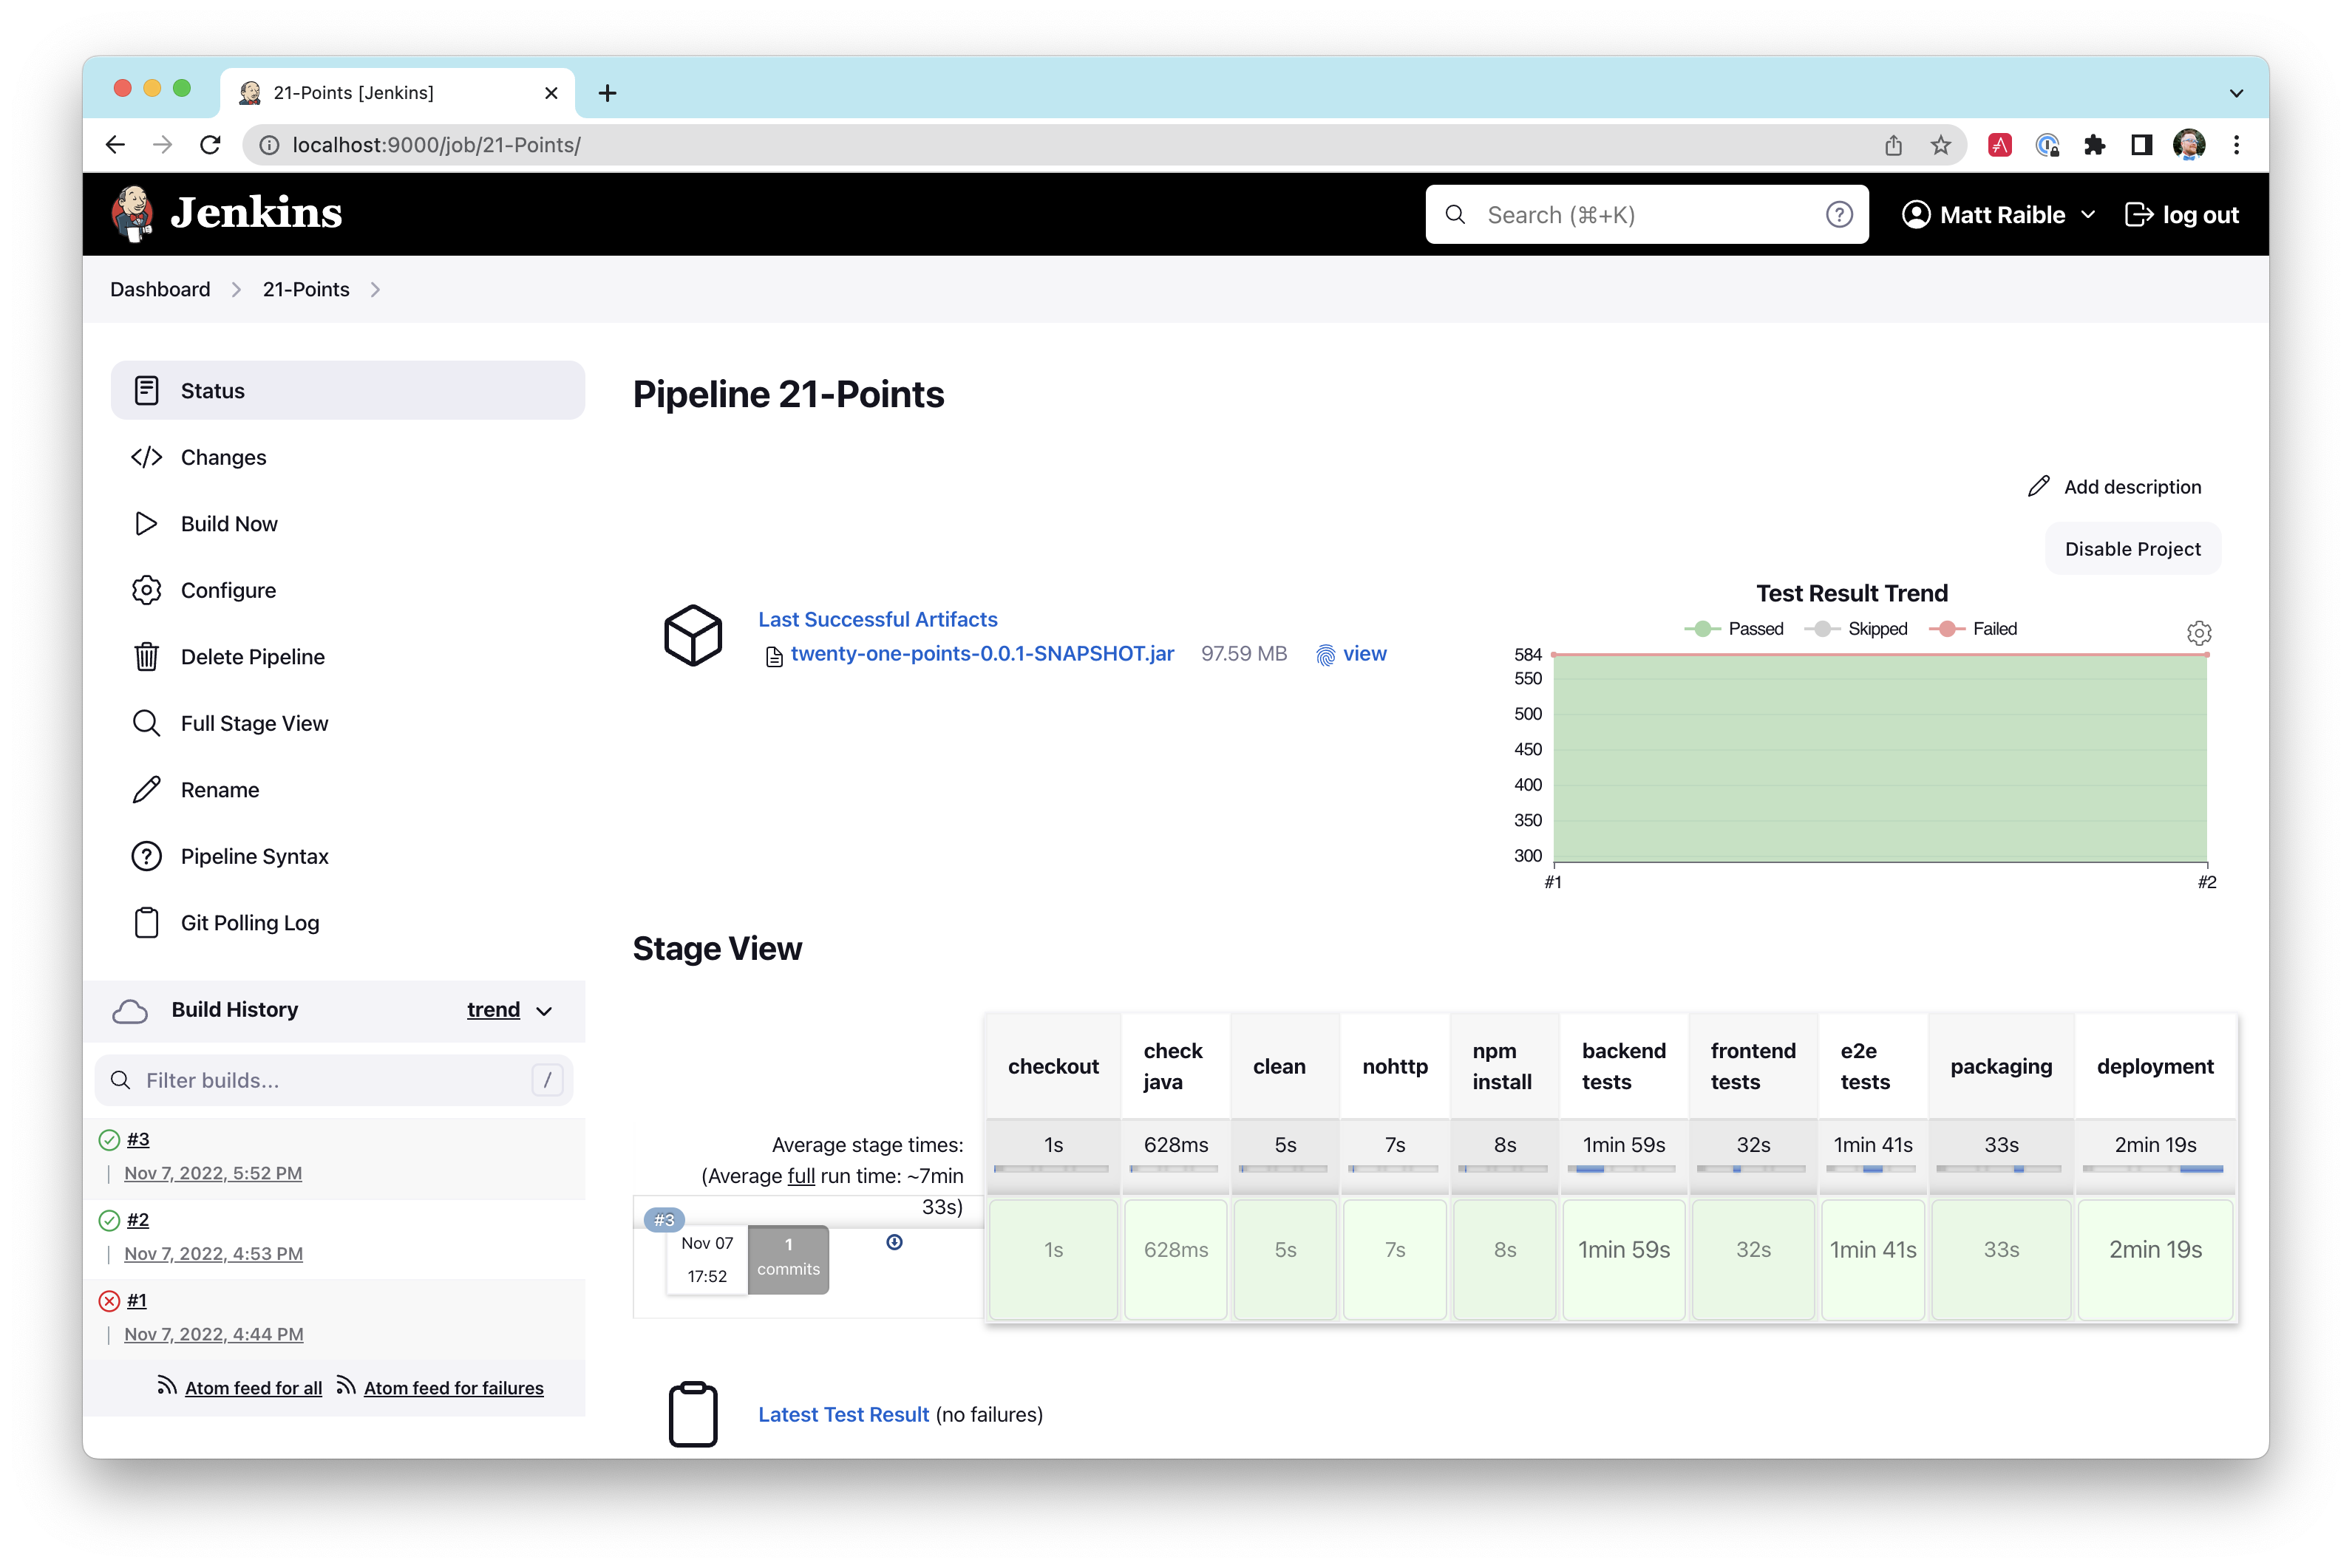
}I was pumped to see all the stages in my pipeline pass.
When working on this project, I’d start Jenkins and have it running while I checked in code. I did not install it on a server and leave it running continuously. My reason was simple: I was only coding in bursts and didn’t need to waste computing cycles or want to pay for a cloud instance to run it.
Code quality
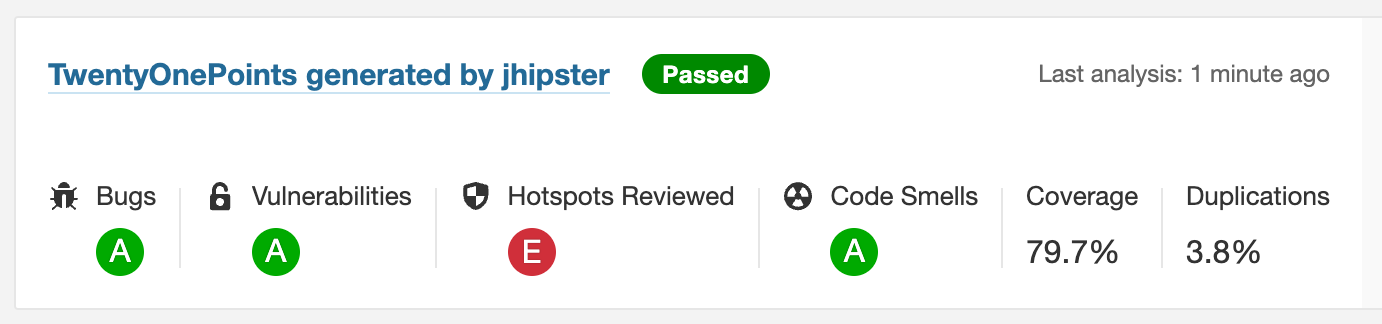
When I finished developing the app, I wanted to ensure that I had good code quality and that things were well tested. JHipster generates apps with high code quality by default. Code quality is analyzed using Sonar, which is automatically configured by JHipster. The "code quality" metric is determined by the percentage of code that is covered by tests. To see the code quality for my finished app, I started Sonar.
docker-compose -f src/main/docker/sonar.yml up|
SonarQube 9.6.0 on Apple Silicon (M1)
SonarQube does not work with Apple Silicon using official images, a native image is not provided, and it fails in compatibility mode. You can build the Docker image locally to solve the problem: |
Then I ran all the tests and the sonarqube task.
./gradlew -Pprod clean check jacocoTestReport sonarqubeOnce this process was completed, an analysis of the project was available on the Sonar dashboard at http://127.0.0.1:9001. 21-Points Heath is a triple-A-rated app! Not bad, eh?
Progressive web apps
Progressive web apps, aka PWAs, are the best way for developers to make their web apps load faster and perform better. In a nutshell, PWAs are websites that use current web standards to allow for installation on a user’s computer or device and deliver an app-like experience to those users.
To be a PWA requires three features:
-
The app must be served over HTTPS.
-
The app must register a service worker so it can cache requests and work offline.
-
The app must have a web-app manifest with installation information and icons.
For HTTPS, you can use JHipster’s "tls" profile for localhost or (even better) deploy it to production!
To use HTTPS on localhost with Gradle, run ./gradlew -Ptls for the back end and npm run start-tls for the front end.
|
Cloud providers like Heroku and Cloud Foundry will provide you with HTTPS out of the box, but they won’t force it. To force HTTPS, I modified SecurityConfiguration.java and added a rule to force a secure channel when an X-Forwarded-Proto header is sent.
@Bean
public SecurityFilterChain filterChain(HttpSecurity http) throws Exception {
    http
        ...
    .and()
        .requiresChannel()
        .requestMatchers(r -> r.getHeader("X-Forwarded-Proto") != null)
        .requiresSecure();
}
JHipster ships with PWA support for Angular. It’s turned off by default. One of the main components of a PWA is a service worker. To enable it, adjust the code in src/main/webapp/app/app.module.ts:
// Set this to true to enable service worker (PWA)
ServiceWorkerModule.register('ngsw-worker.js', { enabled: true }),
The final feature—a web-app manifest—is already included at src/main/webapp/manifest.webapp. It defines an app name, colors, and icons.
After making these changes, I redeployed 21-Points Health to production and used Lighthouse in Chrome to perform an analysis. You can see the results in the following image.
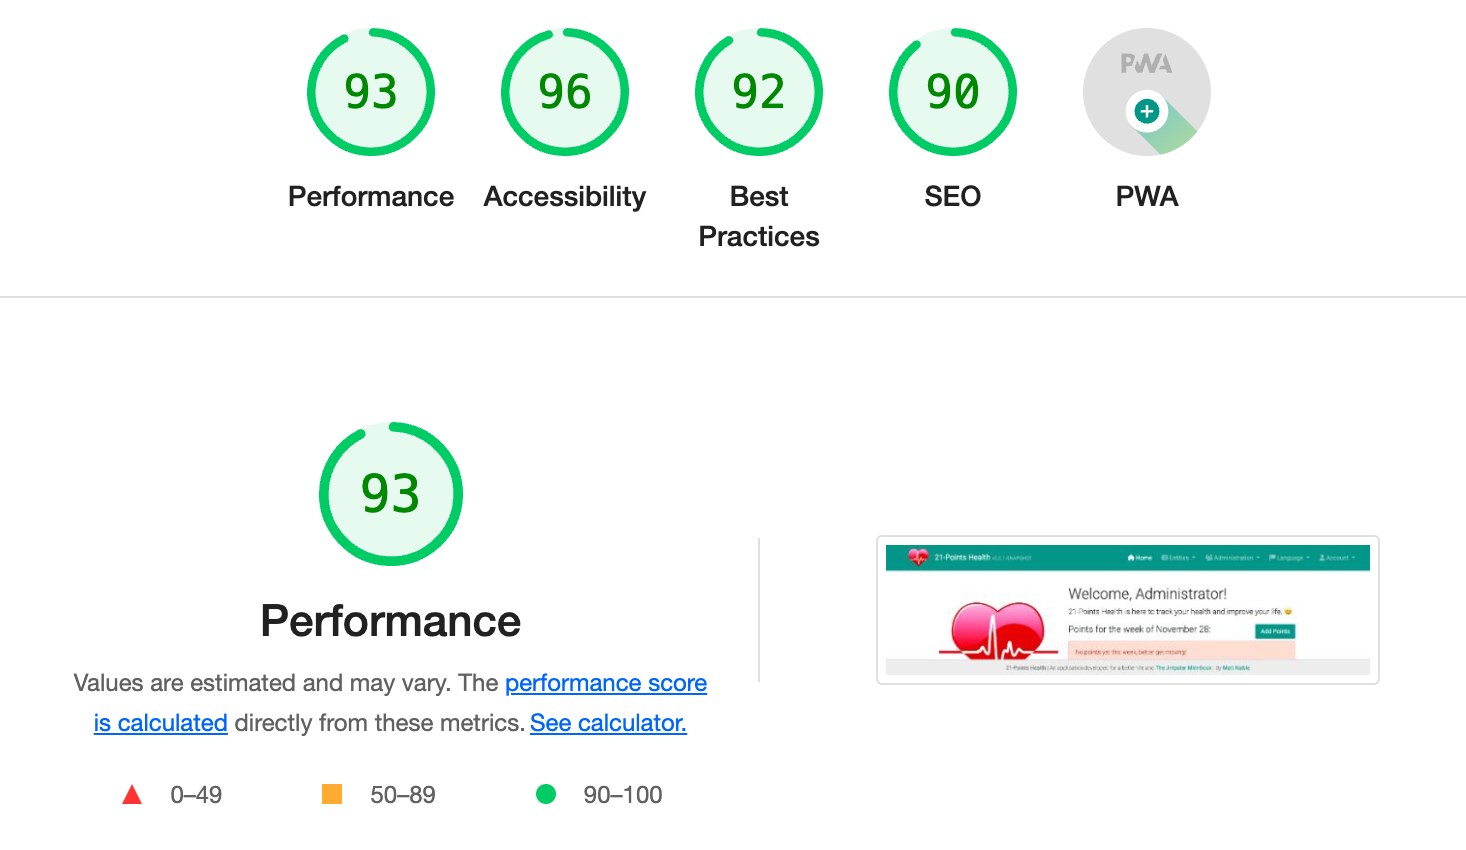
Source code
After getting this application into a good enough state, I pushed it to GitHub and made it available as an open-source project. You can find the source code for 21-Points Health at https://github.com/mraible/21-points.
Summary
This section showed how I created a health-tracking web application with JHipster. It walked you through upgrading to the latest release of JHipster and how to generate code with jhipster entity. You learned how to do test-first development when writing new APIs and how Spring Data JPA makes it easy to add custom queries. You also saw how to reuse existing components on different pages, add methods to client services, and manipulate data to display pretty charts.
After modifying the application to look like my UI mockups, I showed you how to deploy it to Heroku and some common issues I encountered along the way. Finally, you learned how to use Jenkins to build, test, and deploy a Gradle-based JHipster project. I recommend doing something similar shortly after you’ve created your project and verified that it passes all tests.
In the next chapter, I’ll explain JHipster’s UI components in more detail. Angular, Bootstrap, webpack, Sass, WebSockets, and Browsersync are all packed in a JHipster application, so it’s useful to dive in and learn more about these technologies.