JHipster's API building blocks
JHipster is composed of two main components: a modern UI framework and an API. APIs are the modern data-retrieval mechanisms. Creating great UIs is how you make people smile.
Many APIs today are RESTful APIs. In fact, representational state transfer (REST) is the software architectural style of the World Wide Web. RESTful systems communicate over HTTP (Hypertext Transfer Protocol) using verbs (GET, POST, PUT, DELETE, etc.). This is the same way browsers retrieve web pages and send data to remote servers. Roy Fielding initially proposed REST in his 2000 Ph.D. dissertation, Architectural Styles and the Design of Network-Based Software Architectures.
JHipster leverages Spring MVC and its @RestController annotation to create a RESTful API. Its endpoints publish JSON to and consume JSON from clients. By separating the business logic and data persistence from the client, you can provide data to many clients (HTML5, iOS, Android, TVs, watches, IoT devices, etc.). This also allows third-party and partner integration capabilities in your application. Spring Boot further complements Spring MVC by simplifying microservices and allowing you to create stand-alone JAR (Java Archive) files.
Spring Boot
In August 2013, Phil Webb and Dave Syer, engineers at Pivotal, announced the first milestone release of Spring Boot. Spring Boot makes it easy to create Spring applications with minimal effort. It takes an opinionated view of Spring and auto-configures dependencies for you. This allows you to write less code but still harness the power of Spring. The diagram below (from https://spring.io) shows how Spring Boot is the gateway to the larger Spring ecosystem.

The primary goals of Spring Boot are:
-
to provide a radically faster and widely accessible “getting started” experience for all Spring development
-
to be opinionated out of the box, but get out of the way quickly as requirements start to diverge from the defaults
-
to provide a range of non-functional features that are common to large classes of projects (e.g., embedded servers, security, metrics, health checks, externalized configuration)
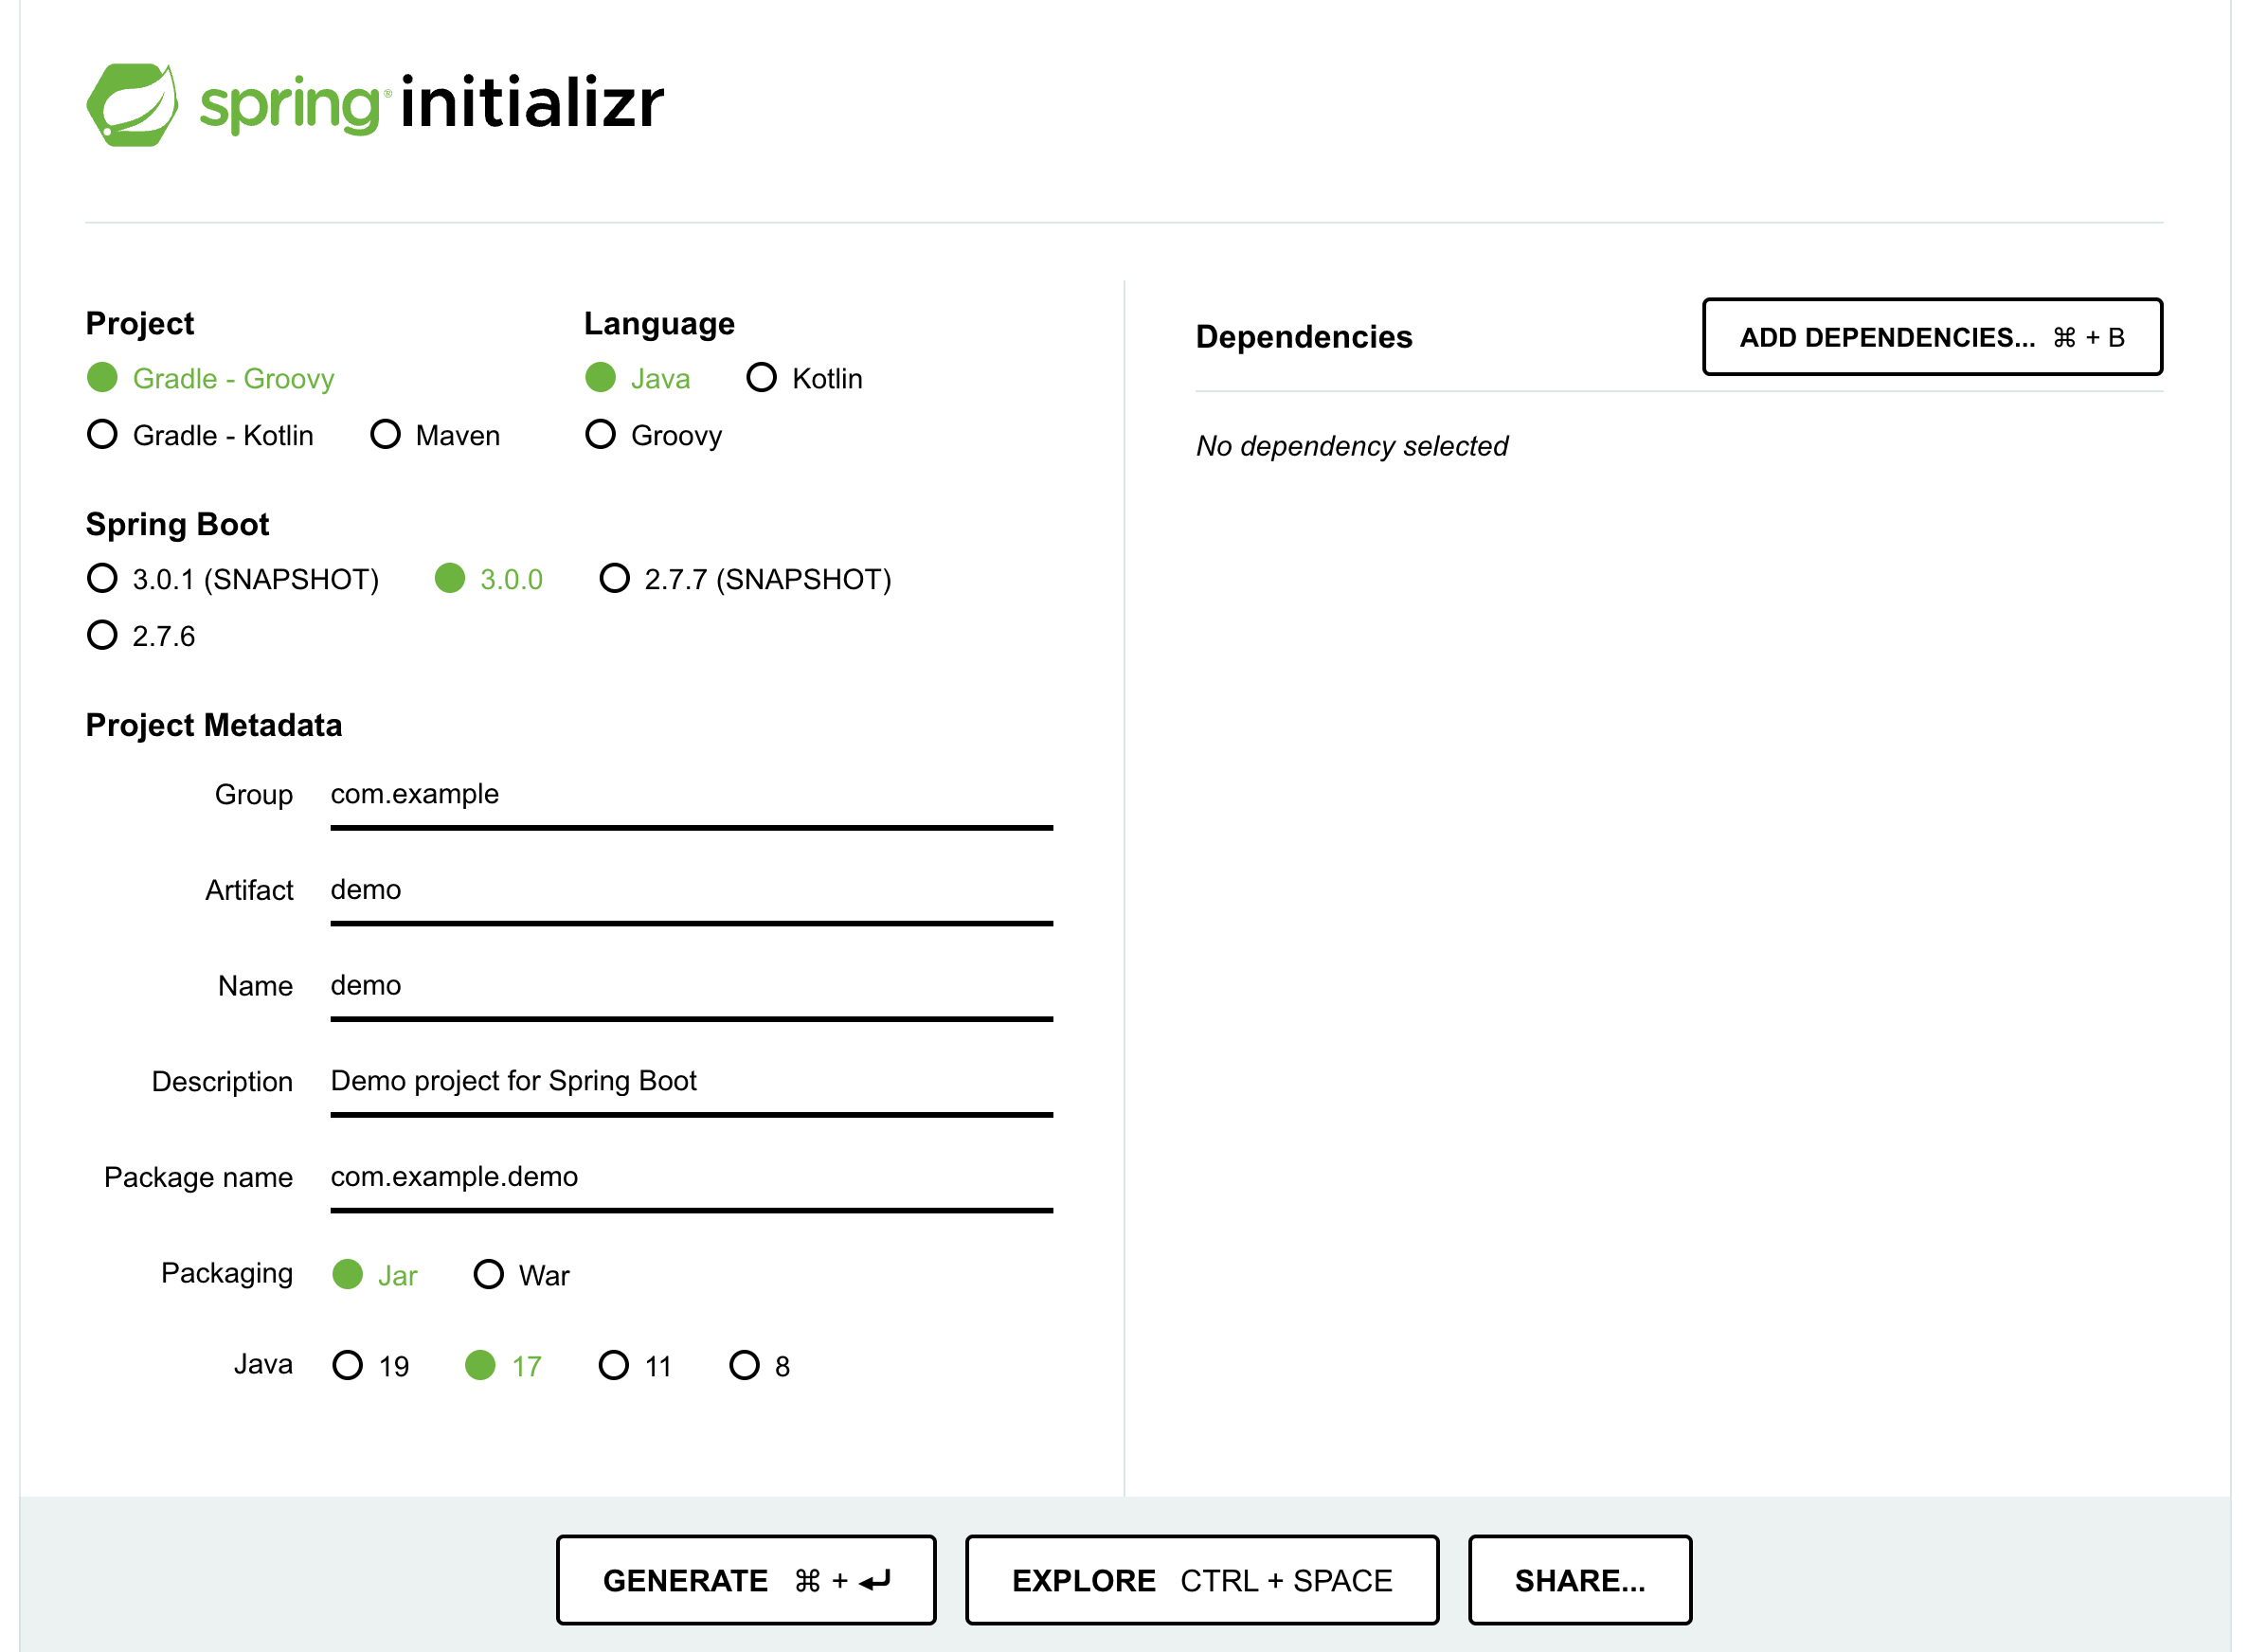
Folks who want to use Spring Boot outside a JHipster application can do so with Spring Initializr, a configurable service for generating Spring projects. You can visit it in your browser at https://start.spring.io, or you can call it via curl.
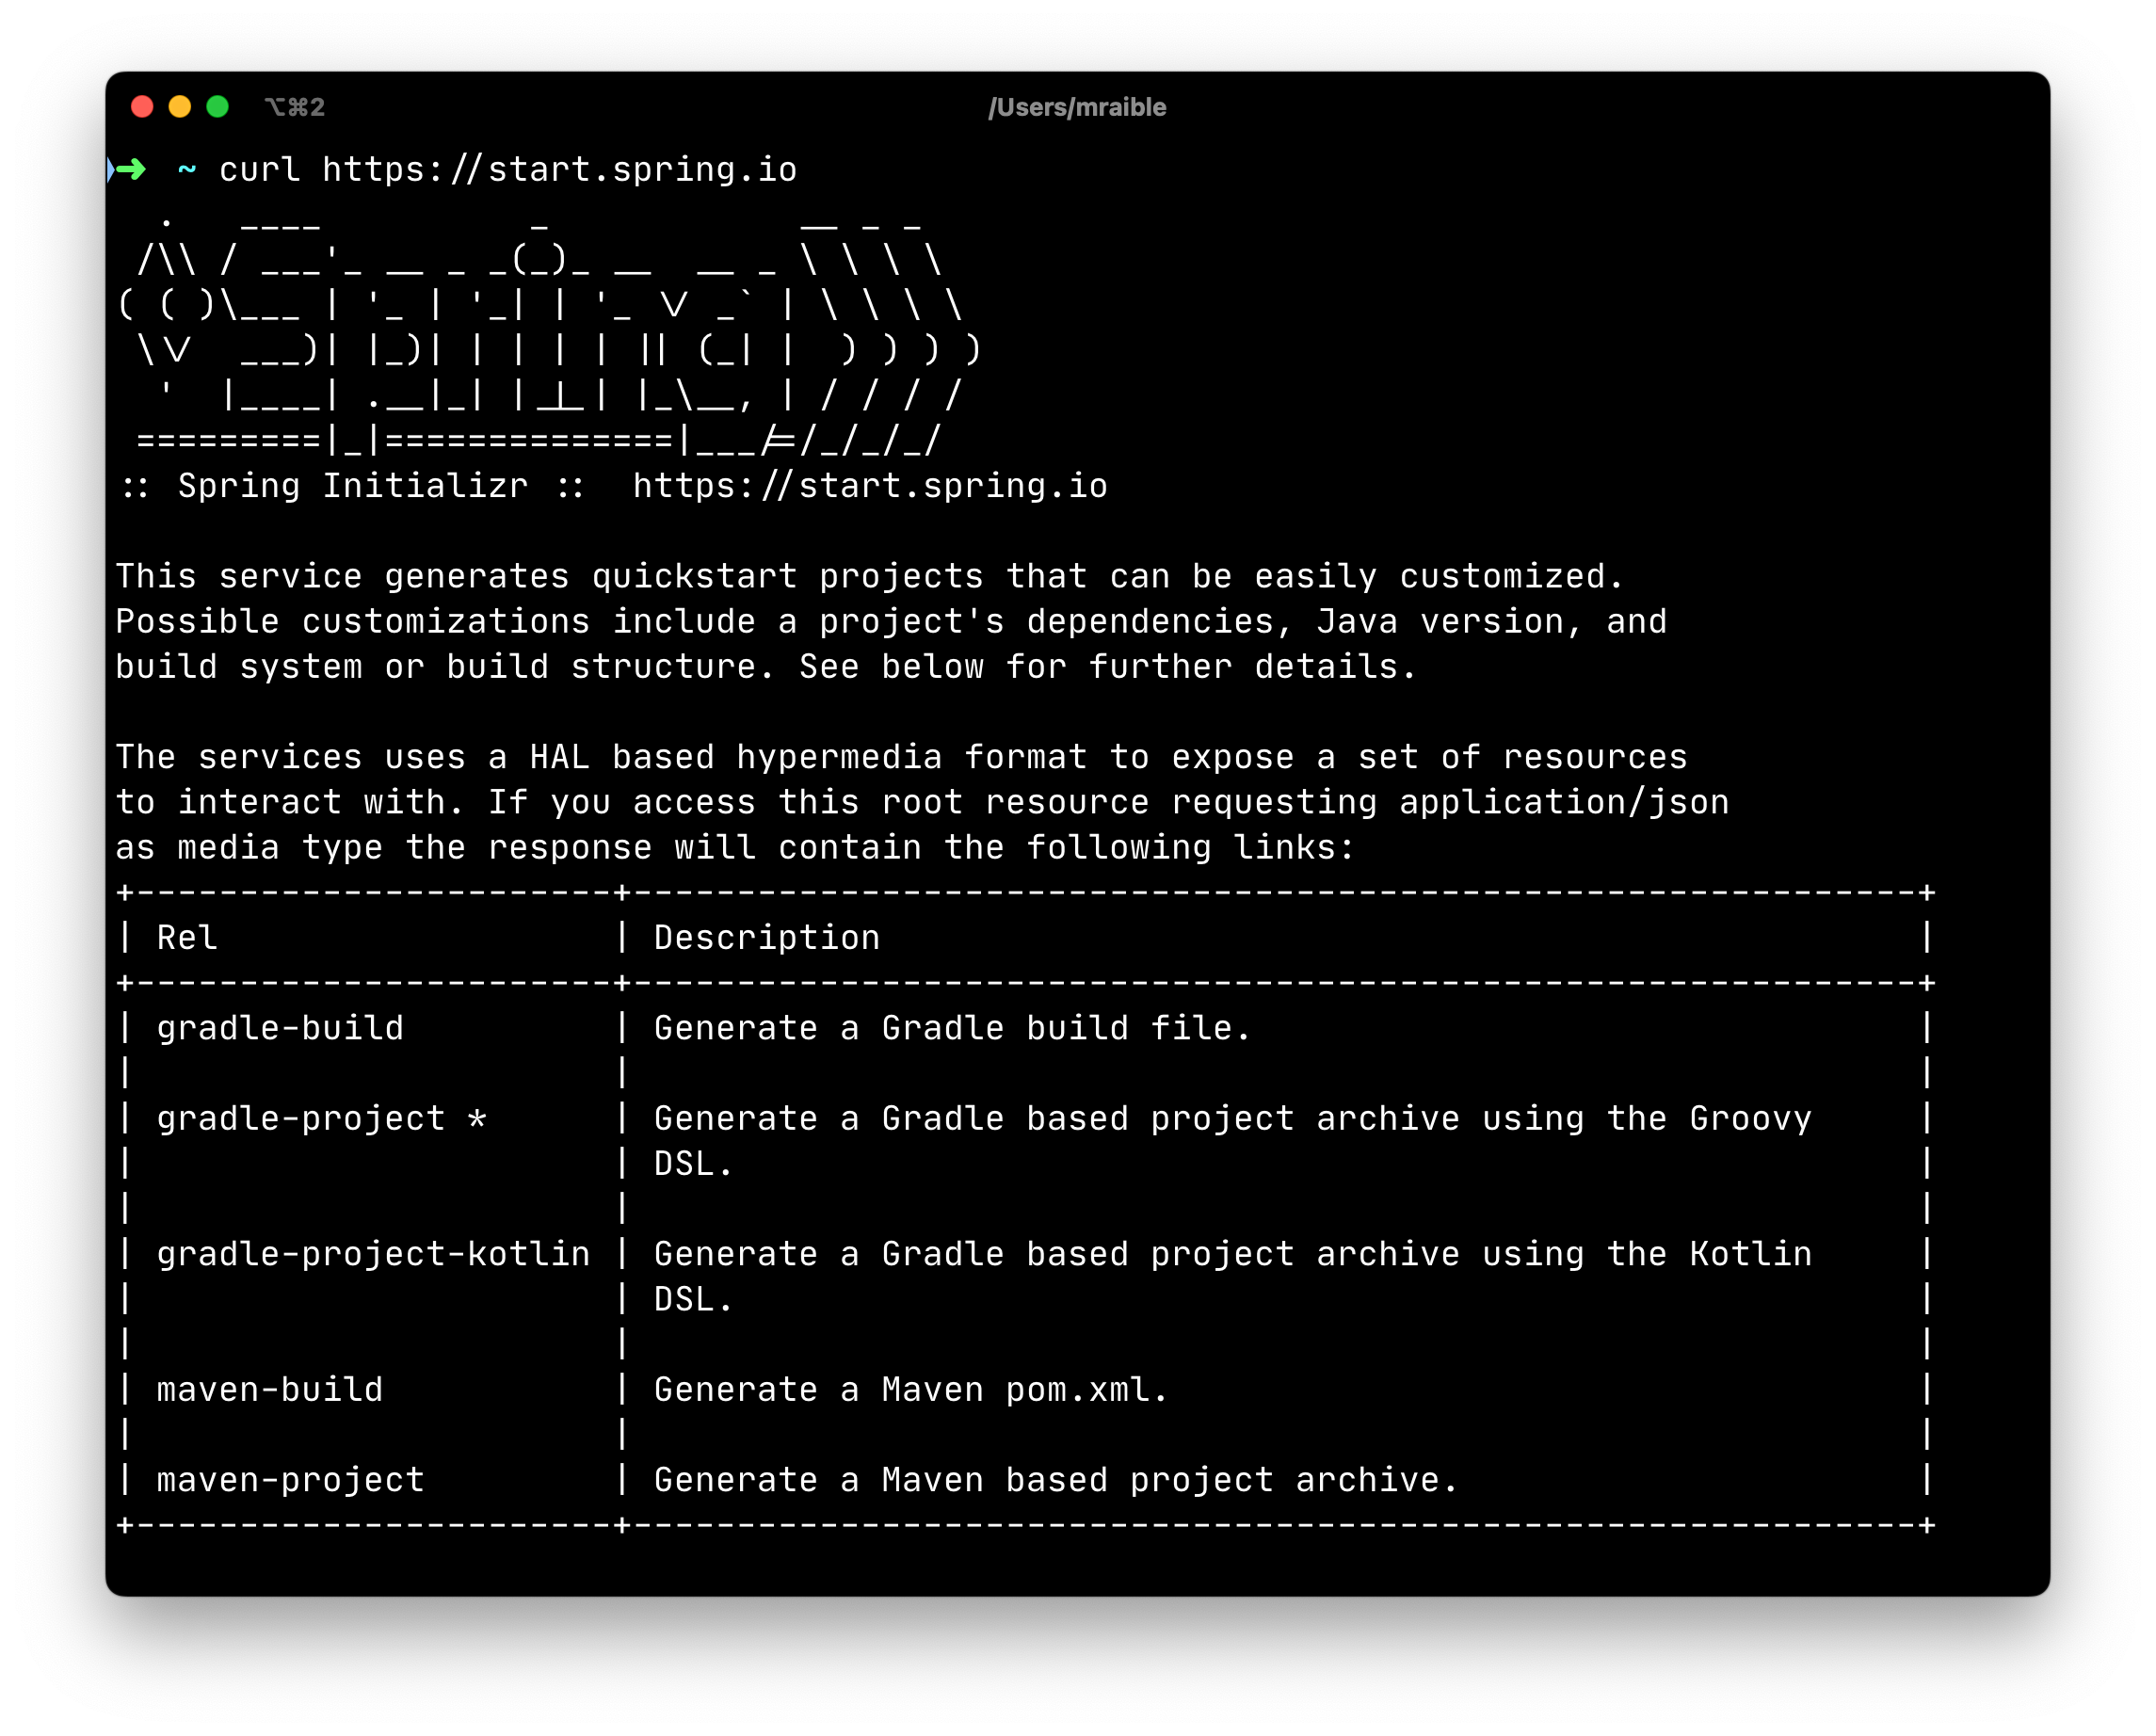
curlSpring Initializr is an Apache 2.0-licensed open-source project that you install and customize to generate Spring projects for your company or team. You can find it on GitHub at https://github.com/spring-io/initializr.
Spring Initializr is also available in the Eclipse-based Spring Tool Suite (STS) and IntelliJ IDEA.
To see how to create a simple application with Spring Boot, go to https://start.spring.io and select Web, JPA, H2, and Actuator as project dependencies. Click “Generate Project” to download a .zip file for your project. Extract it on your hard drive and import it into your favorite IDE.
The Spring CLI’s command for creating this same app is spring init -d=web,jpa,h2,actuator.
|
This project has only a few files, as you can see by running the tree command (on *nix).
.
├── HELP.md
├── build.gradle
├── gradle
│   └── wrapper
│       ├── gradle-wrapper.jar
│       └── gradle-wrapper.properties
├── gradlew
├── gradlew.bat
├── settings.gradle
└── src
    ├── main
    │   ├── java
    │   │   └── com
    │   │       └── example
    │   │           └── demo
    │   │               └── DemoApplication.java
    │   └── resources
    │       ├── application.properties
    │       ├── static
    │       └── templates
    └── test
        └── java
            └── com
                └── example
                    └── demo
                        └── DemoApplicationTests.java

16 directories, 10 files
DemoApplication.java is the heart of this application; the file and class name are irrelevant. What is relevant is the @SpringBootApplication annotation and the class’s public static void main method, colloquially known as the main method.
package com.example.demo;

import org.springframework.boot.SpringApplication;
import org.springframework.boot.autoconfigure.SpringBootApplication;

@SpringBootApplication
public class DemoApplication {

    public static void main(String[] args) {
        SpringApplication.run(DemoApplication.class, args);
    }
}
For this application, you’ll create an entity, a JPA repository, and a REST endpoint to show data in the browser. To create an entity, add the following code to the DemoApplication.java file below the DemoApplication class.
import jakarta.persistence.Entity;
import jakarta.persistence.GeneratedValue;
import jakarta.persistence.Id;
...

@Entity
class Blog {

    @Id
    @GeneratedValue
    private Long id;
    private String name;

    public Long getId() {
        return id;
    }

    public void setId(Long id) {
        this.id = id;
    }

    public String getName() {
        return name;
    }

    public void setName(String name) {
        this.name = name;
    }

    @Override
    public String toString() {
        return "Blog{" +
                "id=" + id +
                ", name='" + name + '\'' +
                '}';
    }
}
In the same file, add a BlogRepository interface that extends JpaRepository. Spring Data JPA makes creating a CRUD repository for an entity easy. It automatically creates the implementation that talks to the underlying data store.
import org.springframework.data.jpa.repository.JpaRepository;
....

interface BlogRepository extends JpaRepository<Blog, Long> {}
Define a CommandLineRunner that injects this repository and prints out all the data found by calling its findAll() method. CommandLineRunner is an interface that indicates that a bean should run when it is contained within a SpringApplication.
import org.springframework.boot.CommandLineRunner;
import org.springframework.stereotype.Component;

...

@Component
class BlogCommandLineRunner implements CommandLineRunner {

    private BlogRepository repository;

    public BlogCommandLineRunner(BlogRepository repository) {
        this.repository = repository;
    }

    @Override
    public void run(String... strings) throws Exception {
        System.out.println(repository.findAll());
    }
}
To provide default data, create src/main/resources/data.sql and add a couple of SQL statements to insert data.
insert into blog (id, name) values (1, 'First');
insert into blog (id, name) values (2, 'Second');
And add the following property to src/main/resources/application.properties:
spring.jpa.defer-datasource-initialization=trueStart your application with gradle bootRun (or right-click → “Run in your IDE”), and you should see this default data show up in your logs.
INFO 65838 --- [           main] o.s.b.w.embedded.tomcat.TomcatWebServer
  : Tomcat started on port(s): 8080 (http) with context path ''
INFO 65838 --- [           main] com.example.demo.DemoApplication
  : Started DemoApplication in 1.742 seconds (process running for 1.913)
[Blog{id=1, name='First'}, Blog{id=2, name='Second'}]
To publish this data as a REST API, create a BlogController class and add a /blogs endpoint that returns a list of blogs.
import org.springframework.web.bind.annotation.GetMapping;
import org.springframework.web.bind.annotation.RestController;
import java.util.Collection;
...

@RestController
class BlogController {
    private final BlogRepository repository;

    public BlogController(BlogRepository repository) {
        this.repository = repository;
    }

    @RequestMapping("/blogs")
    Collection<Blog> list() {
        return repository.findAll();
    }
}
After adding this code and restarting the application, you can curl the endpoint or open it in your favorite browser.
$ curl localhost:8080/blogs
[{"id":1,"name":"First"},{"id":2,"name":"Second"}]
| HTTPie is an alternative to cURL that makes many things easier. |
Spring has one of the best track records for hipness in Javaland. It is an essential cornerstone of the solid API foundation that makes JHipster awesome. Spring Boot allows you to create stand-alone Spring applications that directly embed Tomcat, Jetty, or Undertow. It provides opinionated starter dependencies that simplify your build configuration, regardless of whether you’re using Maven or Gradle.
External configuration
You can configure Spring Boot externally to work with the same application code in different environments. You can use properties files, YAML files, environment variables, and command-line arguments to externalize your configuration.
Spring Boot runs through this specific sequence for PropertySource to ensure that it overrides values sensibly:
-
Devtools global settings properties on your home directory (
~/.spring-boot-devtools.propertieswhen devtools is active). -
@TestPropertySourceannotations on your tests. -
@SpringBootTest#propertiesannotation attribute on your tests. -
Command-line arguments.
-
Properties from
SPRING_APPLICATION_JSON(inline JSON embedded in an environment variable or system property). -
ServletConfiginit parameters. -
ServletContextinit parameters. -
JNDI attributes from
java:comp/env. -
Java System properties (
System.getProperties()). -
OS environment variables.
-
A
RandomValuePropertySourcethat only has properties inrandom.*. -
Profile-specific application properties outside your packaged JAR (
application-{profile}.propertiesand YAML variants). -
Profile-specific application properties packaged inside your JAR (
application-{profile}.propertiesand YAML variants). -
Application properties outside your packaged JAR (
application.propertiesand YAML variants). -
Application properties packaged inside your JAR (
application.propertiesand YAML variants). -
@PropertySourceannotations on your@Configurationclasses. -
Default properties (specified using
SpringApplication.setDefaultProperties).
Application property files
By default, SpringApplication will load properties from application.properties files in the following locations and add them to the Spring Environment:
-
a
/configsubdirectory of the current directory -
the current directory
-
a classpath
/configpackage -
the classpath root
You can also use YAML (.yml) files as an alternative to properties files. JHipster uses YAML files for its configuration.
|
You can find more information about Spring Boot’s external-configuration feature in Spring Boot’s “Externalized Configuration” reference documentation.
|
If you’re using third-party libraries that require external configuration files, you may have issues loading them. You might load these files with the following:
This code does not work when using a Spring Boot executable JAR because the classpath is relative to the JAR itself and not the filesystem. One workaround is to run your application as a WAR in a servlet container. You might also try contacting the third-party library maintainer to find a solution. |
Automatic configuration
Spring Boot is unique in that it automatically configures Spring whenever possible. It does this by peeking into JAR files to see if they’re “hip”. If they are, they contain a META-INF/spring.factories that defines configuration classes under the EnableAutoConfiguration key. For example, below is what’s contained in spring-boot-actuator-autoconfigure.
org.springframework.boot.diagnostics.FailureAnalyzer=\
org.springframework.boot.actuate.autoconfigure.metrics.ValidationFailureAnalyzer
These configuration classes usually contain @Conditional annotations to help configure themselves. Developers can use @ConditionalOnMissingBean to override the auto-configured defaults. There are several conditional-related annotations you can use when developing Spring Boot plugins:
-
@ConditionalOnClassand@ConditionalOnMissingClass -
@ConditionalOnMissingClassand@ConditionalOnMissingBean -
@ConditionalOnProperty -
@ConditionalOnResource -
@ConditionalOnWebApplicationand@ConditionalOnNotWebApplication -
@ConditionalOnExpression
These annotations give Spring Boot immense power and make it easy to use, configure, and override.
Actuator
With little effort, Spring Boot’s Actuator sub-project adds several production-grade services to your application. You can add the actuator to a Maven-based project by adding the spring-boot-starter-actuator dependency.
<dependencies>
  <dependency>
    <groupId>org.springframework.boot</groupId>
    <artifactId>spring-boot-starter-actuator</artifactId>
  </dependency>
</dependencies>
If you’re using Gradle, you’ll save a few lines:
dependencies {
    compile("org.springframework.boot:spring-boot-starter-actuator")
}
Actuator’s main features are endpoints, metrics, auditing, and process monitoring. Actuator auto-creates several REST endpoints. By default, Spring Boot will also expose management endpoints as JMX MBeans under the org.springframework.boot domain. Actuator REST endpoints include:
-
/auditevents—Exposes audit events information for the current application. -
/beans—Returns a complete list of all the Spring beans in your application. -
/caches—Exposes available caches. This endpoint is only available when the application context contains aCacheManager. -
/conditions—Shows the conditions that were evaluated on configuration and auto-configuration classes. -
/configprops—Returns a list of all@ConfigurationProperties. -
/env—Returns properties from Spring’sConfigurableEnvironment. -
/flyway—Shows any Flyway database migrations that have been applied. This endpoint is only available when Flyway is on the classpath. -
/health—Returns information about application health. -
/httptrace—Returns trace information (by default, the last 100 HTTP requests). Requires anHttpTraceRepositorybean. -
/info—Returns basic application info. -
/integrationgraph—Shows the Spring Integration graph when Spring Integration is on the classpath. -
/loggers—Shows and modifies the configuration of loggers in the application. -
/liquibase—Shows any Liquibase database migrations that have been applied. This endpoint is only available when Liquibase is on the classpath. -
/metrics—Returns performance information for the current application. -
/mappings—Returns a list of all@RequestMappingpaths. -
/quartz—Shows information about Quartz Scheduler jobs. -
/scheduledtasks—Displays the scheduled tasks in your application. -
/sessions—Allows retrieval and deletion of user sessions from a Spring Session-backed session store. -
/shutdown—Shuts the application down gracefully (not enabled by default). -
/startup—Shows the startup steps data collected byApplicationStartup. Requires the application to be configured with aBufferingApplicationStartupbean. -
/threaddump—Performs a thread dump.
JHipster includes a plethora of Spring Boot starter dependencies by default. This allows developers to write less code and worry less about dependencies and configuration. The boot-starter dependencies in the 21-Points Health application are as follows:
spring-boot-starter-cache
spring-boot-starter-actuator
spring-boot-starter-data-jpa
spring-boot-starter-data-elasticsearch
spring-boot-starter-logging
spring-boot-starter-mail
spring-boot-starter-security
spring-boot-starter-thymeleaf
spring-boot-starter-web
spring-boot-starter-test
spring-boot-starter-undertow
Spring Boot does a great job of auto-configuring libraries and simplifying Spring. JHipster complements that by integrating the wonderful world of Spring Boot with a modern UI and developer experience.
Spring WebFlux
Spring Boot 2.0 also supports building applications with a reactive stack through Spring WebFlux. When using WebFlux (instead of Web), your application will be based on the Reactive Streams API and run on non-blocking servers such as Netty, Undertow, and Servlet 3.1+ containers.
In the next chapter on microservices, I’ll show you how to use Spring WebFlux in a reactive microservices architecture. If you’d like to learn how to use WebFlux in a monolith, I’d suggest reading Josh Long and my Build Reactive APIs with Spring WebFlux blog post.
Maven versus Gradle
Maven and Gradle are the main build tools used in Java projects today. JHipster allows you to use either one. With Maven, you have one pom.xml file that’s 1090 lines of XML. With Gradle, you end up with several *.gradle files. In the 21-Points project, the Groovy code adds up to only 626 lines.
Apache calls Apache Maven a “software project-management and comprehension tool”. Based on the concept of a project object model (POM), Maven can manage a project’s build, reporting, and documentation from a central piece of information. Most of Maven’s functionality comes through plugins. There are Maven plugins for building, testing, source-control management, running a web server, generating IDE project files, and much more.
Gradle is a general-purpose build tool. It can build anything you want to implement in your build script. Out of the box, however, it will only build something if you add code to your build script to ask for that. Gradle has a Groovy-based domain-specific language (DSL) instead of the more traditional XML form of declaring the project configuration. Like Maven, Gradle has plugins that allow you to configure tasks for your project. Most plugins add some preconfigured tasks, which together do something useful. For example, Gradle’s Java plugin adds tasks to your project that will compile and unit test your Java source code and bundle it into a JAR file.
I’ve used both tools for building projects, and they both worked well. Maven works for me, but I’ve used it for almost 20 years and recognize that my history and experience might contribute to my bias toward it.
Many internet resources support the use of Gradle. There’s Gradle’s own Gradle vs. Maven Feature Comparison. Benjamin Muschko, a principal engineer at Gradle, wrote a Dr. Dobb’s article titled “Why Build Your Java Projects with Gradle Rather than Ant or Maven?” He’s also the author of Gradle in Action.
Gradle is the default build tool for Android development. Android Studio uses a Gradle wrapper to fully integrate the Android plugin for Gradle.
Maven and Gradle provide wrappers that allow you to embed the build tool within your project and source-control system. This allows developers to build or run the project after only installing Java. Since the build tool is embedded, they can type gradlew or mvnw to use the embedded build tool.
|
Regardless of which you prefer, Spring Boot supports both Maven and Gradle. You can learn more by visiting their respective documentation pages:
I’d recommend starting with the tool that’s most familiar to you. If you’re using JHipster for the first time, you’ll want to limit the number of new technologies you have to deal with. You can always add some for your next application. JHipster is a great learning tool, and you can also generate your project with a different build tool to see what that looks like.
IDE support: Running, debugging, and profiling
IDE stands for “integrated development environment”. It is the lifeblood of a programmer who likes keyboard shortcuts and typing fast. Good IDEs have code completion that allows you to type a few characters, press tab, and have your code written for you. Furthermore, they provide quick formatting, easy access to documentation, and debugging. You can generate a lot of code with your IDE in statically typed languages like Java, like getters and setters on POJOs and methods in interfaces and classes. You can also easily find references to methods.
The JHipster documentation includes guides for configuring Eclipse, IntelliJ IDEA, Visual Studio Code, and NetBeans. Not only that, but Spring Boot has a devtools plugin that’s configured by default in a generated JHipster application. This plugin allows hot-reloading of your application when you recompile classes.
IntelliJ IDEA, which brings these same features to Java development, is a truly amazing IDE. If you’re only writing JavaScript, their WebStorm IDE will likely become your best friend. Both IntelliJ products have excellent CSS support and accept plugins for many web languages/frameworks. To make IDEA auto-compile on save, like Eclipse does, perform the following steps:
-
Navigate to Settings > Build, Execution, Deployment > Compiler: enable
Build project automatically -
Go to Advanced Settings and enable
Allow auto-make to start even if developed application is currently running
Eclipse is a free alternative to IntelliJ IDEA. Its error highlighting (via auto-compile), code assist, and refactoring support are excellent. When I started using it in 2002, it blew away the competition. It was the first Java IDE that was fast and efficient to use. Unfortunately, it fell behind in the JavaScript MVC era and needs better support for JavaScript or CSS.
NetBeans has a Spring Boot plugin. The NetBeans team has been doing a lot of work on web tools support; they have good JavaScript/TypeScript support, and there’s a NetBeans Connector plugin for Chrome that allows two-way editing in NetBeans and Chrome.
Visual Studio Code is an open-source text editor made by Microsoft. It’s become a popular editor for TypeScript and has plugins for Java development.
The beauty of Spring Boot is you can run it as a simple Java process. This means you can right-click on your *Application.java class and run it (or debug it) from your IDE. When debugging, you’ll be able to set breakpoints in your Java classes and see what variables are being set to before a process executes.
To learn about profiling a Java application, I recommend you watch Nitsan Wakart’s “Java Profiling from the Ground Up!” To learn more about memory and JavaScript applications, I recommend Addy Osmani’s “JavaScript Memory Management Masterclass”.
Security
Spring Boot has excellent security features thanks to its integration with Spring Security. When you create a Spring Boot application with a spring-boot-starter-security dependency, you get HTTP Basic authentication out of the box. By default, a user is created with the username user, and the password is printed in the logs when the application starts. To override the generated password, you can define a spring.security.user.password. To use a plain-text value, you must prefix it with {noop}. See Spring Security’s password storage documentation for more information.
The most basic Spring Security Java configuration creates a servlet Filter responsible for all the security (protecting URLs, validating credentials, redirecting to login, etc.). This involves several lines of code, but half of them are class imports.
import org.springframework.context.annotation.Bean;
import org.springframework.context.annotation.Configuration;
import org.springframework.security.config.annotation.web.configuration.EnableWebSecurity;
import org.springframework.security.core.userdetails.User;
import org.springframework.security.core.userdetails.UserDetailsService;
import org.springframework.security.crypto.factory.PasswordEncoderFactories;
import org.springframework.security.crypto.password.PasswordEncoder;
import org.springframework.security.provisioning.InMemoryUserDetailsManager;

@EnableWebSecurity
@Configuration
public class SecurityConfiguration {

    @Bean
    public PasswordEncoder passwordEncoder() {
       return PasswordEncoderFactories.createDelegatingPasswordEncoder();
   }

    @Bean
    public UserDetailsService userDetailsService(PasswordEncoder passwordEncoder) {
        InMemoryUserDetailsManager manager = new InMemoryUserDetailsManager();
        manager.createUser(User.withUsername("user")
            .password(passwordEncoder.encode("password"))
            .roles("USER").build());
        return manager;
    }
}
There’s not much code, but it provides many features:
-
It requires authentication for every URL in your application.
-
It generates a login form for you.
-
It allows user:password to authenticate with form-based authentication.
-
It allows the user to log out.
-
It prevents CSRF attacks.
-
It protects against session fixation.
-
It includes security-header integration with:
-
HTTP Strict Transport Security for secure requests
-
X-Content-Type-Options integration
-
cache control
-
X-XSS-Protection integration
-
X-Frame-Options integration to help prevent clickjacking
-
-
It integrates with HttpServletRequest API methods of:
getRemoteUser(),getUserPrinciple(),isUserInRole(role),login(username, password), andlogout().
JHipster takes the excellence of Spring Security and uses it to provide the real-world authentication mechanism that applications need. When you create a new JHipster project, it provides you with three authentication options:
-
JWT authentication—A stateless security mechanism. JSON Web Token (JWT) is an IETF proposed standard that uses a compact, URL-safe means of representing claims to be transferred between two parties. JHipster’s implementation uses the Java JWT project.
-
HTTP Session Authentication—Uses the HTTP session, so it is a stateful mechanism. Recommended for small applications.
-
OAuth 2.0 / OIDC Authentication—A stateful security mechanism, like HTTP Session. You might prefer it if you want to share your users between several applications.
In addition to authentication choices, JHipster offers security improvements: improved “remember me” (unique tokens stored in the database), cookie-theft protection, and CSRF protection.
By default, JHipster comes with four different users:
-
system—Used by audit logs when something is done automatically.
-
anonymousUser—Anonymous users when they do an action.
-
user—A normal user with “ROLE_USER” authorization; the default password is “user”.
-
admin—An admin user with “ROLE_USER” and “ROLE_ADMIN” authorizations; the default password is “admin”.
For security reasons, you should change the default passwords in src/main/resources/config/liquibase/users.csv or through the User Management feature when deployed.
JPA versus MongoDB versus Cassandra
A traditional relational database management system (RDBMS) provides several properties that guarantee its transactions are processed reliably: ACID, for atomicity, consistency, isolation, and durability. Databases like MySQL and PostgreSQL provide RDBMS support and have done wonders to reduce the costs of databases. JHipster supports vendors like Oracle and Microsoft as well. If you’d like to use a traditional database, select SQL when creating your JHipster project.
NoSQL databases have helped many web-scale companies achieve high scalability through eventual consistency: because a NoSQL database is often distributed across several machines, with some latency, it guarantees only that all instances will eventually be consistent. Eventually consistent services are often called BASE (basically available, soft state, eventual consistency) services in contrast to traditional ACID properties.
When you create a new JHipster project, you’ll be prompted with the following.
? Which *type* of database would you like to use? (Use arrow keys)
❯ SQL (H2, PostgreSQL, MySQL, MariaDB, Oracle, MSSQL)
  MongoDB
  Cassandra
  [BETA] Couchbase
  [BETA] Neo4j
  No database
If you’re familiar with RDBMS databases, I recommend you use PostgreSQL or MySQL for both development and production. PostgreSQL has great support on Heroku, and MySQL has excellent support on AWS. JHipster’s AWS sub-generator only works with SQL databases (but not Oracle or Microsoft SQL Server).
If your idea is the next Facebook, you might want to consider a NoSQL database that’s more concerned with performance than third normal form.
NoSQL encompasses a wide variety of different database technologies that were developed in response to a rise in the volume of data stored about users, objects, and products, the frequency in which this data is accessed, and performance and processing needs. Relational databases, on the other hand, were not designed to cope with the scale and agility challenges that face modern applications, nor were they built to take advantage of the cheap storage and processing power available today.
NOSQL Database Explained
MongoDB was founded in 2007 by the folks behind DoubleClick, ShopWiki, and Gilt Groupe. It uses the Apache and GNU-APGL licenses on GitHub. Its many large customers include Adobe, eBay, and eHarmony.
Cassandra is “a distributed storage system for managing structured data that is designed to scale to a very large size across many commodity servers, with no single point of failure” (from “Cassandra—A structured storage system on a P2P Network” on the Facebook Engineering blog). It was initially developed at Facebook to power its Inbox Search feature. Its creators, Avinash Lakshman (one of the creators of Amazon DynamoDB) and Prashant Malik released it as an open-source project in July 2008. In March 2009, it became an Apache Incubator project and graduated to a top-level project in February 2010.
In addition to Facebook, Cassandra helps many other companies achieve web scale. It has some impressive numbers about scalability on its homepage.
One of the largest production deployments is Apple’s, with over 75,000 nodes storing over 10 PB of data. Other large Cassandra installations include Netflix (2,500 nodes, 420 TB, over 1 trillion requests per day), Chinese search engine Easou (270 nodes, 300 TB, over 800 million requests per day), and eBay (over 100 nodes, 250 TB).
Project Homepage
JHipster’s data support lets you dream big!
Liquibase
Liquibase is “source control for your database”. It’s an open-source (Apache 2.0) project that allows you to manipulate your database as part of a build or runtime process. It allows you to diff your entities against your database tables and create migration scripts. It even allows you to provide comma-delimited default data! For example, default users are loaded from src/main/resources/config/liquibase/users.csv.
This file is loaded by Liquibase when it creates the database schema.
<loadData
         file="config/liquibase/data/user.csv"
         separator=";"
         tableName="jhi_user"
         usePreparedStatements="true">
    <column name="id" type="numeric"/>
    <column name="activated" type="boolean"/>
    <column name="created_date" type="timestamp"/>
</loadData>
<dropDefaultValue tableName="jhi_user" columnName="created_date" columnDataType="${datetimeType}"/>
Liquibase supports
most major databases.
If you use MySQL or PostgreSQL, you can use mvn liquibase:diff (or ./gradlew generateChangeLog) to automatically generate a changelog.
JHipster’s development guide recommends the following workflow:
-
Modify your JPA entity (add a field, a relationship, etc.).
-
Run
mvn liquibase:diff. -
A new changelog is created in your
src/main/resources/config/liquibase/changelogdirectory. -
Review this changelog and add it to your
src/main/resources/config/liquibase/master.xmlfile so it is applied the next time you run your application.
If you use Gradle, you can use the same workflow by running ./gradlew liquibaseDiffChangelog -PrunList=diffLog.
Elasticsearch
Elasticsearch adds searchability to your entities. JHipster’s Elasticsearch support requires using a SQL database. Spring Boot uses and configures Spring Data Elasticsearch. JHipster’s entity sub-generator automatically indexes the entity and creates an endpoint to support searching its properties. Search superpowers are also added to the Angular UI so that you can search in your entity’s list screen.
When using the (default) “dev” profile, you need to use an external Elasticsearch instance. The easiest way to run an external Elasticsearch instance is to use the provided Docker Compose configuration:
docker-compose -f src/main/docker/elasticsearch.yml up -dBy default, the SPRING_ELASTICSEARCH_URIS property is set to talk to this instance in application-dev.yml and application-prod.yml:
spring:
  ...
  elasticsearch:
    uris: http://localhost:9200
You can override this setting by modifying these files, or using an environment variable:
export SPRING_ELASTICSEARCH_URIS=https://cloud-instanceElasticsearch is used by some well-known companies: Facebook, GitHub, and Uber, among others. The project is backed by Elastic, which provides an ecosystem of projects around Elasticsearch. Some examples are:
-
Elasticsearch as a Service—“Accelerate results with Elastic across any cloud”.
-
Logstash—“Centralize, transform & stash your data”.
-
Kibana—“Your window into the Elastic Stack”.
The ELK (Elasticsearch, Logstash, and Kibana) stack is all open-source projects sponsored by Elastic. It’s a powerful solution for monitoring your applications and seeing how they’re being used.
Deployment
A JHipster application can be deployed wherever you can run a Java program. Spring Boot uses a public static void main entry point that launches an embedded web server for you. Spring Boot applications are embedded in a “fat JAR”, which includes all necessary dependencies like, for example, the web server and start/stop scripts. You can give anybody this .jar, and they can easily run your app: no build tool required, no setup, no web-server configuration, etc. It’s just java -jar killerapp.jar.
To build your JHipster app with the production profile, use the preconfigured “prod” Maven profile.
mvn package -Pprod
With Gradle, it’s:
gradle bootJar -Pprod
The “prod” profile will trigger a webapp:prod, which optimizes your static resources. It will combine your JavaScript and CSS files, minify them, and get them production ready. It also updates your HTML (in your (build|target)/www directory) to reference your versioned, combined, and minified files.
I’ve deployed JHipster applications to Heroku and several cloud providers with Kubernetes, including Google Cloud, AWS, Azure, and Digital Ocean.
Summary
Spring Framework has one of the best track records for hipness in Javaland. It’s remained backward compatible between many releases and has been an open-source project for over 20 years. Spring Boot has provided a breath of fresh air for people using Spring with its starter dependencies, auto-configuration, and monitoring tools. It’s made it easy to build microservices on the JVM and deploy them to the cloud.
You’ve seen some of the cool features of Spring Boot and the build tools you can use to package and run a JHipster application. I’ve described the power of Spring Security and shown you its many features, which you can enable with only a few lines of code. JHipster supports relational and NoSQL databases, allowing you to choose how you want your data stored. When creating a new application, you can select JPA, MongoDB, Cassandra, Couchbase, or Neo4j.
Liquibase will create your database schema and help you update your database when needed. Its diff feature provides an easy-to-use workflow for adding new properties to your JHipster-generated entities.
You can add rich search capabilities to your JHipster app with Elasticsearch. This is one of the most popular Java projects on GitHub, and there’s a reason for that: it works really well.
JHipster applications are Spring Boot applications, so you can deploy them wherever you can run Java. You can deploy them in a traditional Java EE (or servlet) container, or you can deploy them in the cloud. The sky’s the limit!